

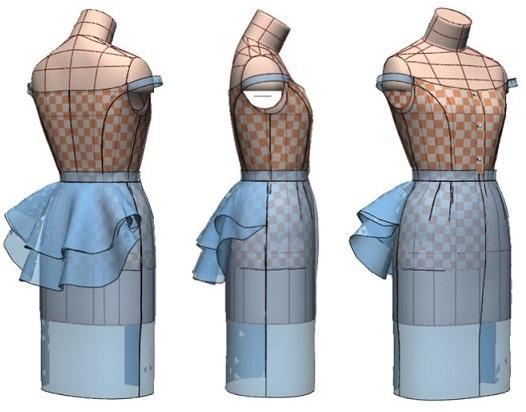
Chapter 22: Digital Toile Check of Camisole-Style Blouse and Double Peplum Skirt Patterns
"Flat Pattern Making and Digital Toile Check" by Masaharu Sekikawa
- Study



Link copied.
In this chapter, we explain the patternmaking and digital toile check of a camisole-style blouse with exposed shoulders and a double peplum skirt. Let’s get started.
Chapter 22: Digital Toile Check of Camisole-Style Blouse and Double Peplum Skirt Patterns
1. Create the Sloper from the ACS_Ladies (Set-In Sleeve) Body Form
Figure 1: ①Prepare the princess sloper without auxiliary darts created in Chapter 17 of this column.
②Perform a toile check.
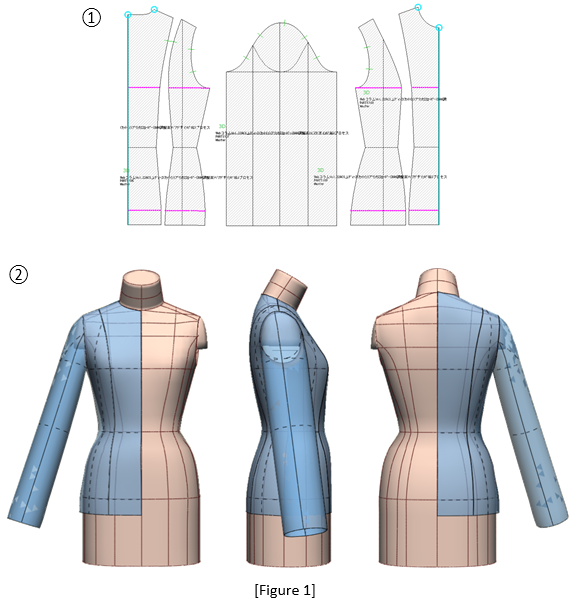
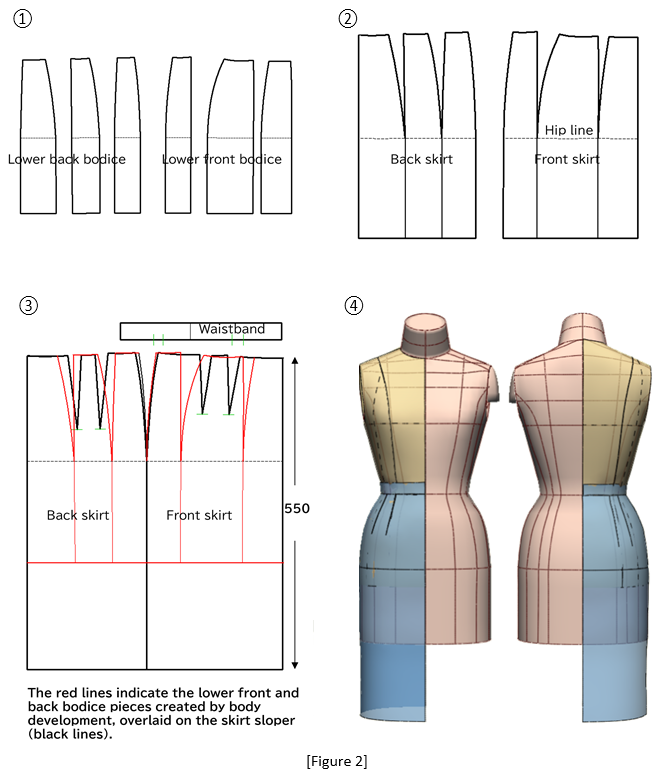
Figure 2: ①Prepare the lower front and back bodice pieces created using the 3D menu [Body Development].
②Align them at the hip line and integrate them into the front and back skirt pieces.
③Extend the skirt length to 550 mm and define it as a skirt sloper (black lines) with two front and back darts.
④Place the skirt sloper over the princess sloper and perform a toile check.
2. Modify the Front and Back Bodices into Panel Lines
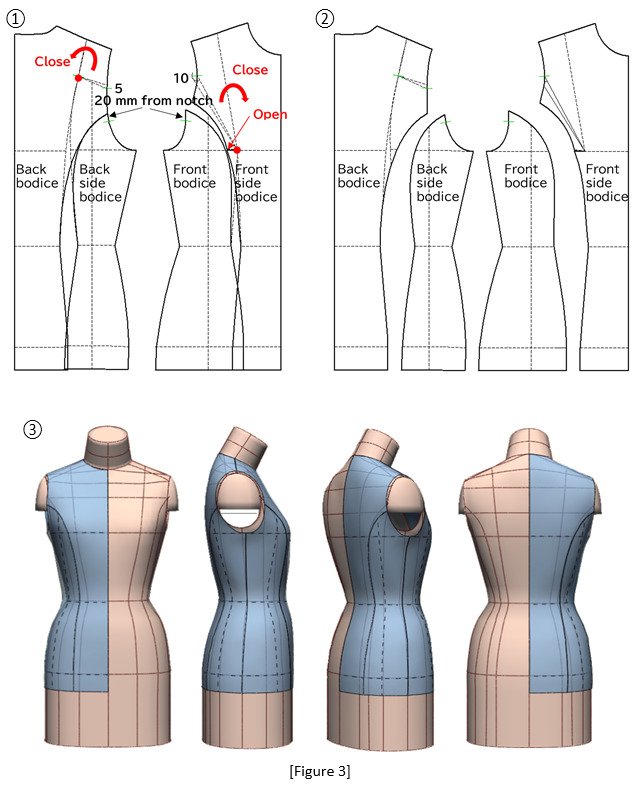
Figure 3: ①Join the front, back, and side bodices at the red-marked pivot points. Using the red circles as pivot points, close the back shoulder dart, leaving 5 mm at the 4th notch, and close the front shoulder dart, leaving 10 mm at the 2nd notch, then open the remaining amount at the bust line. Draw the panel line from the waist position.
②Separate the pattern into the back bodice, back side bodice, front side bodice, and front bodice.
③Perform a toile check.
3. Mark the Neckline and Sleeve Seam Line on the Toile
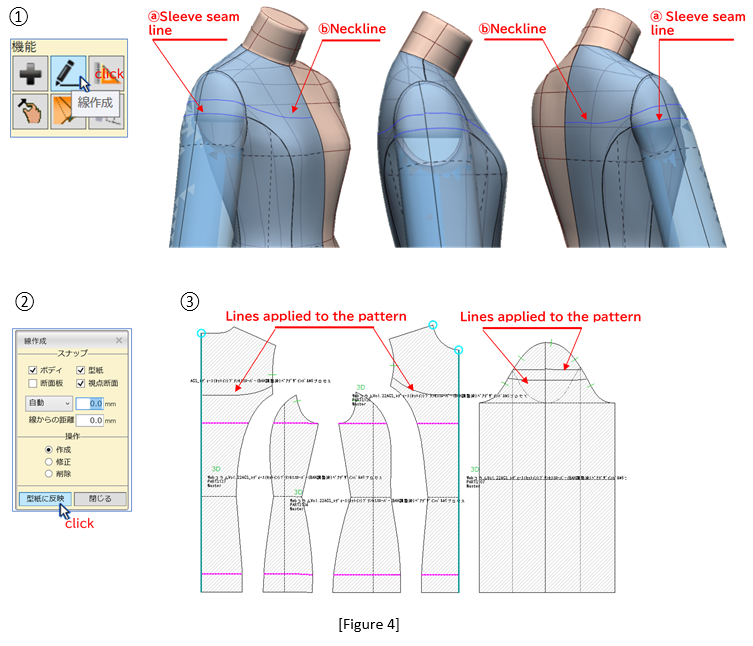
Figure 4: ①In the 3D menu, select [Create Line] to directly mark the ⓐ sleeve seam line and ⓑ neckline at the décolletage (blue lines) on the dressed toile with the sleeves stitched on.
②Click [Apply to Pattern] tab.
③Transfer the lines marked on the toile to the pattern.
4. Perform a Toile Check on the Camisole-Style Blouse
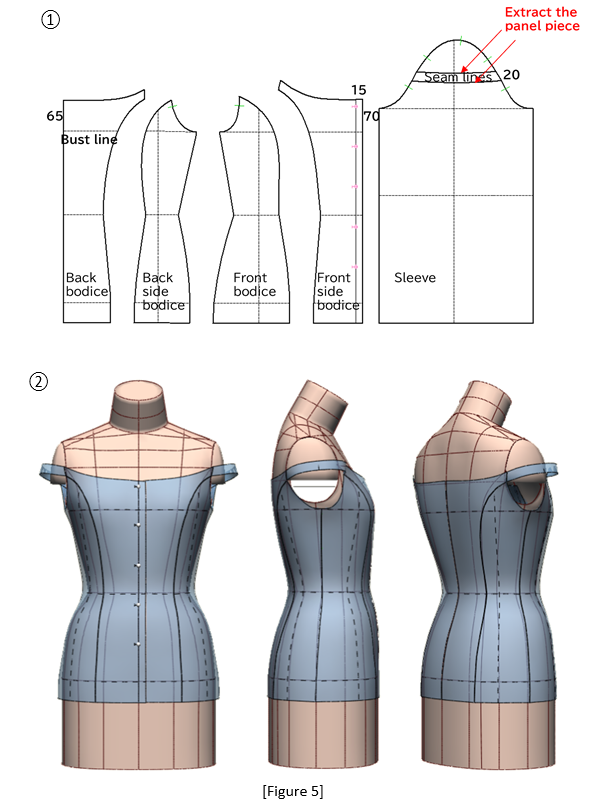
Figure 5: ①Extract the parts along the marked lines, draw a 15 mm extension from the center front line, and attach five buttons measuring 8 mm each.
②Perform a toile check.
5. Create the Peplum Seam for the Skirt
Figure 6: ①Draw two peplum lines (red lines) on the back skirt.
②Using the peplum lines (red lines), extract the upper peplum piece and the lower peplum piece, then draw perpendicular lines from each dart tip.
③Using the dart tips as pivot points (red dots), close the darts and open them out to the peplum lines.
④Divide both the upper and lower peplum pieces into four equal sections, then using the red dots as pivot points, spread each section by 80 mm and redraw the hemlines (red lines) as shown in the figure.
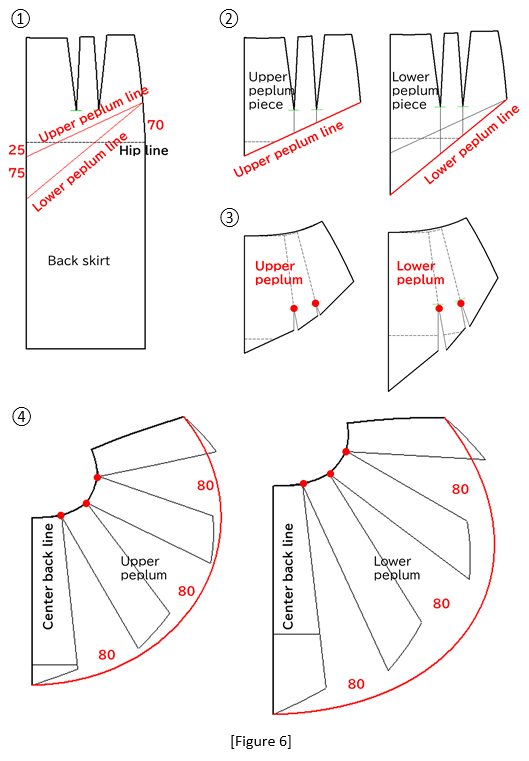
Figure 7: Expand the back skirt symmetrically to the left and right using the center line as the mirror axis. Divide the front skirt into the upper front and lower front sections. Expand both the upper and lower peplum symmetrically to the left and right using the center back line as the mirror axis.

6. Perform a Toile Check on the Double Peplum Skirt
Let’s look at the process of creating a 3D toile.
Figure 8: From the 3D menu, select [Line Information Settings] to set the stitching parameters for each part.
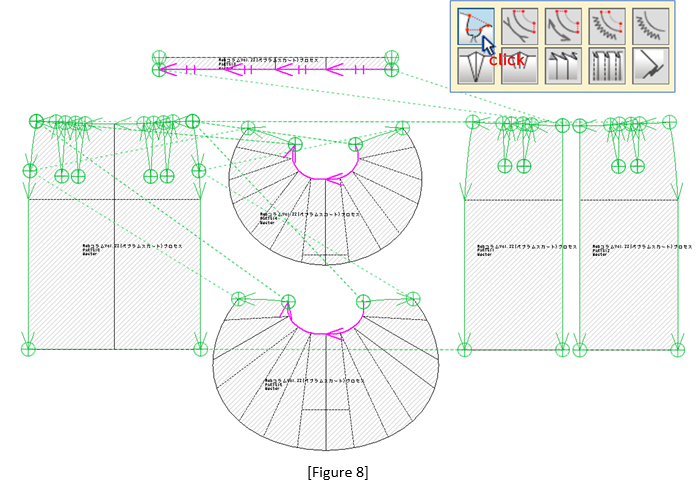
Figure 9: Use the 3D menu [Placement Settings] to determine the part positions and layer order.
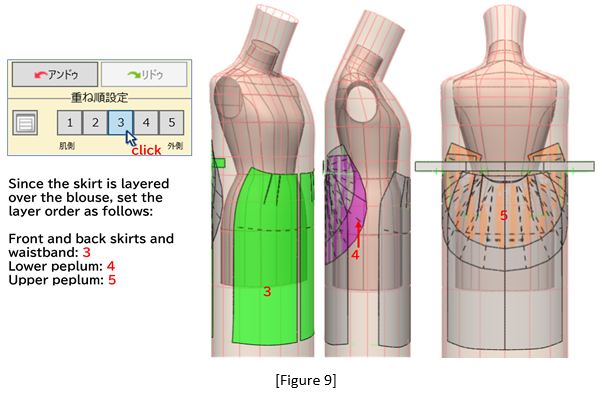
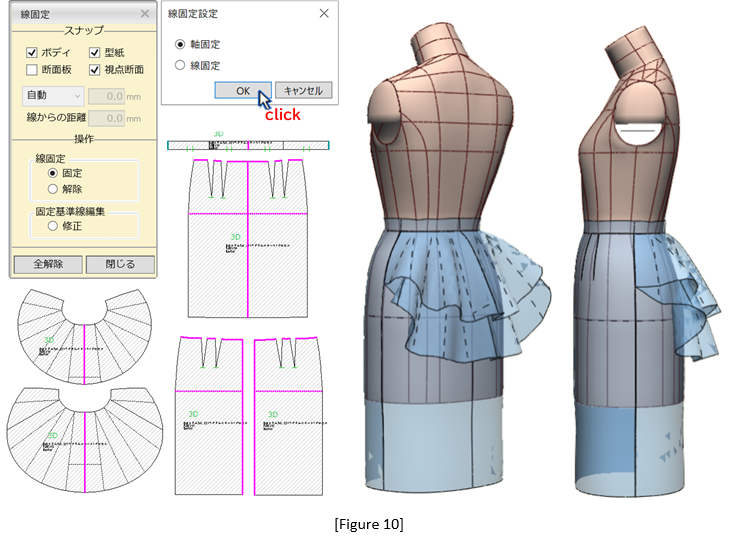
Figure 10: Use the 3D menu [PM Preform] to fix the axes (pink lines) and perform the stitching.
7. Combine the Upper and Lower Garments on the ACS_Ladies (Set-In Sleeve) Body Form and Perform a Toile Check
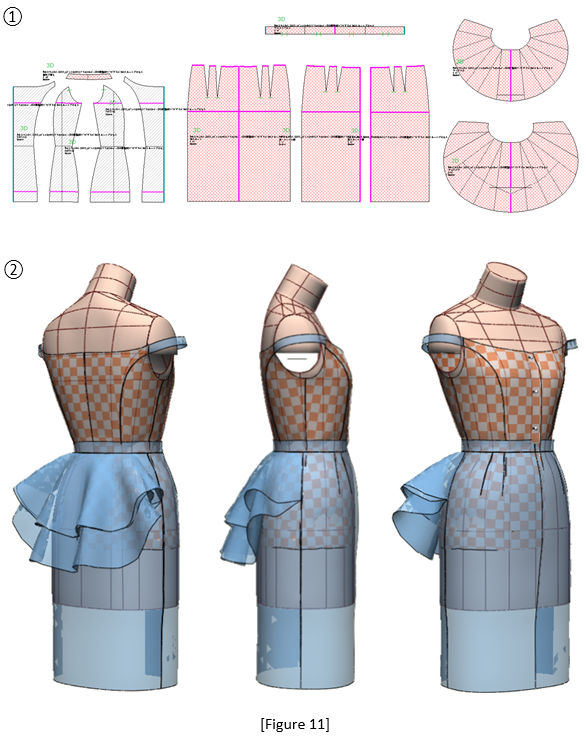
Figure 11: ①Set up [PM Preform] for the camisole-style blouse and double peplum skirt.
②Place the skirt over the blouse and perform a toile check.
8. Change the ACS_LadiesHumanBody to a Show-Model Body Type and Perform a Toile Check
Figure 12: Although the ACS_Ladies (Set-In Sleeve) body form represents a Japanese standard size 9, let's switch to ACS_LadiesHumanBody. Set the height to a show-model size of 1690 mm and the body type to slim, extend the skirt length by 150 mm to a midi length, and perform a toile check.
①In the Body Creation Wizard (excerpt shown), change the height to 1690 mm and set the body type to slim.
②In the 3D menu [PM Preform Placement], set the layer order.
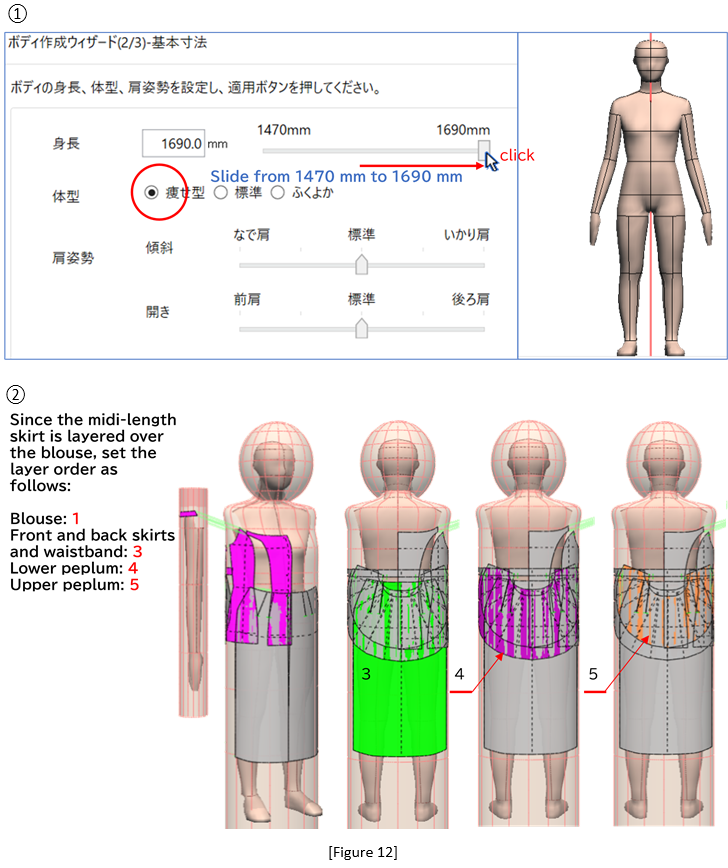
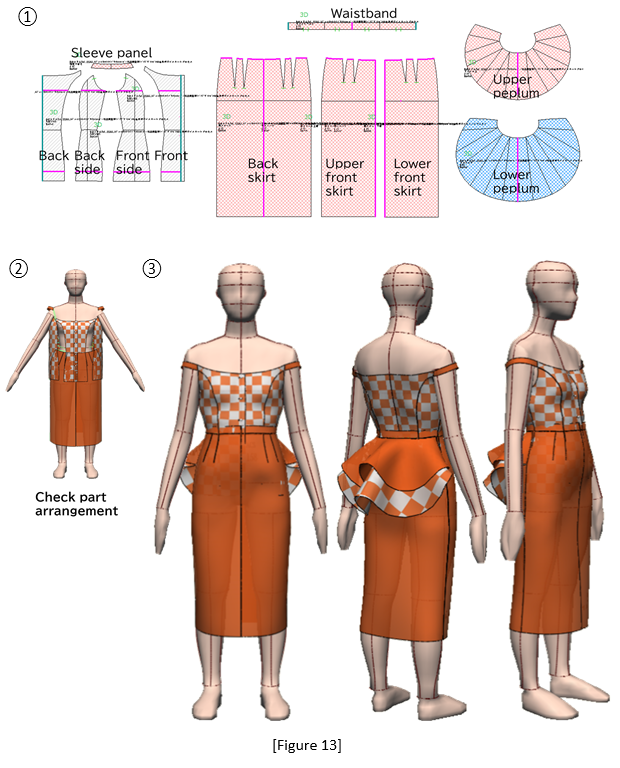
Figure 13: ①Set up [PM Preform] for the camisole-style blouse and the double peplum skirt.
②In the 3D menu, select [PM Preform] to check the placement of the blouse and skirt on the body form.
③Apply the design theme “Ichimatsu (checkered) pattern” to the front and back bodices and to the lower peplum, varying the scale for each area. By reviewing and adjusting the design through a 3D toile check, the classic image of the double peplum skirt is transformed into a light, modern style.
|
Masaharu Sekikawa 2002 - 2017: Principal at the International Total Fashion College Currently retired as principal and serving as a part-time lecturer at the International Total Fashion College, specializing in apparel CAD education. In June 2017, he published a book on digital toile research and simultaneously launched a website. Please see below. |

| Academic Presentations |
Delivered a presentation on "Pattern & 3D Simulation Verification of Women's Tailored Jackets Using 3D Toile" at the National Conference of the Fashion Business Society in 2016. Delivered a presentation on “Practical Applications of Digital Toile” at the National Conference of the Fashion Business Society in 2017. |
| Website | http://masa-cad.com/ |
| Publications | https://masacad.thebase.in/ |