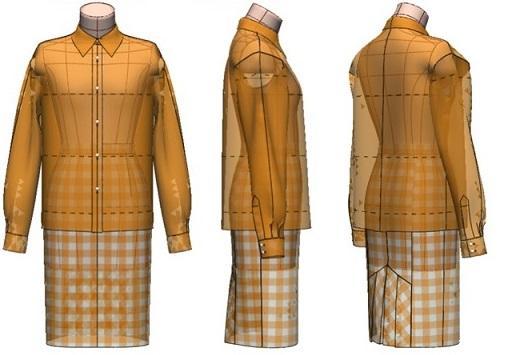
Chapter 21: Digital Toile Check of Shirt-Collar Blouse with Collar Stand and Pleated-Panel Tight Skirt Patterns
"Flat Pattern Making and Digital Toile Check" by Masaharu Sekikawa
- Study


Link copied.
Using the Kiiya_ModeliaStylish_38_N (Set-In) Body Form, this chapter explains the patternmaking and digital toile check of a shirt-collar blouse with a collar stand and a pleated-panel tight skirt. Let’s get started.
Chapter 21: Digital Toile Check of Shirt-Collar Blouse with Collar Stand and Pleated-Panel Tight Skirt Patterns
1. Modify the Blouse Sloper Created from the Kiiya_ModeliaStylish_38_N (Set-In) Body Form into a Vertical Silhouette
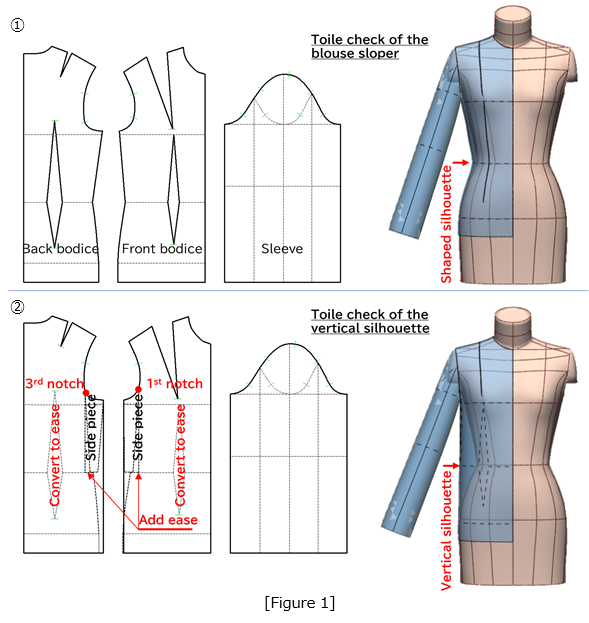
Figure 1: ①Use the blouse sloper created in Figure 5 of Chapter 20.
②Set the red circles (the 3rd and the 1st notches) as pivot points, rotate the side pieces toward the side seam to correct the silhouette to a straight one, and perform a toile check.
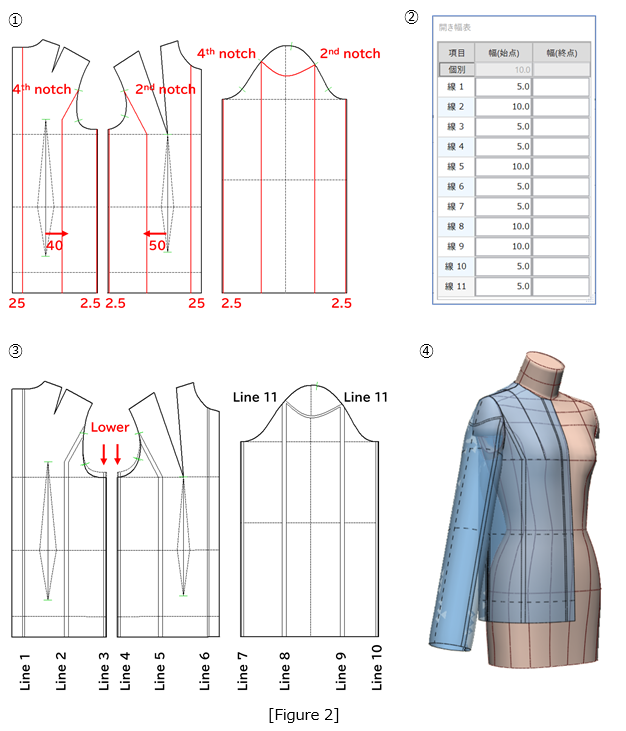
2. Add 80 mm Total Across the Bodice
Figure 2: ①Draw expansion lines (red lines) 25 mm parallel to the center front and center back lines, 40 mm and 50 mm parallel to the waist-dart centerlines, and 2.5 mm parallel to the side seam line. Draw a concave line from the 4th notch to the 2nd notch on the sleeve cap line, and draw perpendicular lines down to the sleeve hem line at a position 2.5 mm parallel to the sleeve underarm line.
②Specify the spread values as shown in the table.
③Open Lines 1 through 11 in parallel, and lower the armhole line down to the bustline.
④Perform a toile check.
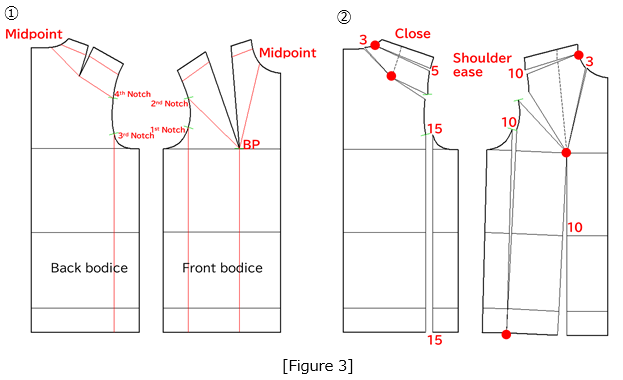
3. Use manipulation to redistribute the ease from the front and back shoulder darts
Figure 3: ①Draw the expansion lines (red lines).
②Using the red circles as the pivot points, open the sections according to the values shown in the figure.
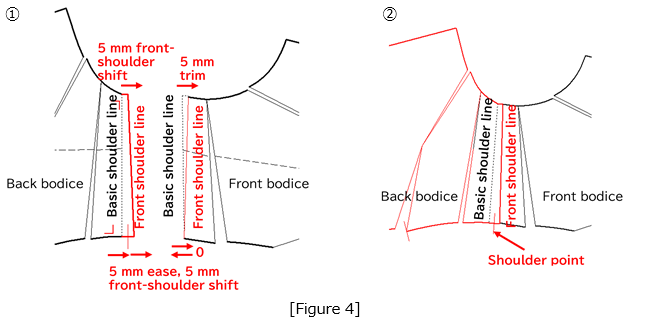
4. Shift to the Front Shoulder to Prevent the Sleeve from Drifting Toward the Back
Figure 4: ①Shift the basic back shoulder line toward the front shoulder line. On the basic front shoulder line, trim 5 mm at the neck point. At the shoulder point, add 5 mm of ease and trim 5 mm for the front-shoulder shift, resulting in a net shift of 0.
②Align the front and back bodices along the front shoulder line and check the continuity of the neckline and armhole lines.
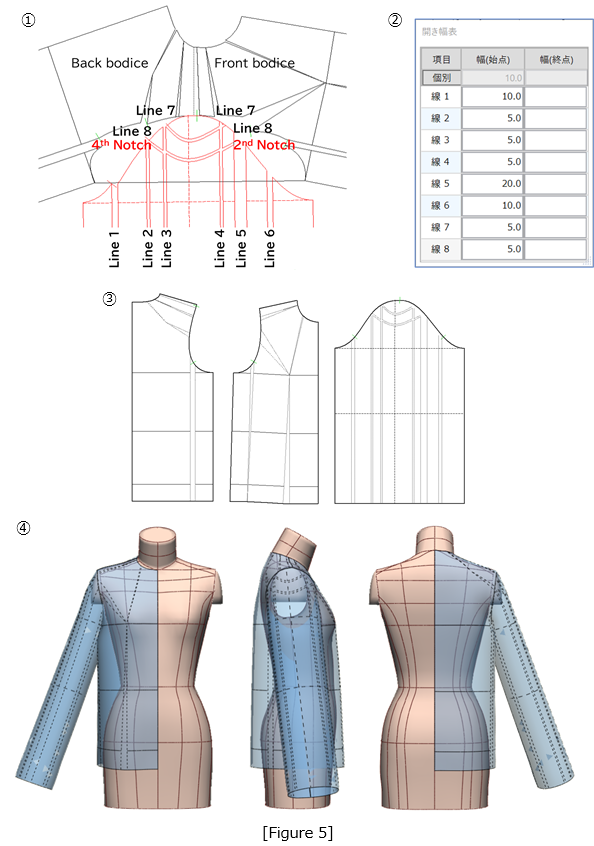
5. Open the Sleeve Cap Line Along the Armhole Line
Figure 5: ①Draw a concave line (red line) above the expansion line previously drawn from the 4th notch to the 2nd notch on the sleeve cap line, then draw six perpendicular lines (red lines) from each sleeve cap intersection down to the sleeve hem line.
②Open Lines 1 through 8 according to the values shown in the table.
③Use the completed width-added pattern.
④Perform a toile check.
6. Draft the Shirt Sleeve
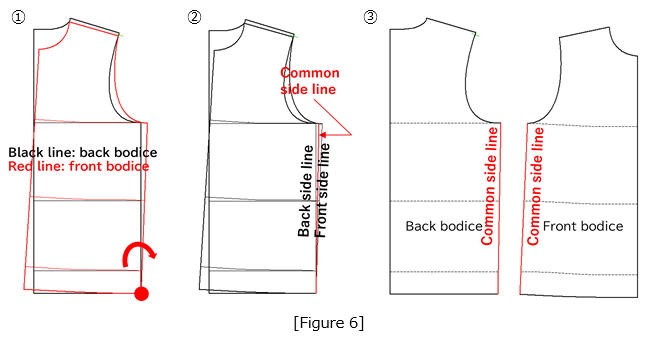
(1)Adjust the Bodice Side Lines
Figure 6: ①Flip the front bodice (red line), align and overlap the side hem corner with that of the back bodice, and rotate it to the position shown in the figure using the red circle as the pivot point.
②Define the bisector of the front and back side lines as the common side line (red line).
③Return the overlapped front bodice pattern to its original position.
(2) Position the Sleeve Sloper by Aligning the Front and Back Bodices at the Shoulder Line
Figure 7: Align the sleeve cap notch with the armhole notch. Rotate the sleeve sloper until the straight line connecting the front and back armhole corners (ⓐ and ⓑ) is parallel to the sleeve width line (ⓒ and ⓓ).

(3)Create the Sleeve
Figure 8: Shift the front shoulder line downward by 30 mm. From points ⓐ and ⓑ, redraw the front and back armhole lines (black lines) at positions lowered by 20 mm. Draw a line (red dashed line) 55 mm above and parallel to the sleeve width line of the sleeve sloper. Using the same length as the armhole lines, draft the front and back sleeve cap lines (red lines) as shown in the figure.
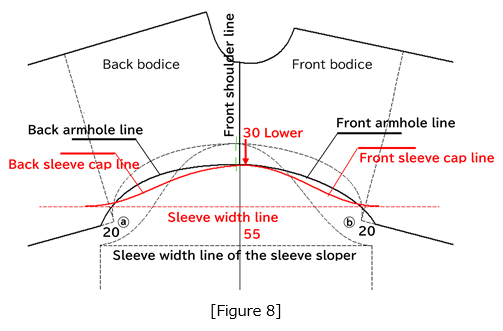
Figure 9: Draft the cuff with a length of 50 mm and a width of 250 mm, including a 30 mm extension. Add two tucks, each 25 mm wide, to the sleeve opening, and attach a sleeve placket. Draft the sleeve opening so that the finished width is 220 mm.

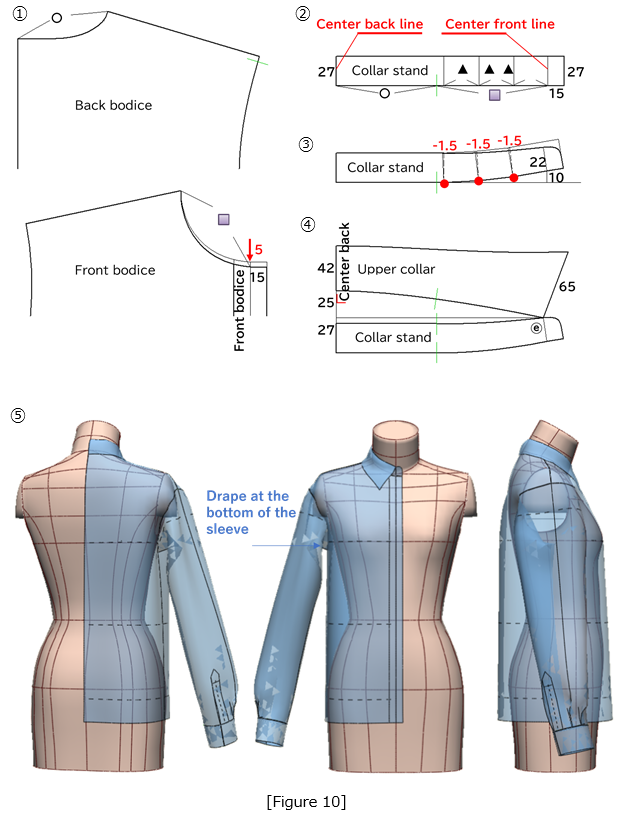
7. Draft the Shirt Collar with Collar Stand
Figure 10: ①Create a 15 mm extension from the center front line, and lower the neckline by 5 mm.
②Draw the collar stand with a height of 27 mm and a width equal to the back neckline length (○) plus the front neckline length (□) plus 15 mm.
③Draw expansion lines dividing the front neckline into three equal parts, and using the red circles as pivot points, fold each section by 1.5 mm.
④Draw a horizontal line from point ⓔ on the collar stand until it meets the center back line. From a point 25 mm above the collar stand, measure 42 mm along the center back line, and draft the upper collar as shown in the figure.
⑤Perform a toile check and confirm the drape at the bottom of the sleeve.
8. Create the Tight Skirt
Figure 11: ①Prepare the skirt sloper with expansion lines added, based on Figure 6 from Chapter 20.
②Set the values in the spread-width table.
③Add a total of 40 mm of width across the hip.
④After arranging the pattern, connect each dart tip to the hip line and draw perpendicular lines down to the hemline.
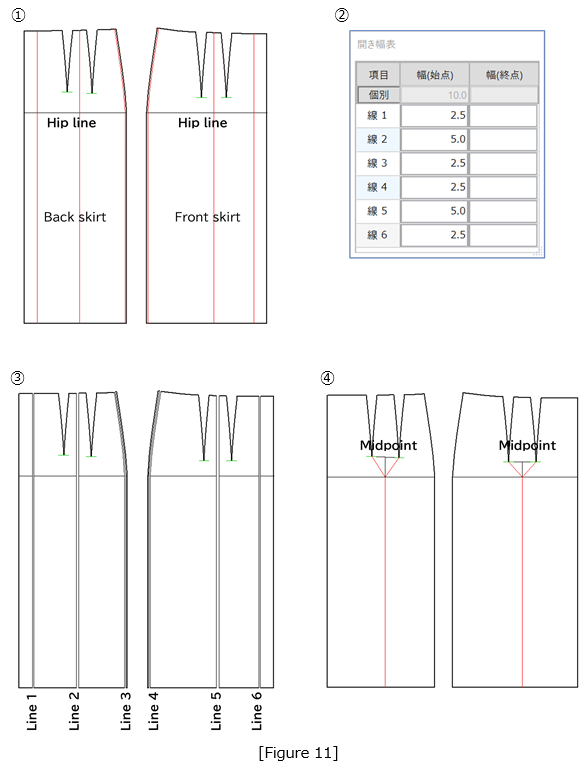
Figure 12: ①Using the red circles as pivot points, fold along the hemline as shown in the figure.
②From the one-third position of the waistline, draw a perpendicular line to set the single dart position.
③Set the dart intakes to 25 mm for the back dart and 20 mm for the front dart, and reduce 12.5 mm at both the front and back side seams.
④Completed tight skirt pattern.
⑤Perform a toile check.
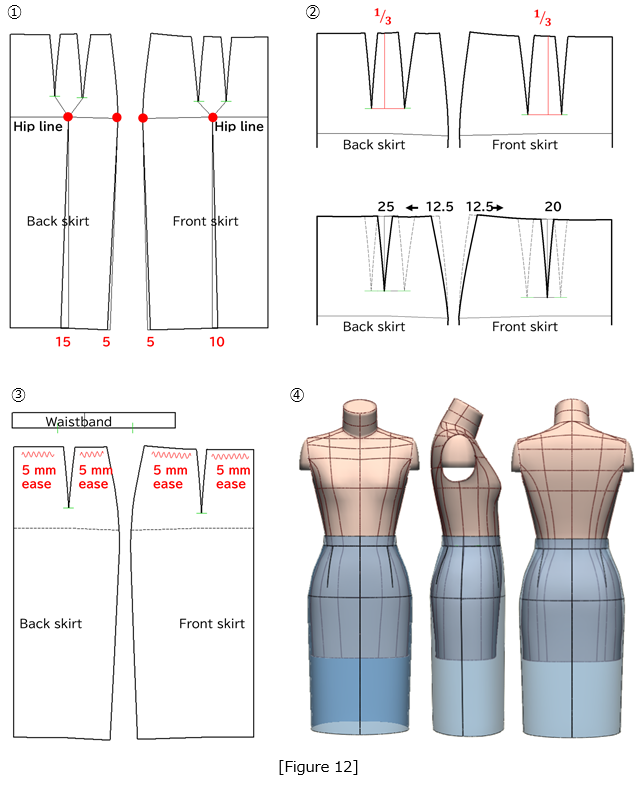
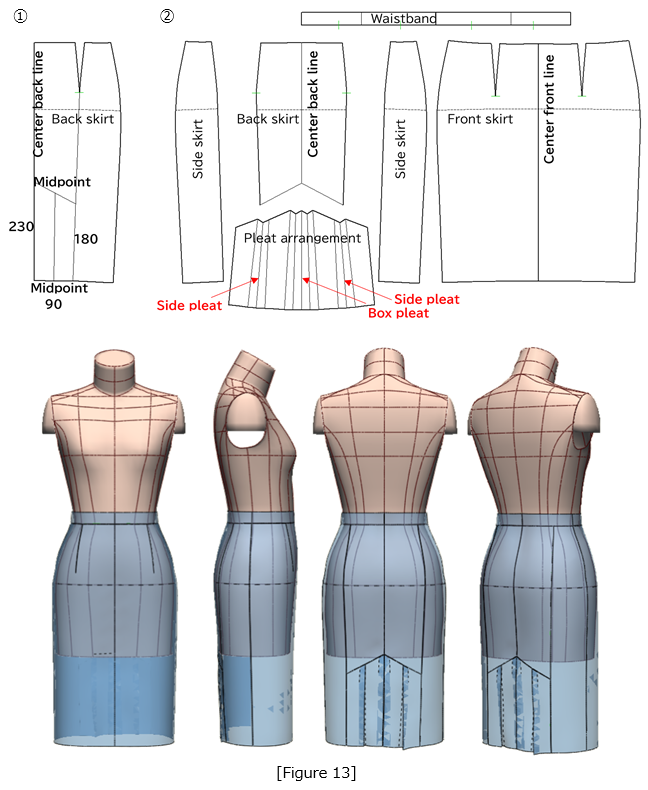
Figure 13: ①Draft the pleated section of the back skirt according to the dimensions shown in the figure.
②Create the skirt as a full-body pattern, arranging a box pleat at the center and side pleats on both sides.
③Perform a toile check of the tight skirt designs.
9. Combine the Blouse and Skirt and Perform a Toile Check
Figure 14: ①In the 3D menu, select [PM Preform] to set the seam parameters for the blouse and skirt parts.
②In [Layer Order] menu, assign the blouse to layer 4 and the skirt to layer 1.
③Start the stitching simulation using [Arms Down A] (shallow sleeve setting).
④Stop the simulation once the sleeves settle into their designated position.
⑤Remove the arms from the body form, re-stitch, and complete the toile.
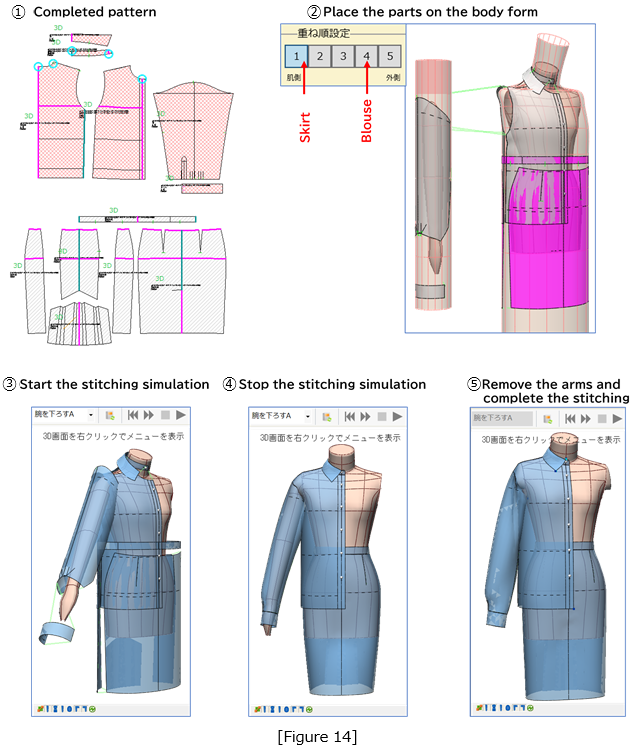
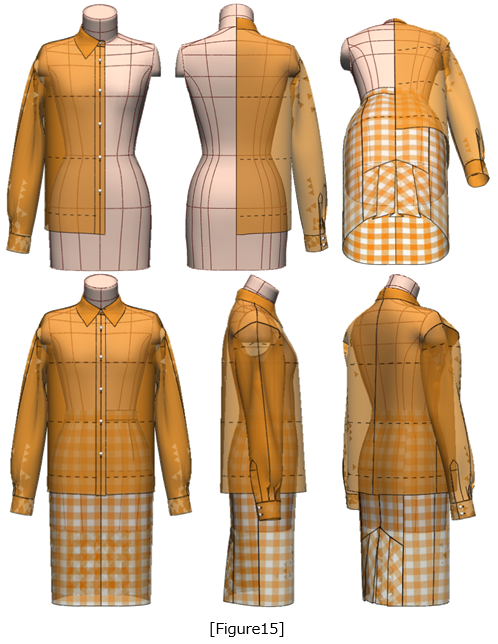
Figure 15: In the 3D menu, apply a fabric texture using [Display Settings] to complete the toile.
|
Masaharu Sekikawa 2002 - 2017: Principal at the International Total Fashion College Currently retired as principal and serving as a part-time lecturer at the International Total Fashion College, specializing in apparel CAD education. In June 2017, he published a book on digital toile research and simultaneously launched a website. Please see below. |

| Academic Presentations |
Delivered a presentation on "Pattern & 3D Simulation Verification of Women's Tailored Jackets Using 3D Toile" at the National Conference of the Fashion Business Society in 2016. Delivered a presentation on “Practical Applications of Digital Toile” at the National Conference of the Fashion Business Society in 2017. |
| Website | http://masa-cad.com/ |
| Publications | https://masacad.thebase.in/ |