Chapter 8: Blouse Pattern Development and Digital Toile Check
"Flat Pattern Making and Digital Toile Check" by Masaharu Sekikawa
- Study


Link copied.
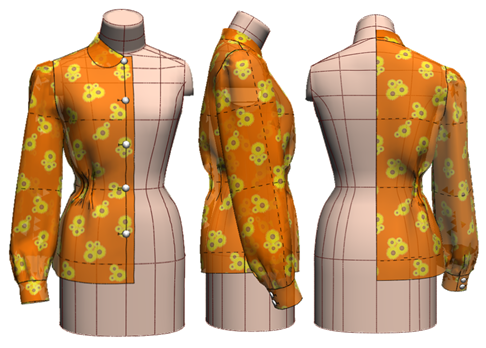
This time, we will focus on a feminine blouse with soft, curved structures.
We will explain the pattern making and digital toile check for a blouse featuring waist tucks, puff sleeves with gathers at the sleeve cap and cuff, and a 1-inch stand roll collar.
Let’s get started.
1. Developing from the Torso Sloper
This section covers the distribution of darts, expansion in the width direction, and matching points for the sleeve cap line from the torso Sloper.
Figure 1: Use red circles as rotation centers to manipulate the front and back bodice and distribute the shoulder darts.
Parallel to the third notch position, open 8mm, and open 4mm from the first notch position using the red circles as rotation centers.
Cut 1/3 from the front and back waist sides. Expand the sleeves to match the armholes.
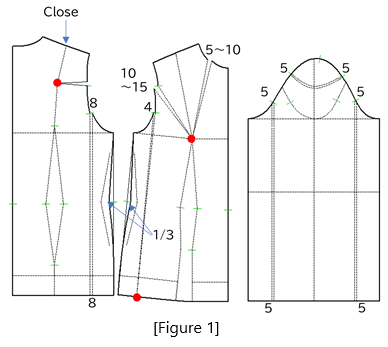
Figure 2: Create box pleats with the following dimensions: 7mm and 6mm width, 50mm length, with 2 pleats on the back bodice and 3 pleats on the front bodice.
(Use the original waist darts as a guide for the tuck positions.)
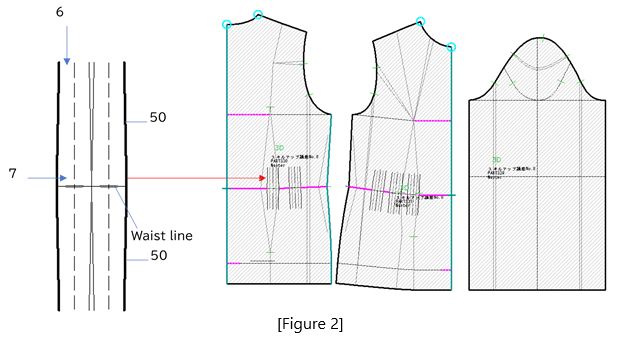
Figure 3: Set the "Tuck" function using the 3D [Line Information] feature.
Folding the waist tucks creates a curved structure.

Figure 4: Cut 50mm from the cuff length of the sleeve block.
Divide the front and back sleeve widths into four equal parts from the sleeve centerline.
Draw perpendicular lines 10mm from the first and third notches on the sleeve cap line and draw parallel expansion lines 20mm wide.
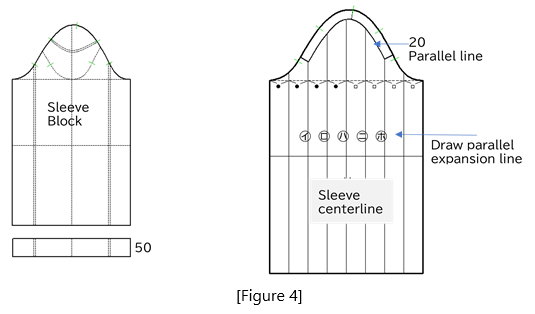
Figure 5: Use red circles as rotation centers on the sleeve cap line to open 15mm and 7.5mm on the sleeve hem line.
Expand the width at points ㋑, ㋺, ㋩, ㋥, ㋭ and open 15mm at the sleeve cap notches using blue circles as rotation centers.
Add opening for the sleeve hem and gather puff details.
Draw a cuff of 50mm length and 220mm width.
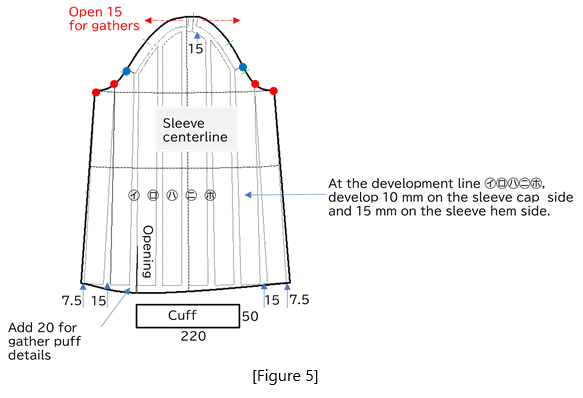
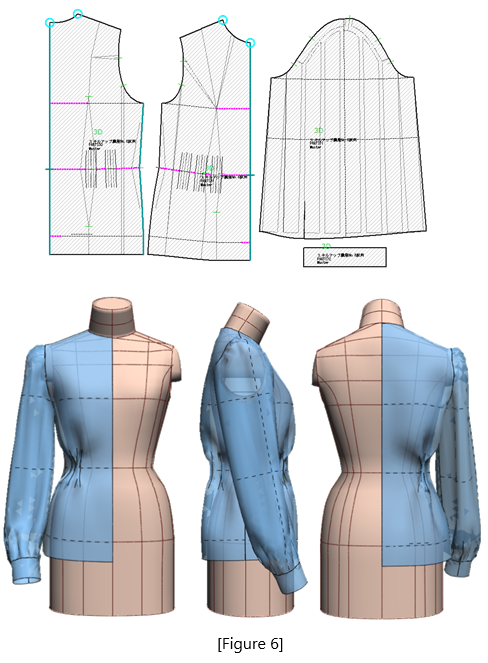
Figure 6: Set "Gather" at the sleeve cap and sleeve hem using the 3D [Line Information] feature.
This creates a fluffy sleeve silhouette.
Creating a 1-Inch Stand Roll Collar
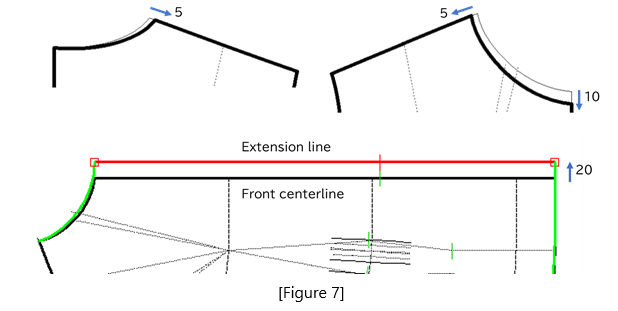
Figure 7: Modify the neckline and draw the front extension line of 20mm.
Two methods for creating a 1-inch stand roll collar are introduced:
Figure 8: Creating from a flat collar using the cutting expansion method.
For details on creating flat collars, refer to Chapter 4, "Dress Pattern Development and Digital Toile Check."
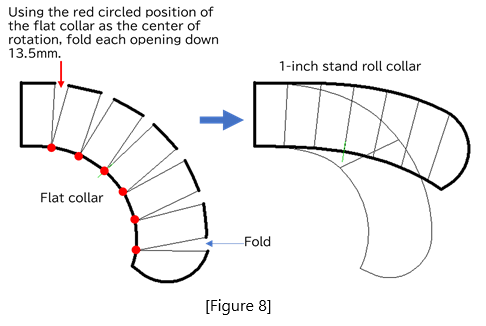
Figure 9: Box Method: This method creates patterns using boxed drafting.
From the back neckline measurement point 〇, draw an arc △ with the front neckline measurement as the radius, and find the intersection with the rectangle at point ⓑ.
Draw a guiding line that intersects the vertical line on the right side of the rectangle at 1/2 position ⓒ, and adjust the collar end to a rounded corner (thick black line) with a 40mm radius using the [Rounded Corner] menu.
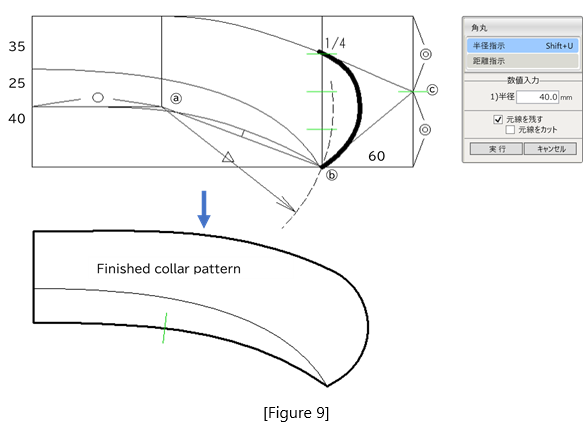
Figure 10: Draft buttons for the bodice and cuffs. Use 5 buttons with 15mm at the top, 120mm at the bottom, and evenly spaced at 18mm.
For the cuff, use 2 buttons at 15mm from the top, bottom, and end.

Figure 11: Set line information for the drafted collar parts and place them.
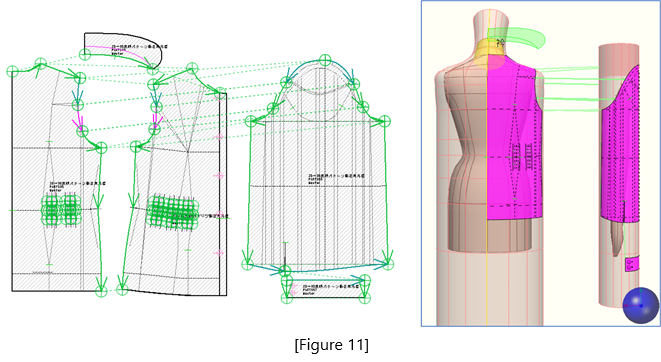
Figure 12: Fix lines and points of the collar and sew them to complete the 3D model.
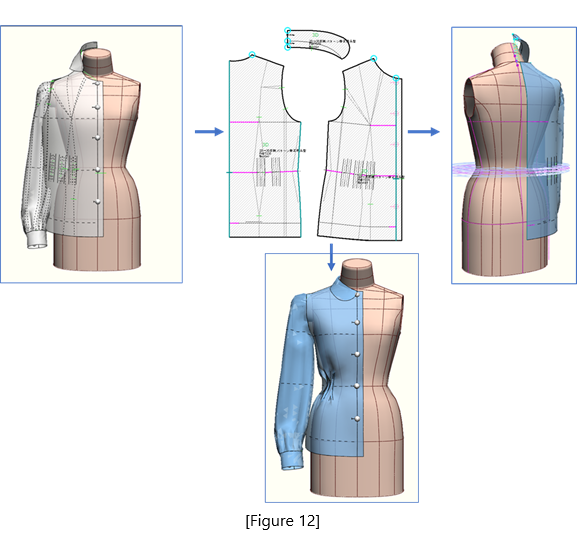
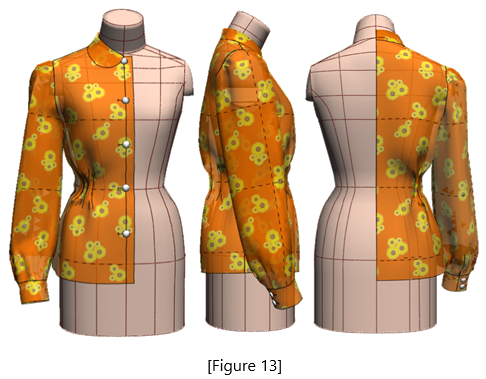
Figure 13: Change to a printed pattern and perform a digital toile check.
|
Masaharu Sekikawa 2002 - 2017: Principal at the International Total Fashion College Currently retired as principal and serving as a part-time lecturer at the International Total Fashion College, specializing in apparel CAD education. In June 2017, he published a book on digital toile research and simultaneously launched a website. Please see below. |

| Academic Presentations |
Delivered a presentation on "Pattern & 3D Simulation Verification of Women's Tailored Jackets Using 3D Toile" at the National Conference of the Fashion Business Society in 2016. Delivered a presentation on “Practical Applications of Digital Toile” at the National Conference of the Fashion Business Society in 2017. |
| Website | http://masa-cad.com/ |
| Publications | https://masacad.thebase.in/ |