Chapter 6: Dress Pattern Development and Digital Toile Check
"Flat Pattern Making and Digital Toile Check" by Masaharu Sekikawa
- Study


Link copied.
Following the retro-style dress from the last two posts, this time we will discuss pattern making for a dolman sleeve shirt dress and its digital toile check. Let's get started.
1. Development from the Sheath Dress Sloper
Create a shirt-style dress with sleeves from the sheath dress sloper using flat pattern making.
Figure 1: Let's perform a digital toile check on the sheath dress sloper.
— Use ACS_LadiesHumanBody to check the balance of the entire body.
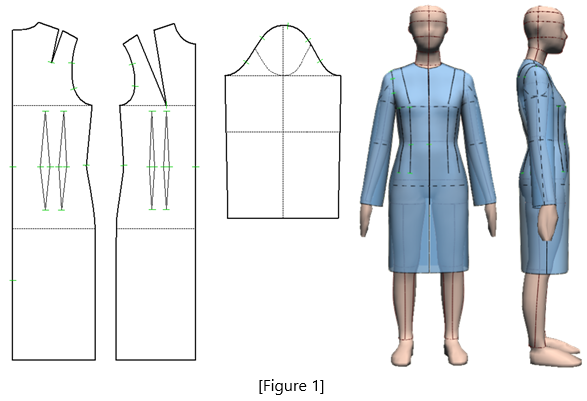
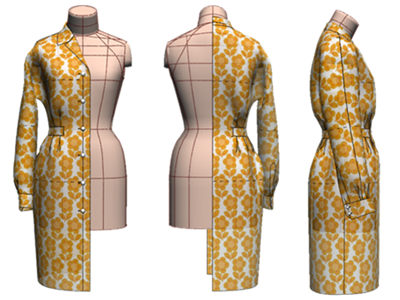
Figure 2: Let's check the silhouette of the dolman sleeve shirt dress that we are going to create.
— Add tucks at the waist, incorporate details from an open-collar shirt, and finish it as a shirt dress with a peg-top (doughnut-shaped) skirt. The cuffed continuous sleeves (dolman sleeves) are also a key theme in this design.
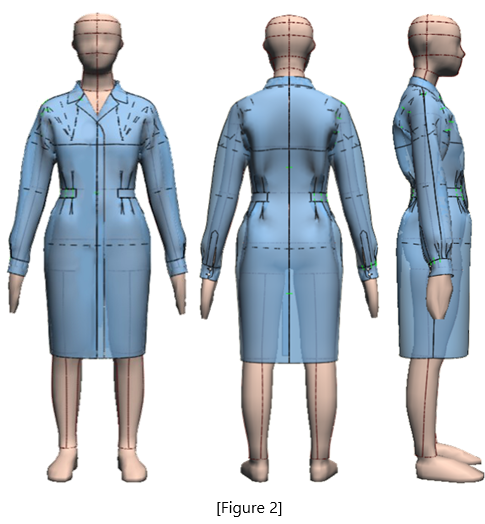
Figure 3: Prepare the sheath dress sloper and draw a 30mm (from the ● mark) wide switch as shown in Figure 3, ensuring that the waist notch aligns with the centerline.
Figure 4: Add the waist switch line and organize the pattern.
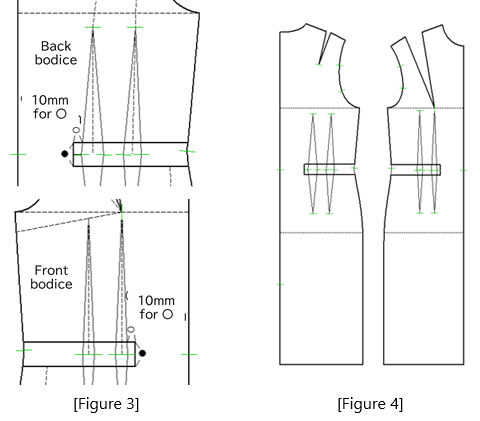
Figure 5: Extract the waist switch parts from the front and back bodice, fold the waist dart into the piece, and create a single switch part.
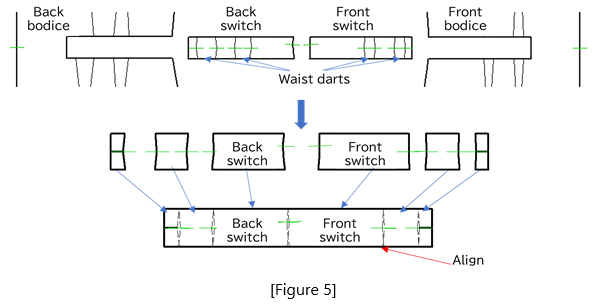
Figure 6: Extend the expansion lines from the waist dart of the back bodice vertically up and down, and intersect them with the shoulder dart expansion lines and the skirt hemline.
Draw side expansion lines from the skirt side seam to the waistline.
Figure 7: At the two rotation centers on the shoulder dart expansion line (marked with red circles), distribute 10 mm each to the waist dart openings and allocate the remaining amount to the fourth notch position.
For the back skirt, use the hemline and side seam (marked with red circles) as rotation centers, opening 10 mm at the waist dart opening, 10 mm, and 35 mm at the intersection of the side expansion line.
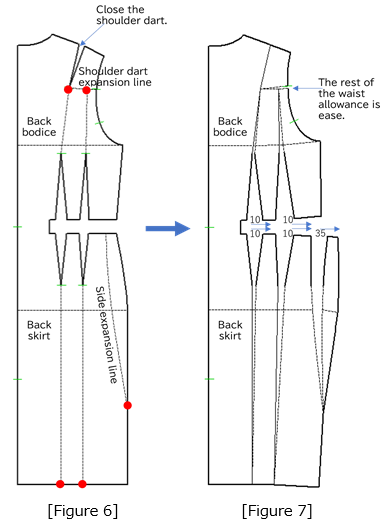
Figure 8: Draw expansion lines connecting the bust point, the midpoint of the neckline, the second notch, and side seam point A.
Extend the expansion lines from the waist dart up and down, intersecting with the shoulder dart expansion lines and the hemline.
Draw side expansion lines from the skirt side seam to the waistline.
Figure 9: At the midpoint of the neckline, make an adjustment of 5 mm. Close the shoulder dart, and at the second notch, adjust by 15 mm.
Using the two rotation centers on the shoulder dart expansion line (marked with red circles), open 10 mm each to the waist dart openings.
Point A is closed. For the front skirt, use the hemline and side seam (marked with red circles) as rotation centers, opening 10 mm at the waist dart opening, 10 mm, and 35 mm at the intersection of the side expansion line.
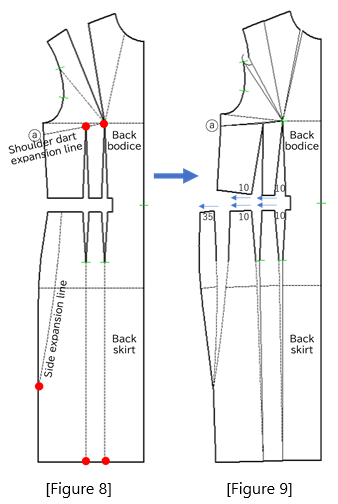
Figure 10: Move the set-in sleeves (dolman sleeves) to the front shoulder.
(I) Move the shoulder line of the back bodice to the front shoulder line (red line).
(II) Move the shoulder line of the front bodice to the front shoulder line (red line)
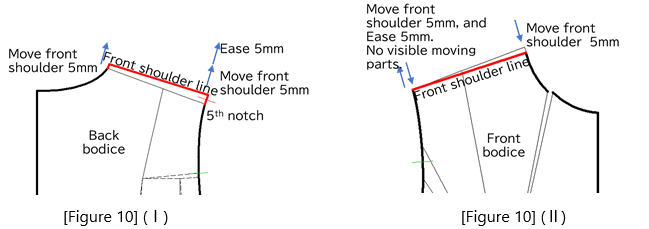
Figure 11: Align the front and back bodices at the front shoulder line and adjust the connections of the neckline and armhole lines.
Figure 12: Connect and flip the front bodice neckline.
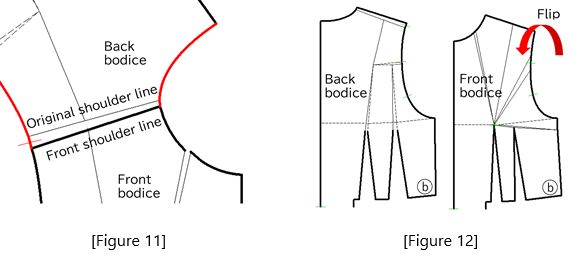
Figure 13: Fix the waistline and side seam angle B of the front and back bodices, then rotate the front bodice to determine and adjust the evenly spaced positions (points K to L) on the side seam.
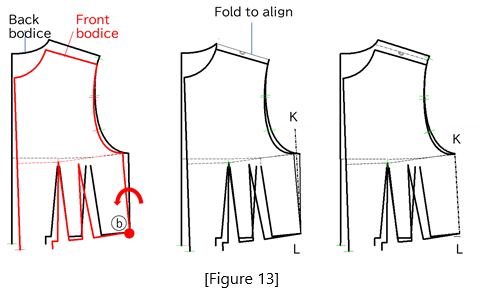
Figure 14: Compare the adjusted (black line) and unadjusted (red line) side seam of the dolman sleeve to see the difference in sleeve pattern angles (shallow vs. deep). This adjustment is necessary for dolman sleeves without a gusset.
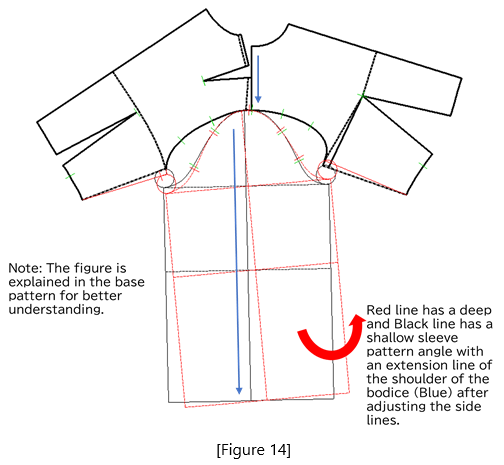
Figure 15: Cut 50 mm cuff length from the sleeve base pattern, and draw a concave line from the second notch to the fourth notch of the sleeve cap, with further expansion lines towards the sleeve hemline. Adjust the sleeve cap line according to the ease added to the armhole of the front and back bodices.
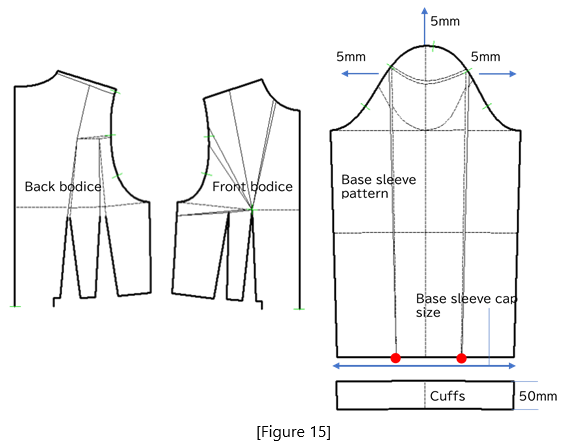
Figure 16: Use the second and fourth notches on the sleeve cap line as rotation centers (marked with red circles) and fold the sleeve hemline to achieve a final measurement of 270 mm.
Fold the difference between the original sleeve hemline dimension and 270 mm.
Complete the two-tuck and cuff (50 x 220) sleeve division lines.
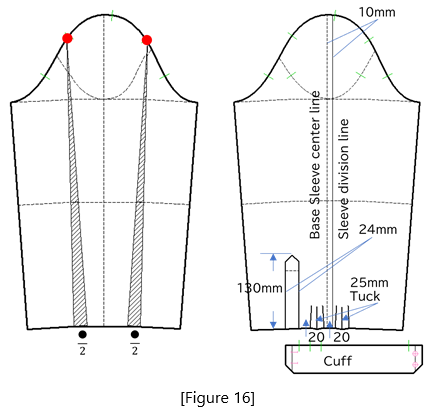
Figure 17: Draw auxiliary lines C to D connecting the underarm of the front and back bodices, arranging them horizontally.
Align the shoulder seam end E and sleeve division line F, ensuring the distance between the armhole base and sleeve base is the same as the diameter of the red circle.
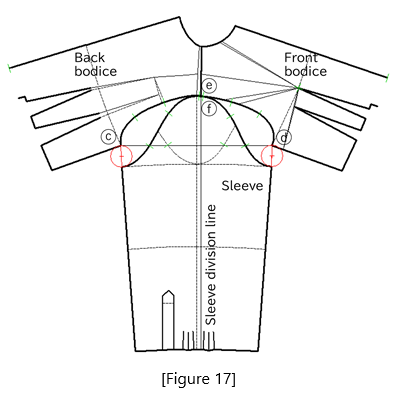
Figure 18: Draw the front and back sleeve hem lines and separate the front and back bodices along the sleeve division line.
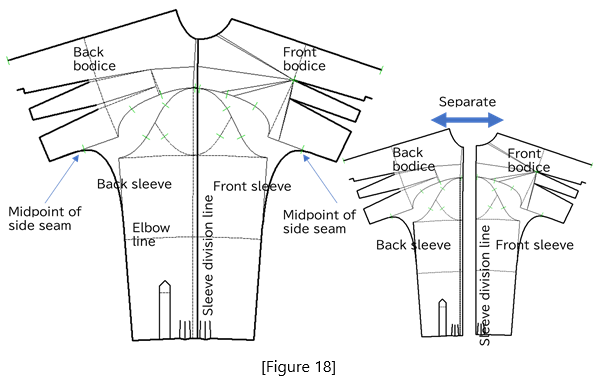
Figure 19: Trim 5 mm from the side neck of the front and back bodices and adjust the connections of the front and back neckline lines.
Add a 25 mm extension at the front center.
Draw the collar outer circumference line on the back bodice with 25 mm for the collar base and 40 mm for the collar lapel.
Figure 20: Connect position X on the extension line with position Y, which is 20 mm out parallel to the shoulder line from the point 25 mm on the front neckline line from the original side neck point.
This becomes the lapel roll line and is reversed.
Sketch the collar, reverse the neckline line, and draw arcs with radii for the back collar attachment line K and the outer collar line L, then draw auxiliary lines from points KM to MN.
Draw perpendicular lines from the notch on the front neckline line to points K M to MN, with intersections at 10 mm, collar base at 25 mm, and lapel at 40 mm, completing the collar attachment line, collar base line, and collar outer circumference line.
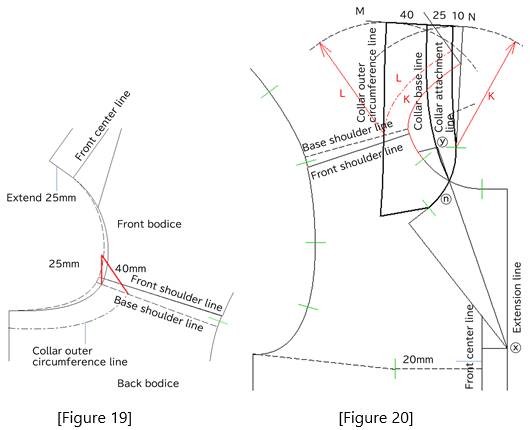
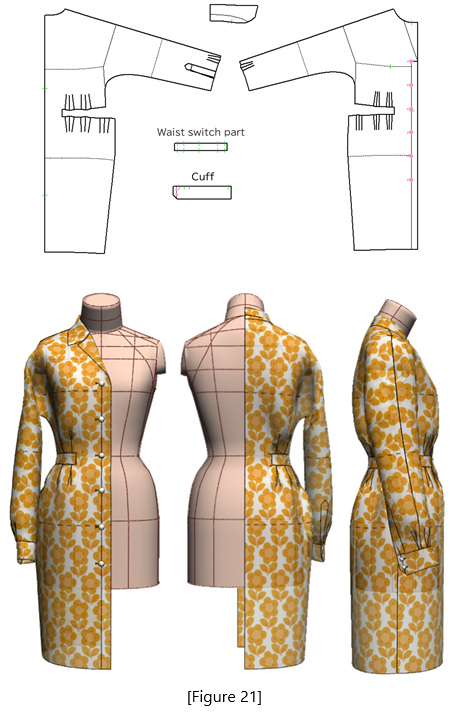
Figure 21: Draft 15 mm x 6 buttons with 95 mm spacing and perform a muslin check of the completed dress pattern.
|
Masaharu Sekikawa 2002 - 2017: Principal at the International Total Fashion College Currently retired as principal and serving as a part-time lecturer at the International Total Fashion College, specializing in apparel CAD education. In June 2017, he published a book on digital toile research and simultaneously launched a website. Please see below. |

| Academic Presentations |
Delivered a presentation on "Pattern & 3D Simulation Verification of Women's Tailored Jackets Using 3D Toile" at the National Conference of the Fashion Business Society in 2016. Delivered a presentation on “Practical Applications of Digital Toile” at the National Conference of the Fashion Business Society in 2017. |
| Website | http://masa-cad.com/ |
| Publications | https://masacad.thebase.in/ |