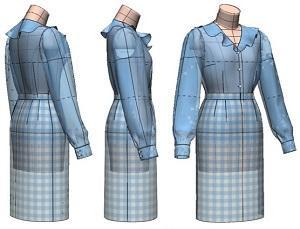
Chapter 20: Digital Toile Check of Ruffle-Collar Blouse and Tight Skirt Patterns
"Flat Pattern Making and Digital Toile Check" by Masaharu Sekikawa
- Study


Link copied.
The Kiiya_ModeliaStylish_38_N (Set-In) Body Form is a nude body form with no built-in ease, allowing full flexibility in adding garment ease during pattern making and making it ideal for creating silhouettes that fit closely to the body. In this chapter, we will cover the patternmaking and digital toile check of the tucked-in blouse with a ruffle collar and the tight skirt. Let’s get started.
Chapter 20: Digital Toile Check of Ruffle-Collar Blouse and Tight Skirt Patterns
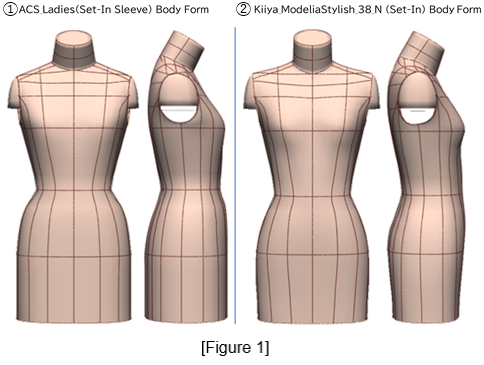
1. Compare the ACS_Ladies (Set-In Sleeve) and the Kiiya_ModeliaStylish_38_N (Set-In) Body Forms
Figure 1: ①The ACS_Ladies (Set-In Sleeve) body form is an industrial body form that includes the ease required for breathing, movement, and wearing foundation garments, resulting in a more angular silhouette.
②The Kiiya_ModeliaStylish_38_N (Set-In) body form, on the other hand, is an industrial nude body form with a rounder silhouette. A comparison from the side view shows that ② is closer to the nude body shape than ①.
2. Create Blouse and Skirt Slopers from the Kiiya_ModeliaStylish_38_N (Set-In) Body Form
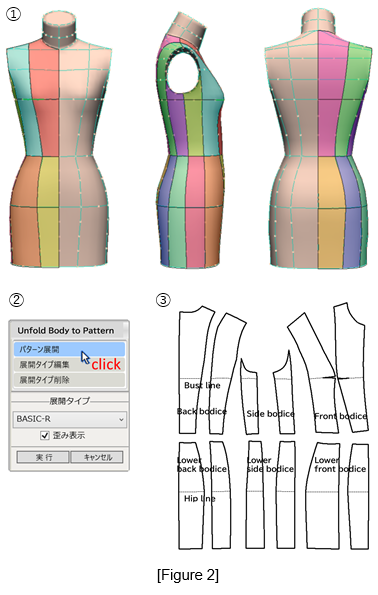
Figure 2: ①Check the default 3D body form surface division (12 panels).
②From the 3D menu, select [Unfold Body to Pattern].
③Flatten the body form into 12 pieces.
(1) Create the Blouse Sloper
Figure 3: ①Merge the unfolded upper bodice and lower bodice pieces into the front and back bodices.
②Consolidate the divided waist darts into a single dart—30 mm on the front bodice and 40 mm on the back bodice—forming the blouse sloper bodice (bold outline).
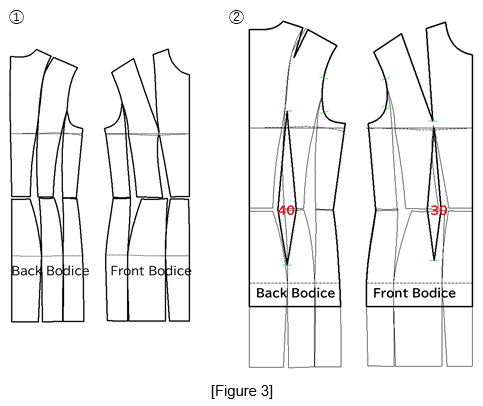
Figure 4: ①Draw a rectangle measuring 130 mm in height and 150 mm in width, draw a perpendicular line from the midpoint ⓐ to establish the sleeve centerline, and designate its lower end as point ⓑ.
Mark point ⓒ at 5 mm above the halfway point of the vertical line, and point ⓓ at 5 mm below one-third of the vertical line. Use these points to draft the sleeve grainline shape as shown in the diagram.
②Extend the sleeve length to 550 mm, divide the front silhouette line equally, and draw the elbow line, sleeve width line, and sleeve hem line.
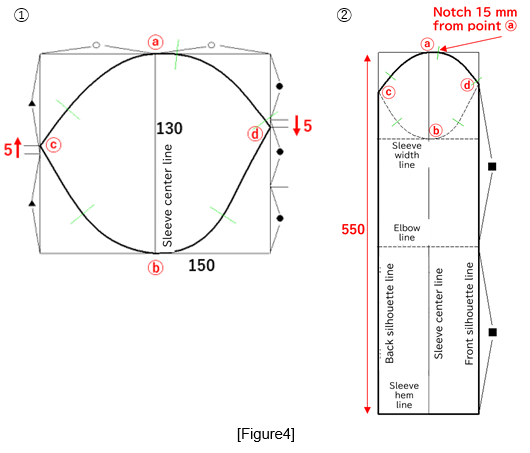
Figure 5: ①Use the front and back sleeve silhouette lines as the mirror axis and open the sleeve to create the one-piece sleeve sloper.
②Align the front and back bodices at the armhole corner ⓔ, and match point ⓔ with the sleeve grainline reference point ⓕ. Rotate the sleeve sloper (red outline) so that the line connecting the 1st to the 3rd notch on the bodice and sleeve becomes parallel, and confirm the matching of the sleeve cap line and the armhole line.
③Perform a toile check of the blouse sloper.

(2) Create the Skirt Sloper (Straight Silhouette)
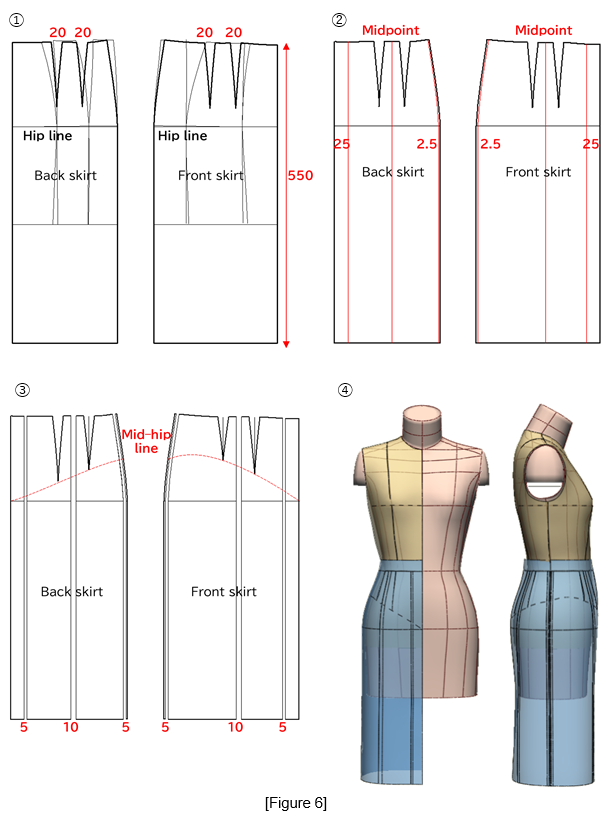
Figure 6: ①Merge the unfolded lower bodice pieces to form the front and back skirt, consolidate the darts into 20-mm darts, and set the skirt length to 550 mm.
②Draw six expansion lines (red lines).
③Add width in parallel according to the measurements shown in the figure. Draw the mid-hip line (red dashed line) and shorten the dart tips to that line.
④Perform a toile check with the blouse sloper tucked in.
3. Create the Shaped (Tucked-In) Blouse Silhouette
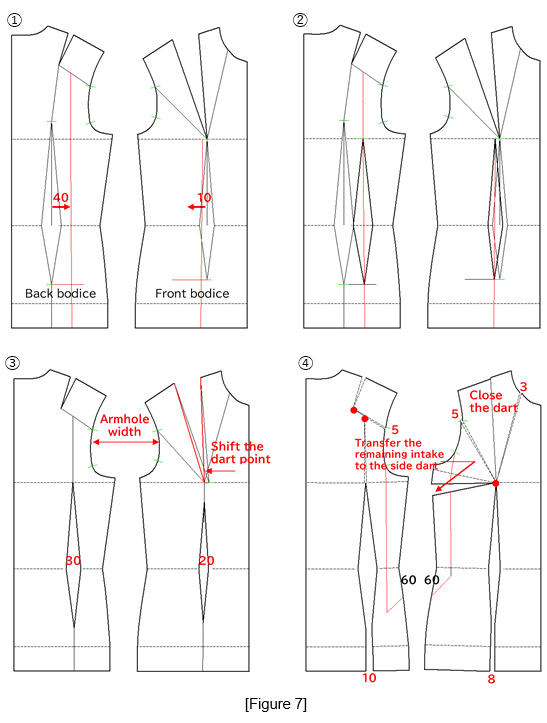
Figure 7: ①Draw auxiliary lines (red lines) to move the waist darts toward the side seam—40 mm on the back bodice and 10 mm on the front bodice.
②Move the waist darts as shown in the diagram.
③Reduce the waist dart intake to 30 mm on the back and 20 mm on the front, and shift the shoulder dart point.
④Using the red circles as the pivot points, rotate the sections to open the shoulder area as shown in the figure, and draw the armhole expansion lines (red lines).
4. Create the Gathered Sleeve
Figure 8: ①Using the red circles as pivot points, open the back armhole line by 15 mm and the front armhole line by 10 mm.
Lower the armhole lines down to the bustline (red arrows).
②Lower the sleeve width line by half the amount that the bodice armhole lines were lowered. From the 2nd notch to the 4th notch, draw a concave line, and from the same notches draw perpendicular lines down to the sleeve hem to create the cutting lines (red lines).
③Open the cutting lines according to the values shown in the figure and align them with the bodice armhole lines.
④Perform a toile check.

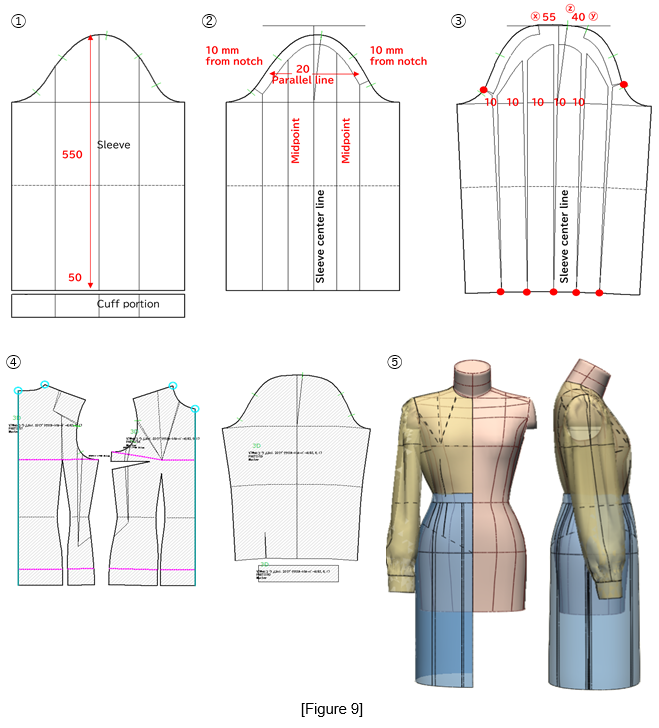
Figure 9: ①Extend the sleeve length to 600 mm and separate 50 mm for the cuff length.
②Draw cutting lines 20 mm parallel to the sleeve cap line, and from the midpoint draw a perpendicular line downward.
③Using the red circles as pivot points, open the sleeve cap by 55 mm between points Ⓧ–Ⓩ and by 40 mm between points Ⓨ–Ⓩ.
④Set the seam parameters using [PM Preform]
⑤Perform a toile check.
5. Create the Ruffle Collar
Figure 10: Lower the side neck points of both the front and back bodices by 10 mm, and draw a 15 mm extension line from the center front line.

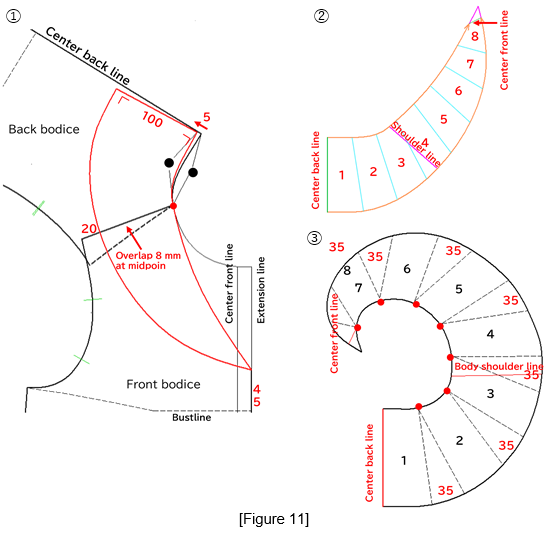
Figure 11: ①Align the front and back bodices at the shoulder line, and overlap the bodices by 8 mm at the midpoint of the shoulder line, using the red circle as the pivot point. Using the back neckline length (black circle), redraw it at a position 5 mm lower, and define the line as the collar attachment line. From this line, set the collar center back at a right angle with a length of 100 mm, and connect it to the point located 45 mm along the extension line.
②Take out the collar and divide it into eight equal sections.
③Using the red circles as pivot points, open each section by 35 mm.
6. Perform a Toile Check on the Completed Pattern
Figure 12: Check the completed pattern.
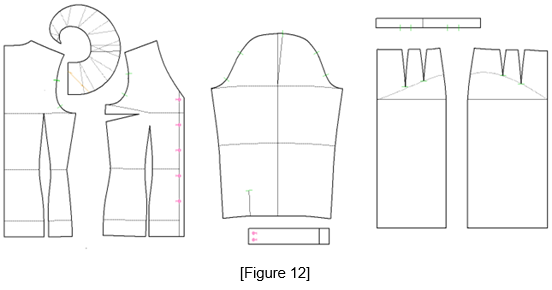
Figure 13: ①From the 3D menu, select [PM Preform] and set the arm position to [Arms Down A] to start the stitching simulation.
② Once the arms settle into their designated position, stop the simulation, rotate the body form, and check the toile.
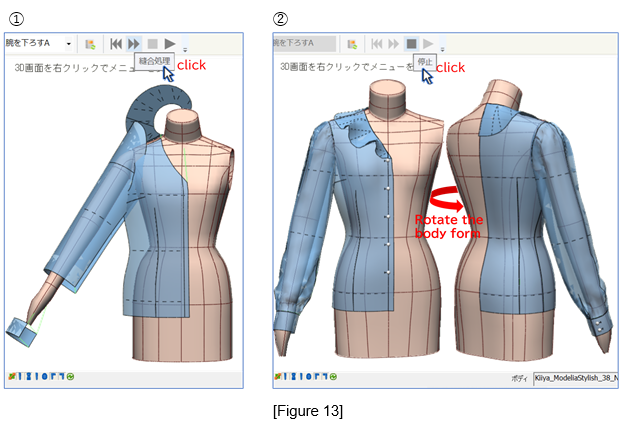
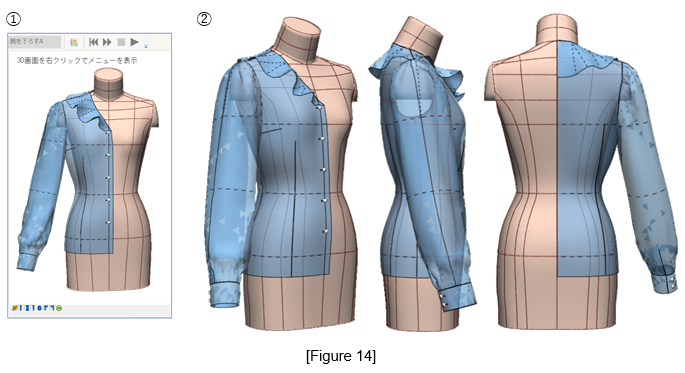
Figure 14: ①Remove the arms from the body form.
②Perform a toile check.
7. Combine with the Tight Skirt
Figure 15: ① Prepare the skirt pattern.
② Perform a toile check.
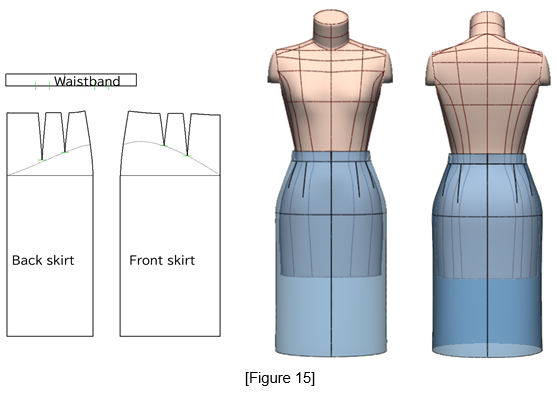
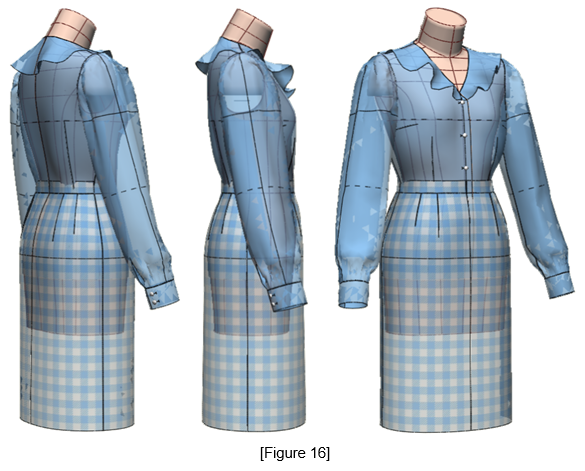
Figure 16: Combine the ruffle-collar blouse and the skirt, and perform a toile check.
|
Masaharu Sekikawa 2002 - 2017: Principal at the International Total Fashion College Currently retired as principal and serving as a part-time lecturer at the International Total Fashion College, specializing in apparel CAD education. In June 2017, he published a book on digital toile research and simultaneously launched a website. Please see below. |

| Academic Presentations |
Delivered a presentation on "Pattern & 3D Simulation Verification of Women's Tailored Jackets Using 3D Toile" at the National Conference of the Fashion Business Society in 2016. Delivered a presentation on “Practical Applications of Digital Toile” at the National Conference of the Fashion Business Society in 2017. |
| Website | http://masa-cad.com/ |
| Publications | https://masacad.thebase.in/ |