Chapter 19: Three-Button Rolled-Lapel Jacket Pattern and Digital Toile Check
"Flat Pattern Making and Digital Toile Check" by Masaharu Sekikawa
- Study


Link copied.
This chapter introduces a men’s jacket for the first time in this series. In men’s wear, the enclosed method of flat pattern drafting is generally used. In this case, however, the pattern making and digital toile check of a three-button rolled-lapel jacket are explained, using a ladies’ pattern-making method that opens up a three-dimensional basic form. Let’s get started.
Chapter 19: Three-Button Rolled-Lapel Jacket Pattern and Digital Toile Check
1. What Is the Three-Button Rolled-Lapel Jacket?
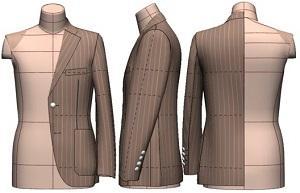
Figure 1: The three-button rolled-lapel jacket is a single-breasted style with three buttons, designed so that the top button is positioned beneath the lapel roll. By fastening the second button, the V-zone becomes lower and the lapel rolls softly, creating a refined yet relaxed impression. This style has become a signature look of many Italian brands.
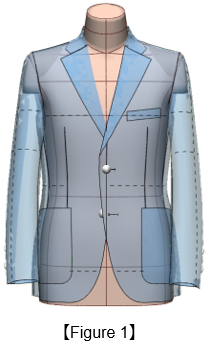
2. Expand the ACS_Men(Set-In) Body Form Into Flat Patterns
Figure 2: ①Check the default 3D body form surface division (12 panels).
②From the 3D menu, select [Unfold Body to Pattern].
Figure 3: ①Flatten the body form into 12 pieces.
②Merge the pieces into the front and back bodice patterns.

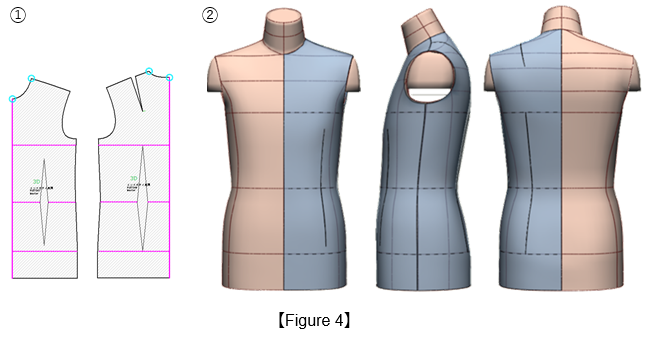
3. Convert to a Basic Fitted Sloper
Figure 4: ① Adjust the back shoulder dart and the front and back waist darts, then set the seam parameters using [PM Preform] in the 3D menu.
② With the ACS_Men(Set-In) Body Form, perform a toile check to confirm a fit with no ease.
4. Create the Jacket Sloper
Figure 5: ① Draw six vertical expansion lines (red lines) and open them in parallel by the specified amounts to add a total of 40 mm across the body width.
② Perform a toile check on the bodice.
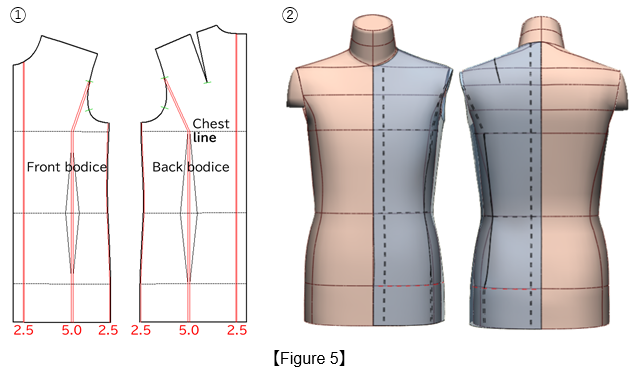
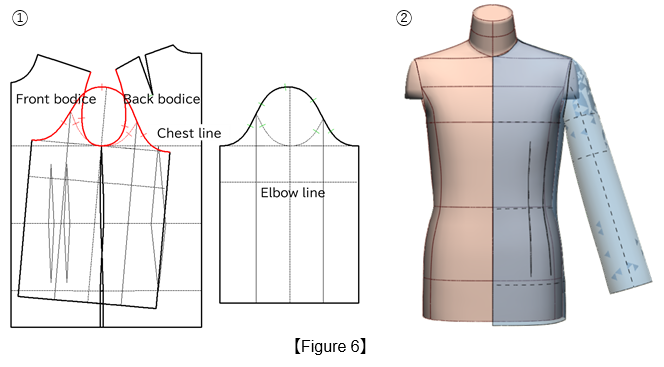
Figure 6: ① Divide the front waist dart into two darts and lower the armhole line to the chest line.
② Sew the sleeve and perform a toile check. For details on drafting the sleeve, please refer to the step below.
5. Draft the sleeve
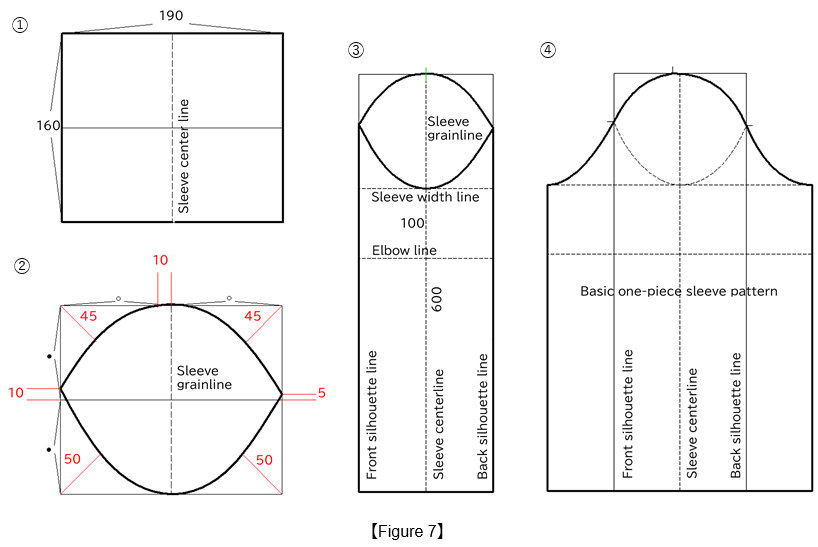
Figure 7: ① Draw a rectangle measuring 190 mm (width) × 160 mm (height) and divide both the width and height into equal sections.
② Draw angle bisector lines at each corner to establish the sleeve grainline.
③ Extend the sleeve center line to a length of 600 mm, and draw the elbow line parallel to the sleeve width line at 100 mm, forming the rectangular block.
④ Open the sleeve along the mirrored front and back silhouette lines to create the basic one-piece sleeve pattern.
6. Move the Dart Positions and Divide into a Three-Panel Bodice
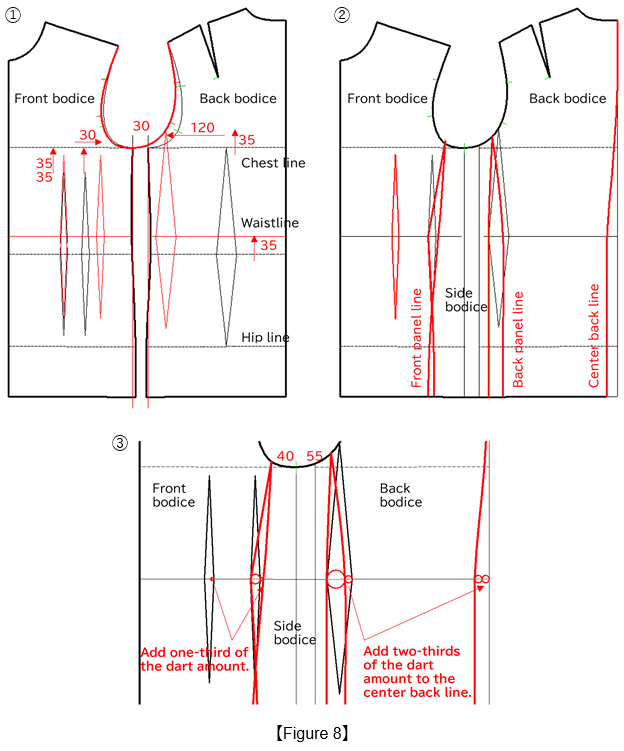
Figure 8: ① Place the front and back bodice pieces 30 mm apart. Raise the waistline 35 mm, shift the front auxiliary dart 30 mm toward the side line, and shift the back dart 120 mm toward the side line (red lines). Shift the armhole line forward and redraw it (red lines).
② Draw the front and back panel dart lines and the center back line to create the three-panel bodice (red lines).
③ Distribute the panel dart volume according to the method shown in the figure.
7. Distribute Ease Using Manipulation
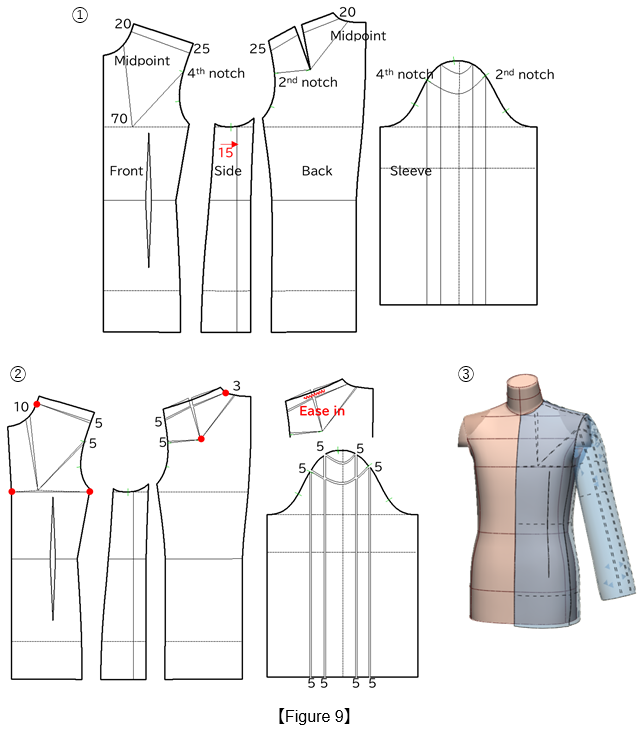
Figure 9: ① Draw the expansion lines. To align the pattern with the body reference lines, shift the side line 15 mm toward the back.
② Using the red circles as pivot points, open 5 mm to account for the shoulder pad thickness, 5 mm along both the front and back armhole lines, 10 mm along the front neckline, and 3 mm along the back neckline. Then, to match the bodice armhole line, open 5 mm along each vertical line on the sleeve and 5 mm along each horizontal line. Ease in the back shoulder dart intake.
③ Perform a toile check.
8. Create a Two-Piece Sleeve
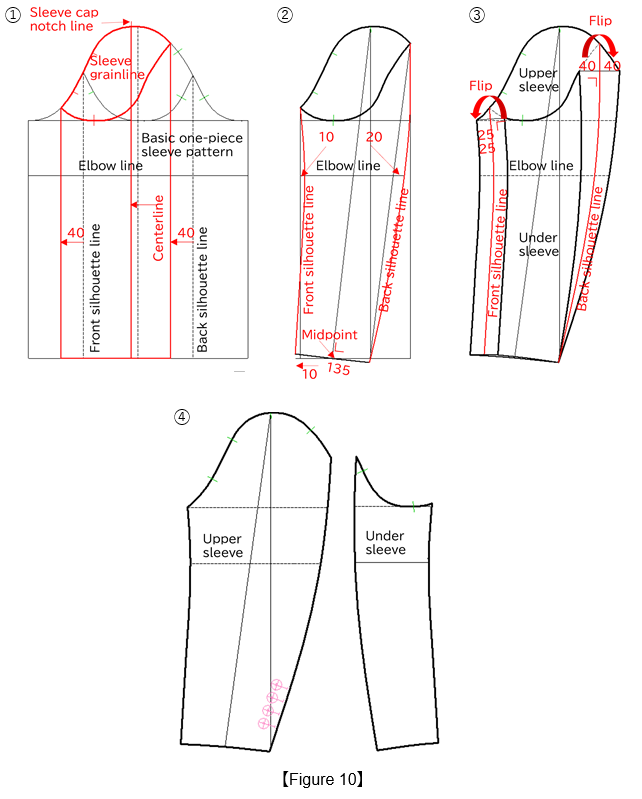
Figure 10: ① Shift the front and back silhouette lines of the basic one-piece sleeve 40 mm forward (red lines) and use them as the mirror axis to refold the sleeve grainline. Move the sleeve centerline to the sleeve cap notch line.
② Draw the front and back silhouette lines for the two-piece sleeve.
③ From the front and back silhouette lines, draw the two-piece sleeve finished lines by 25 mm for the front sleeve and 40 mm for the back sleeve.
④ Extract the under sleeve from the upper sleeve and flip it. Attach four 18 mm buttons to the upper sleeve.
9. Perform a Toile Check on the Two-Piece Sleeve
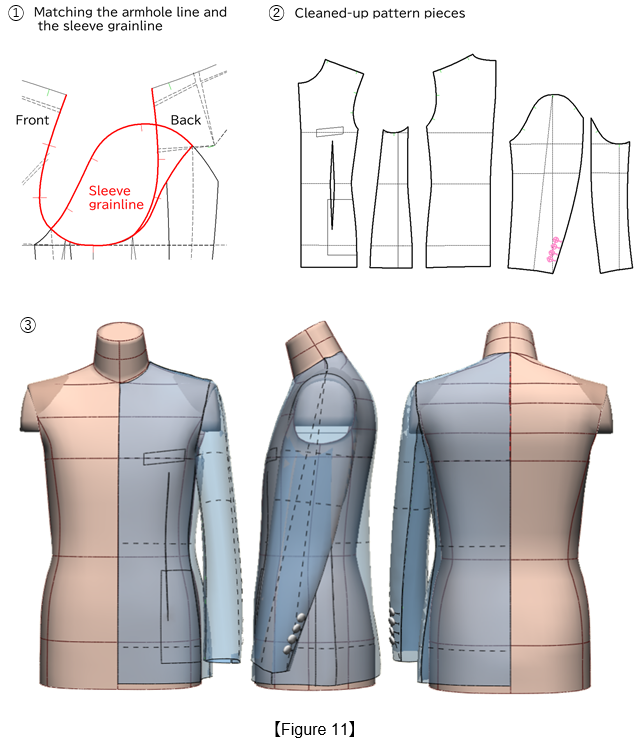
Figure 11: ① Confirm that the front and back bodice armhole lines and the sleeve grainline are correctly matched.
② Clean up the pattern to a finished length of 700 mm, a chest width of 1000 mm, and a hip width of 1100 mm.
③ Perform a toile check.
10. Create a Tailored Collar
Figure 12: Lower the neckline by 3 mm at the center front and center back lines, and by 15 mm at the shoulder line.
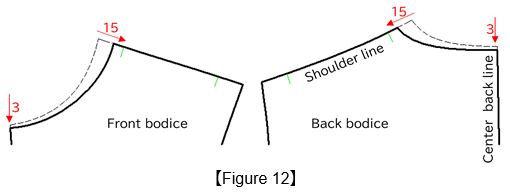
Figure 13: ① From the side neck point on the back bodice, draw a 30 mm perpendicular line for the collar stand and a 40 mm line for the upper collar width. Connect these lines to the shoulder line to draw the back outer collar edge line.
② From the waistline intersection on the 20 mm extension line, mark point ⓐ at 100 mm. From the point 25 mm below the side neck point, draw a 25 mm line parallel to the shoulder line to mark point ⓑ. Connect ⓐ and ⓑ to form the lapel break line, and sketch the collar and lapel (red lines).
③ Mirror the lapel break line along its axis, extend the gorge line, and connect it to the front neckline (red lines).
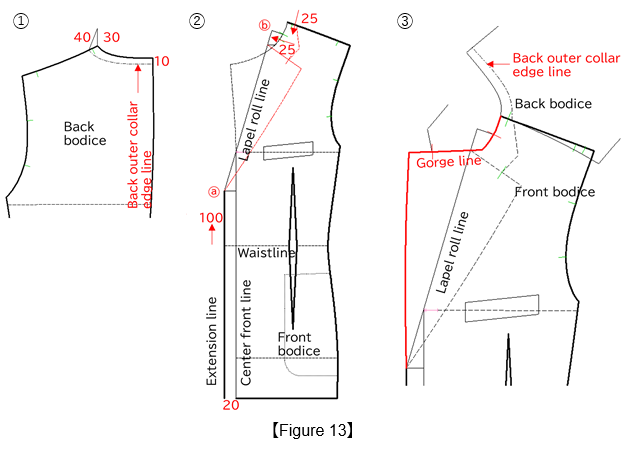
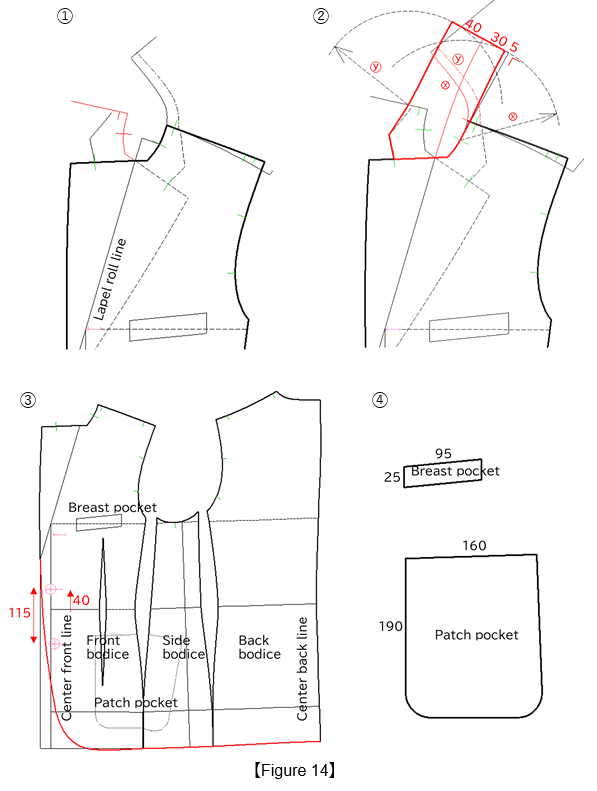
Figure 14: ① Mirror the front neckline (red line) along the lapel break line as the mirror axis.
② Draw arcs using the collar attachment length ⓧ and the back outer collar edge length ⓨ as their respective radii, and use the tangent line between the arcs as the center back line of the collar. Take a 30 mm collar stand and a 40 mm upper collar width, and draw the upper collar.
③ Join the front and back side bodices along the panel lines, and draw the front edge line, hemline (red line), and the positions of three 23 mm buttons.
④ Draw the breast pocket at 25 mm × 95 mm and the patch pocket at 190 mm × 160 mm.
11. Create the Digital Toile
Figure 15: ① Position all garment pieces on the body form.
② Use [Arms Down B] in the 3D menu to run the stitching simulation.
③ Stop the simulation once the sleeve settles into its correct position.
④ Remove the arms from the body.
⑤ The full-body toile is now complete.
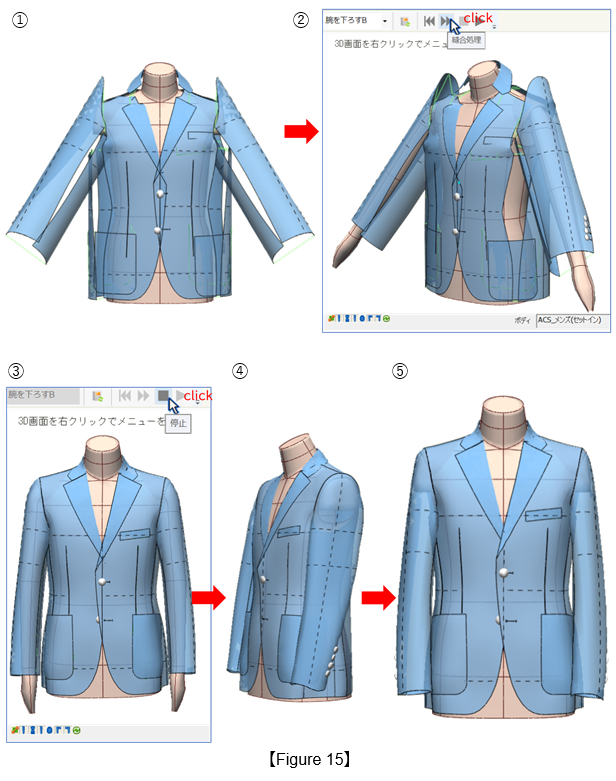
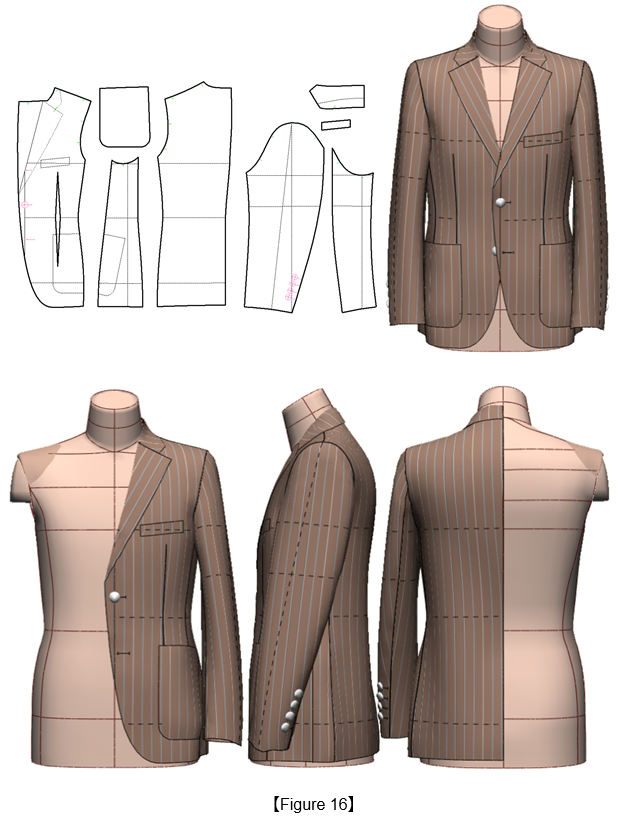
Figure 16: Perform a toile check on the jacket using the ACS_Men(Set-In) Body Form with the actual fabric pattern applied.
|
Masaharu Sekikawa 2002 - 2017: Principal at the International Total Fashion College Currently retired as principal and serving as a part-time lecturer at the International Total Fashion College, specializing in apparel CAD education. In June 2017, he published a book on digital toile research and simultaneously launched a website. Please see below. |

| Academic Presentations |
Delivered a presentation on "Pattern & 3D Simulation Verification of Women's Tailored Jackets Using 3D Toile" at the National Conference of the Fashion Business Society in 2016. Delivered a presentation on “Practical Applications of Digital Toile” at the National Conference of the Fashion Business Society in 2017. |
| Website | http://masa-cad.com/ |
| Publications | https://masacad.thebase.in/ |