
Chapter 17: Feminine Blouse Pattern and Digital Toile Check
"Flat Pattern Making and Digital Toile Check" by Masaharu Sekikawa
- Study


Link copied.
In this chapter, we will cover the patternmaking and digital toile check process for the drop-shoulder jacket, an essential casualwear favorite. Let’s get started.
Chapter 17: Feminine Blouse Pattern and Digital Toile Check
1. Expand the ACS_Ladies (Set-In Sleeve) Body Form Into Flat Patterns
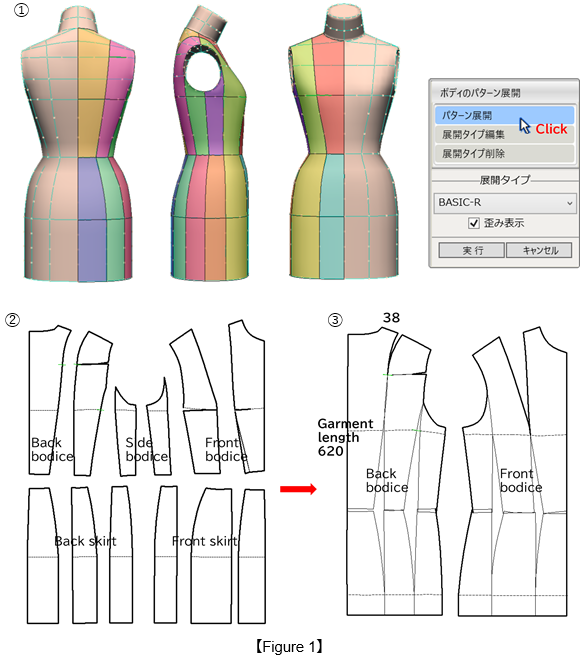
Figure 1: ①Check the default 3D body form surface division (12 panels). From the 3D menu, select [Unfold Body to Pattern].
②Flatten the body form into 12 pieces.
③Merge the pieces into the front and back bodice patterns.
2. Convert to a Princess Sloper
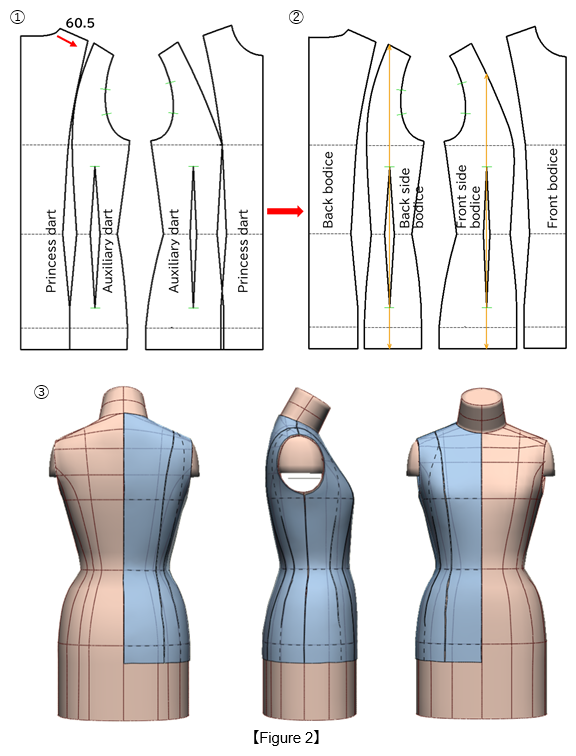
Figure 2: ①Move the shoulder dart toward the side seam (60.5 mm from the neck point) and reshape the pattern to form the princess dart and auxiliary dart.
②Divide the princess sloper into four panels.
③Perform a toile check to make sure it fits on the body form (and there is no ease).
3. Create the Blouse Sloper
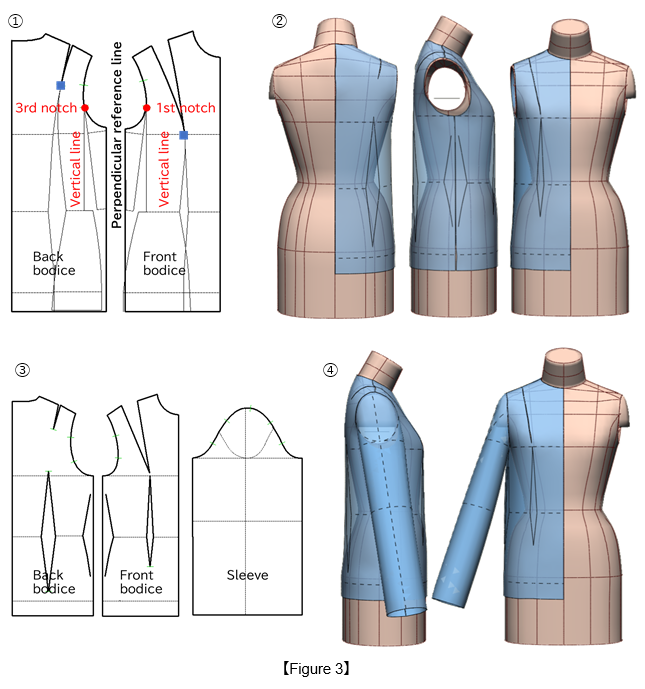
Figure 3: ①Align the four panels of the princess sloper at the ■ marks and join them to create the front and back bodice. Using the red circles as pivot points, open the side lines until they are vertical.
②Perform a toile check to confirm fit across the torso.
③Adjust the shoulder darts, waist darts, and armhole lines, then add the sleeve sloper to complete the blouse sloper.
④Perform a toile check to confirm the sleeve position and rotation.
4. Divide the Yoke and Expand the Armhole
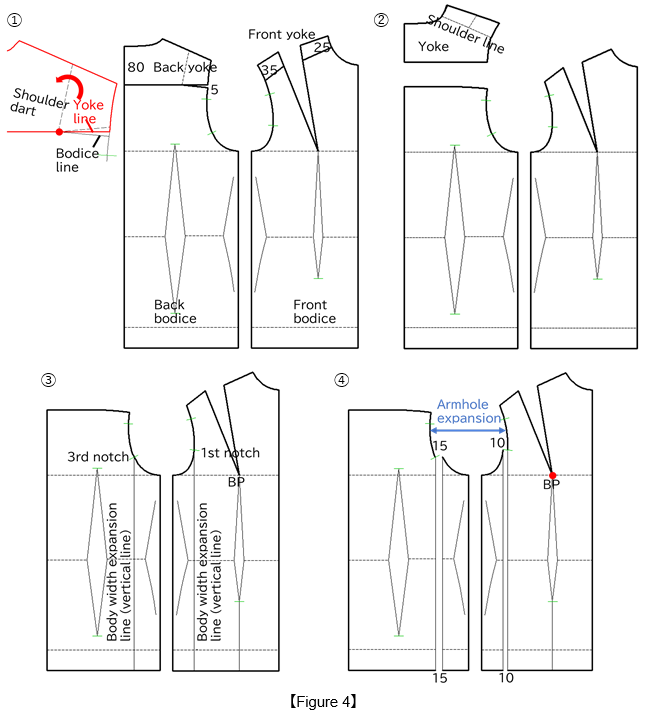
Figure 4: ①Using the red circle as the pivot point, fold the shoulder dart and divide the back yoke (red line) at 80 mm from the center back and the front yoke into widths of 35 and 25 mm.
②Separate the front and back yokes and join them along the shoulder line.
③Draw the body width expansion lines from the first and third notches using a vertical line.
④Open the body width expansion lines in parallel according to the dimensions in the figure to expand the armhole.
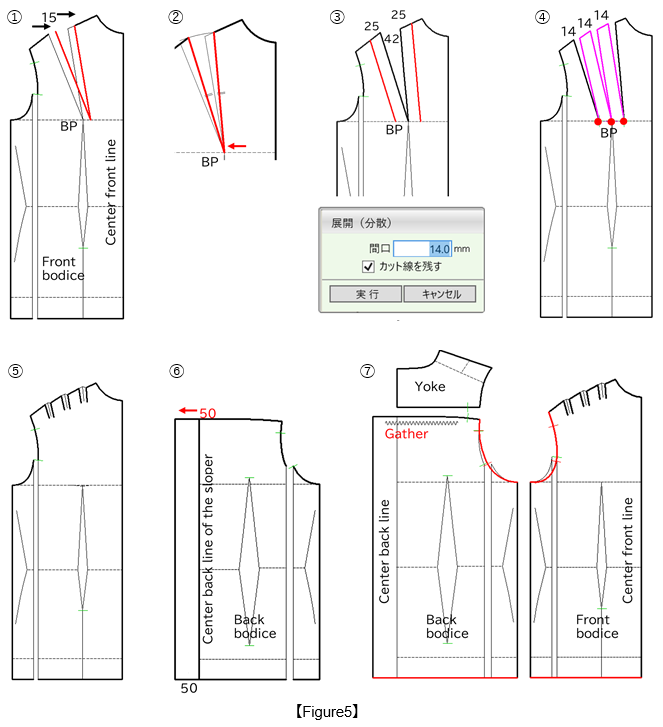
5. Move the Shoulder Darts and Split into Three Tucks
Figure 5: ①Move the shoulder dart on the bodice 15 mm toward the front center, keeping it parallel to its original line (red line).
②Shift the dart tips to the bust point.
③Draw parallel expansion lines 25 mm from the moved dart line to the left and right (red lines), then use the [Development - Distribute] menu with an opening of 14 mm.
④Rotate around the red circle to open the expansion lines to the specified width.
⑤Form three tucks.
⑥Add gathers parallel to the center back line at 50 mm.
⑦Redraw the yoke, front and back bodice armhole lines, and hem lines (red lines).
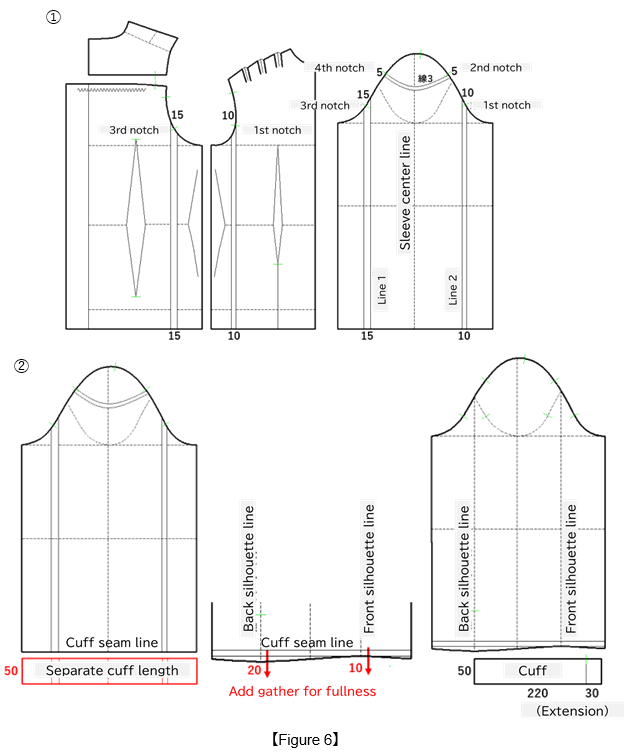
6. Create the Sleeve Cap Line Adjusted for Armhole Ease
Figure 6: ①Draw lines 1-2 vertically from the sleeve cap line to the sleeve opening, and draw line 3 as a concave line. Open lines 1, 2 and 3 in parallel according to the values added to the bodice.
②Separate 50 mm from the sleeve for the cuff length, then add 10-20 mm along the sleeve opening to create fullness. Draft a cuff measuring 50 mm wide x 220 mm long, with a 30 mm extension.
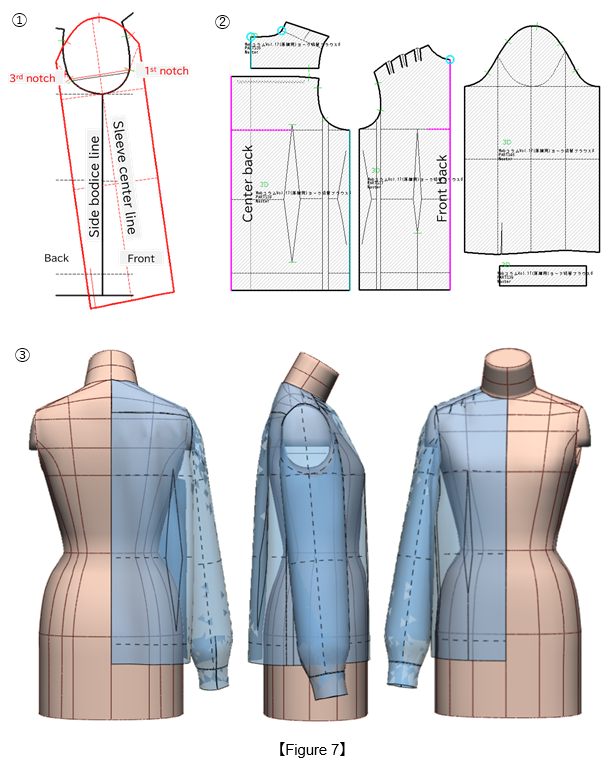
7. Perform a Toile Check on the Completed Bodice and Sleeve
Figure 7: ①First, confirm that the armhole line of the bodice matches the sleeve grainline on the pattern.
②In the 3D menu, select [PM Preform] to place the pattern on the body form.
③Assemble the toile and check the gathers on the back bodice, the tuck volume on the front yoke, and the sleeve swing and fit.
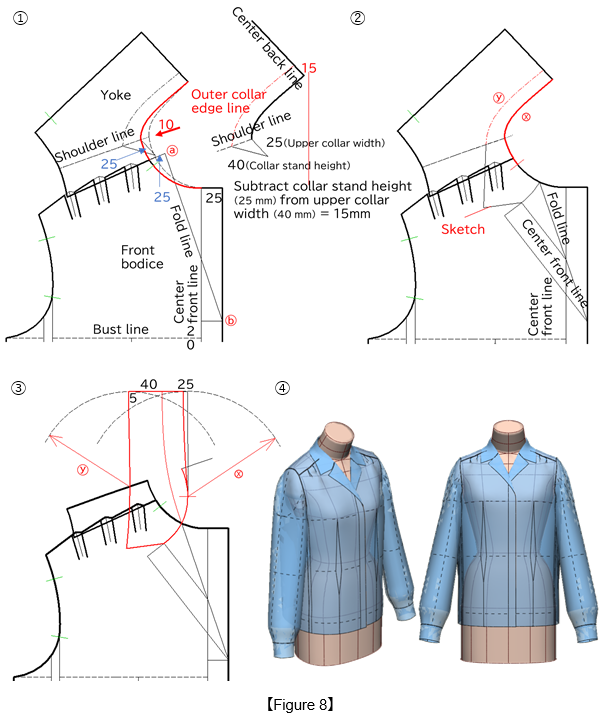
8. Draft the Open Collar from the Sketch
Figure 8: ①Align the yoke piece with the front bodice and lower the side neck point by 10 mm ( red line). Draw the outer collar edge line. Add a 25 mm extension at the center front line and connect points A and B to form the fold line.
②Sketch the upper collar line from the reversed front center line. Make [x] the collar attachment measurement and [y] the collar outer edge measurement.
③Draw two arcs using [x] and [y] as the radius. Draw a tangent line between the arcs to complete the upper collar (red line).
④Assemble on the toile and check the open collar fit.
9. Create the Buttons
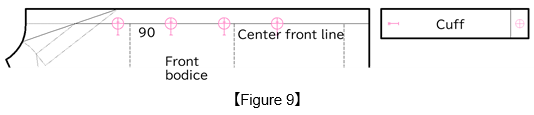
Figure 9: Attach four 18 mm buttons along the center front line and one 15 mm button on each cuff.
10. Perform a Toile Check
Figure 10: Place the pattern onto the ACS_Ladies (Set-In Sleeve) and the Human Body forms.

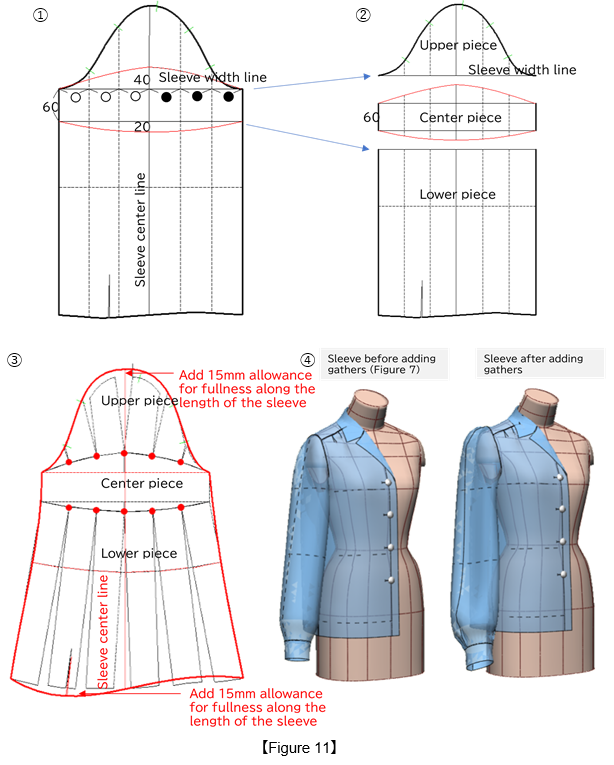
11. Add Gathers to the Sleeve Cap and Cuff
Figure 11: ①Prepare the sleeve pattern created in Figure 7, and draw expansion lines by dividing the front and back sleeve width lines into three equal parts. From the sleeve width lines, draw parallel lines 40 mm and 60 mm above, and convex lines 20 mm below (red lines).
②Divide the sleeve into three pieces.
③Align the upper and lower pieces with the center piece along the red lines, opening the sleeve cap and sleeve opening for gathers.
④Compare the toile before modifying the sleeve gathers in Figure 7 and after modifying the sleeve gathers.
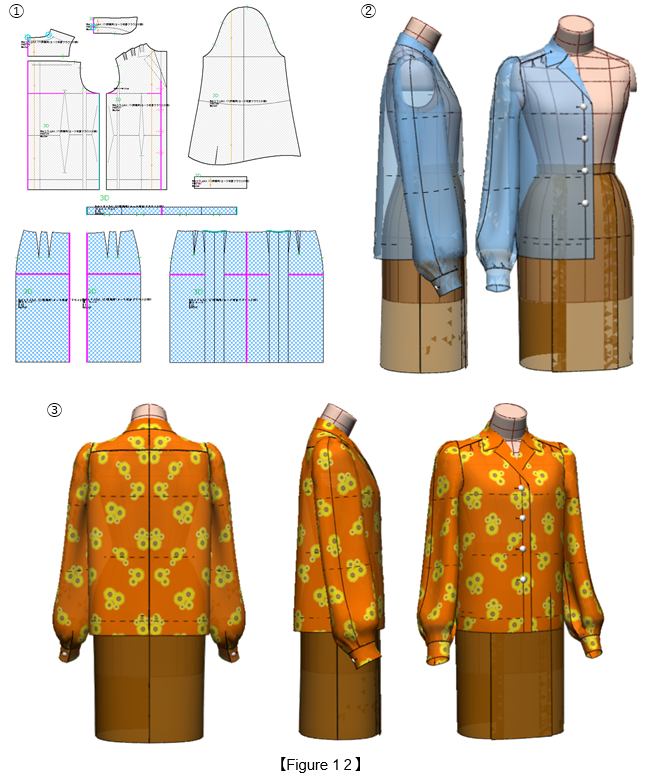
12. Perform a Toile Check on the Completed Blouse with Gathered Sleeves
Figure 12: ①Set up the seam parameters for the completed pattern.
②Set toile opacity to 60% on the ACS_Ladies (Set-In Sleeve) body form and place the blouse as a half-body piece and a skirt as a full-body piece to check for overall fit.
③Run a final simulation with the toile opacity set to 100%.
|
Masaharu Sekikawa 2002 - 2017: Principal at the International Total Fashion College Currently retired as principal and serving as a part-time lecturer at the International Total Fashion College, specializing in apparel CAD education. In June 2017, he published a book on digital toile research and simultaneously launched a website. Please see below. |

| Academic Presentations |
Delivered a presentation on "Pattern & 3D Simulation Verification of Women's Tailored Jackets Using 3D Toile" at the National Conference of the Fashion Business Society in 2016. Delivered a presentation on “Practical Applications of Digital Toile” at the National Conference of the Fashion Business Society in 2017. |
| Website | http://masa-cad.com/ |
| Publications | https://masacad.thebase.in/ |