Chapter 15: 3-Piece Bar Jacket Pattern and Digital Toile Check
"Flat Pattern Making and Digital Toile Check" by Masaharu Sekikawa
- Study


Link copied.
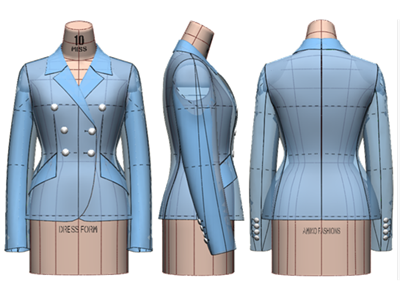
In this article, we will continue to look at the DIOR Bar Jacket that we covered last time. While there are many different possible variations of this iconic jacket, this time we will cover the patternmaking and digital toile check process for the 3-piece feminine tailored jacket. Let's get started.
Chapter 15: 3-Piece Bar Jacket Pattern and Digital Toile Check
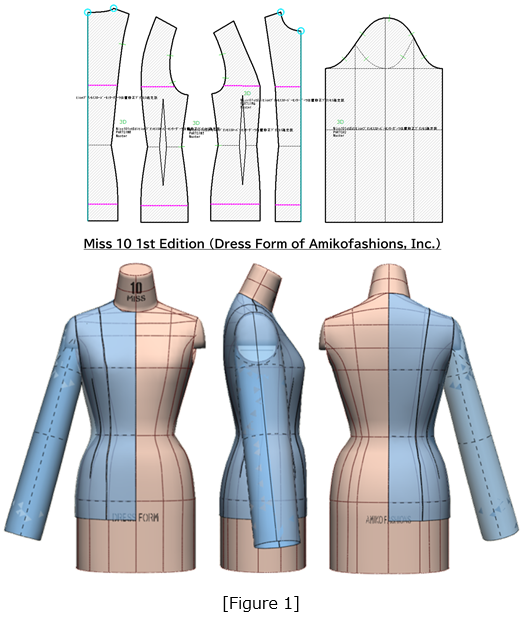
1. Perform a Toile Check on a Princess Sloper
First, we will place a princess sloper created by draping on the Amiko Fashions dress form and perform a toile check.
2. Perform a Digital Toile Check on a Fitted Torso Sloper
The fitted torso sloper serves as the base for distinct garment-specific slopers tailored to different body lengths. Dividing it into front and back bodice pieces allows for more efficient pattern development.
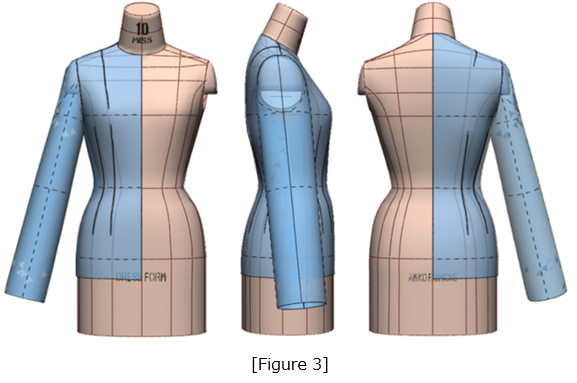
Figure 2: Set the sewing parameters for the torso sloper created from the princess sloper shown in Figure 1.
Figure 3: Perform a toile check to ensure that the bust, waist, and hip lines are correctly positioned and that the sleeve pitch is appropriate.

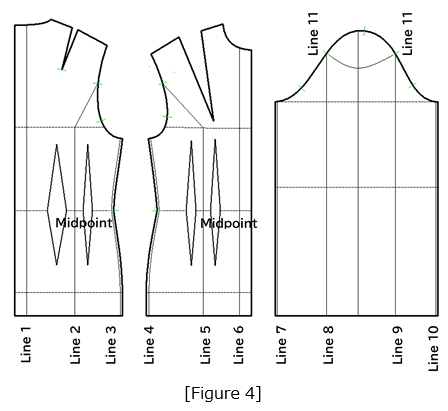
3. Add Width to the Torso Sloper
Flat pattern manipulation techniques are used to introduce ease across the body to allow for layering with garments such as blouses, jackets, or coats.
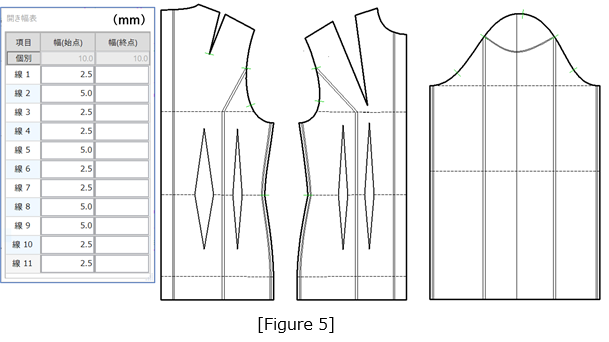
Figure 4: Draw expansion lines (Lines 1–11) on the fitted torso sloper.
Figure 5: Open the sloper by a total of 40 mm across the body width evenly and in parallel.
4. Create a Three-Panel Bodice
Figure 6: An overview of the steps to create a three-panel bodice is shown below.
①Position the front and back bodice pieces with a 15 mm gap at the side line and define the center of that gap (green line) as the new side line.
②Use the back auxiliary dart to absorb the shaping from the center back dart.
③Distribute the shaping from the back panel dart between the center back dart and side dart.
④Allocate the shaping from the front waist dart to the front center dart.
⑤Divide the shaping from the front panel dart between the front auxiliary dart and the side dart. We will cover this process in detail in Figure 8.
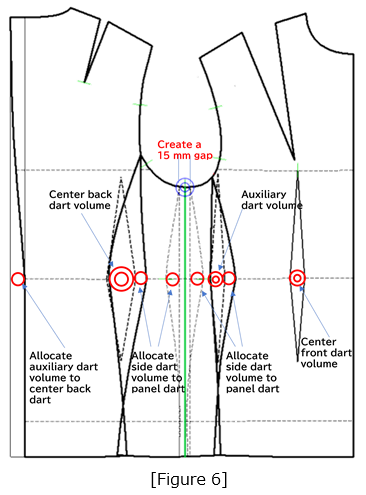
Figure 7: Lower the neckline by 3 mm at the front and back center neck points, and by 5 mm at the side neck points.
Figure 8: ①Raise the waistline by 25 mm to create a high-waisted silhouette.
②Reallocate the back auxiliary dart volume to the center back.
③Shift the center back dart 65 mm toward the side line.
④Raise the front center dart by 25 mm.
⑤Shift the front auxiliary dart 55 mm toward the side line.
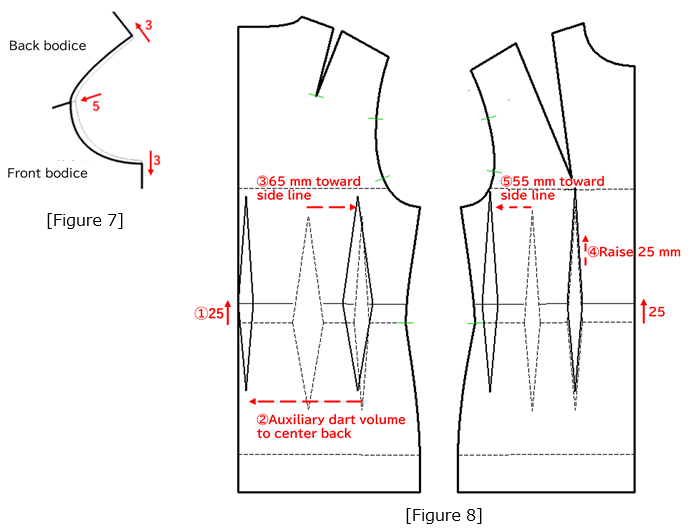
Figure 9: Place the front and back bodice pieces 15 mm apart at the side line, and define the center of the gap (green line) as the new side line. Set the back panel dart volume to 55 mm and draw the panel line from the intersection of the back bust line and a line parallel 30 mm above it to the armhole curve. Set the front panel dart volume to 35 mm, and draw the panel line from the intersection below the front bust line and the armhole curve.
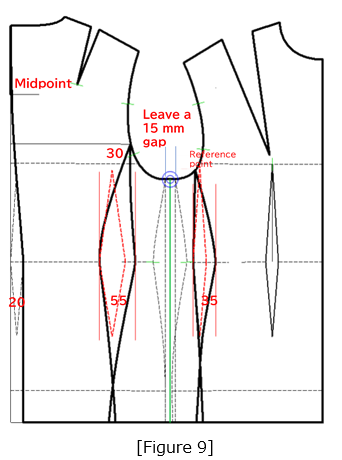
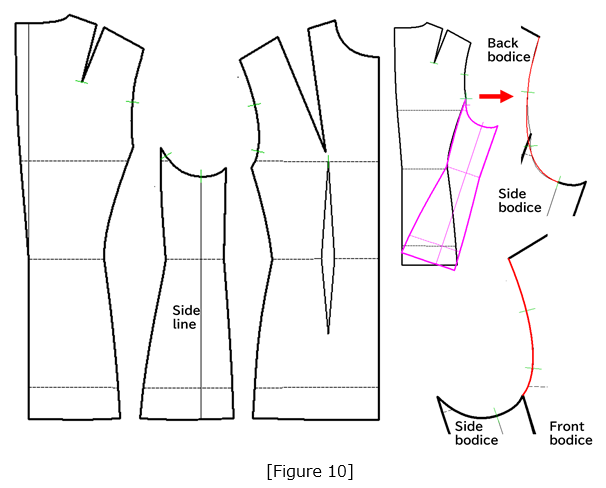
Figure 10: Use the panel lines to separate the back bodice, side bodice, and front bodice.Then, adjust the armhole and hemline curves.
5. Use Manipulation to Create the Bar Jacket Silhouette
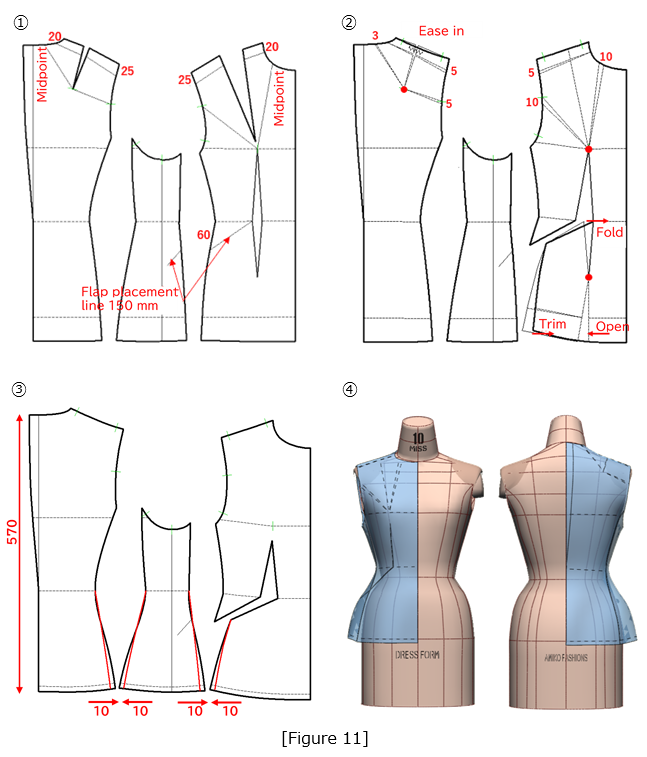
Figure 11: ①Draw guidelines for manipulation.
②Using the red circles as pivot points, rotate the dart volume and redistribute it as ease.
③Set the finished length to 570 mm. To create the Bar silhouette, add 10 mm at each hem corner and adjust the side line into a convex curve.
④Perform a toile check.
6. Create a Two-Piece Sleeve and Perform a Toile Check
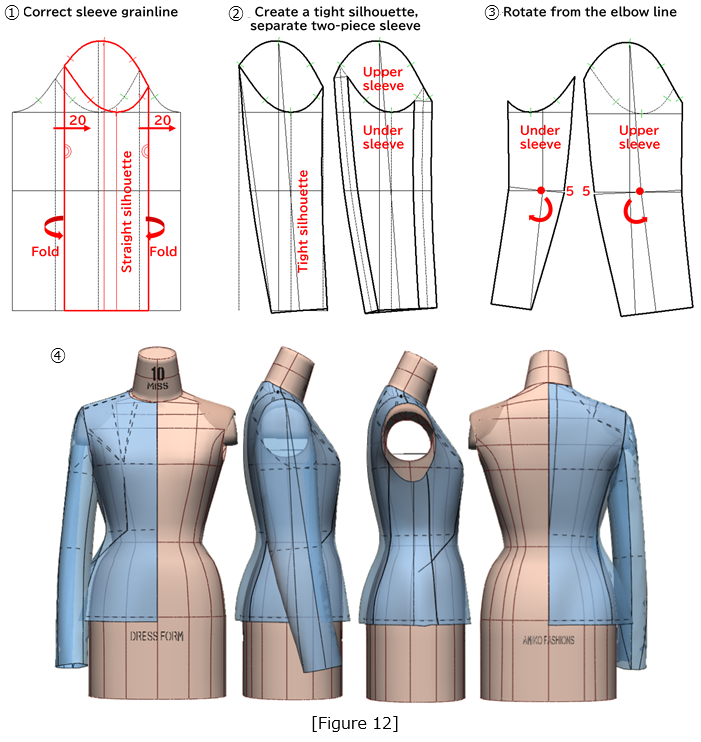
Figure 12: Create a two-piece sleeve using the method explained in Figures 9 and 10 of the previous column (Vol. 14).A simplified diagram is shown in steps ① to ③.
For the detailed process, please refer to Column 14: Bar Jacket Pattern and Digital Toile Check.
④ Perform a toile check.
7. Create the Tailored Collar
Figure 13: ①Extend the front facing extension line 60 mm from the center front line on the 3D toile and select the [Create Line] menu.
②Sketch the lapel, upper collar, and front edge line on the toile (blue lines).
③Click the [Apply to Pattern] tab.
④The sketched lapel, upper collar, and front edge line from the toile will be applied to the front bodice pattern.
⑤Refine and clean up the pattern.
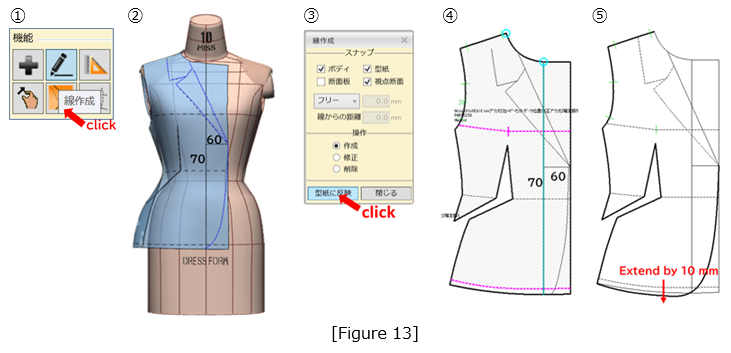
Figure 14:①From point ⓑ, located 25 mm below the side neck point, draw a line parallel to the shoulder line 15 mm long (collar stand height 20 mm minus 5 mm) to point ⓒ as shown. Connect point ⓐ on the extension line to point ⓒ to form the lapel roll line. Mirror this line to the opposite side, and redraw the neckline accordingly.
②Draw arcs using two different radii:
– Radius ㋑: the collar attachment length
– Radius ㋺ minus 20 mm: the outer collar edge length minus 20 mm
Use the tangent line between these arcs as the center back line of the upper collar, and draft the collar accordingly. Place the pivot point (red circle) on the collar stand line, and if necessary, open up the outer collar edge line to adjust the shape. Finally, mark where the 23 mm button will go.
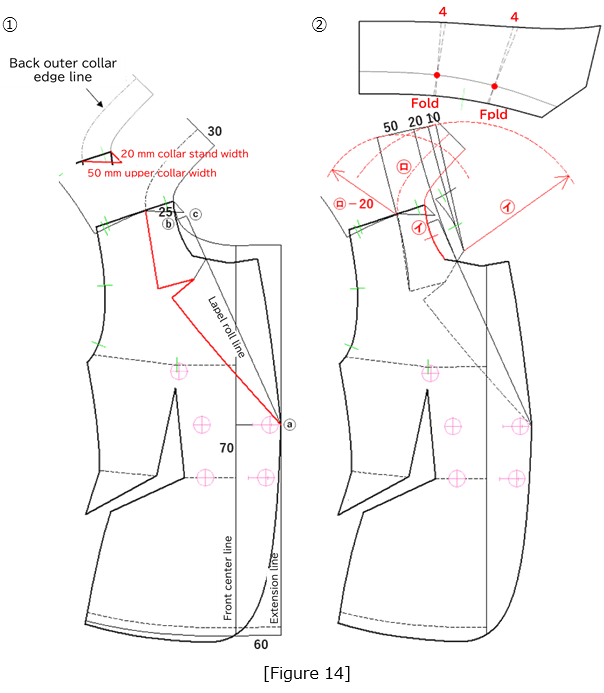
Figure 15: Sew together the outer and under collar pieces created by opening the outer collar edge in step 2 of Figure 14, along with the outer and under flaps of the hip pocket. Then perform a toile check.
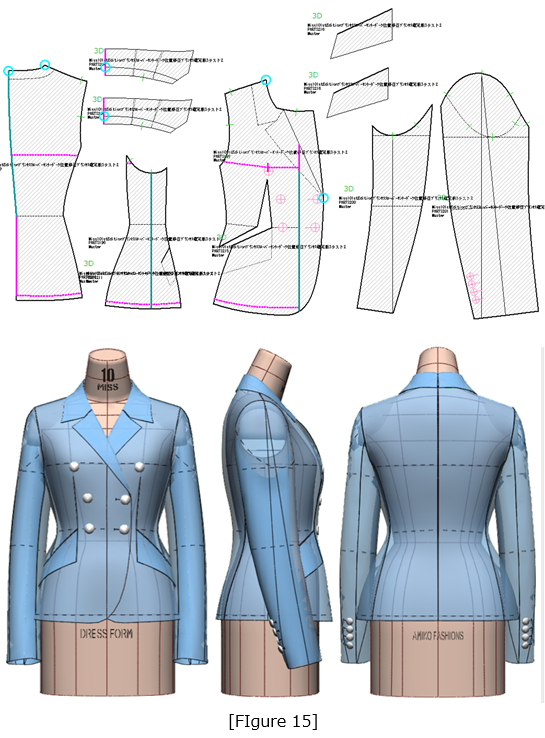
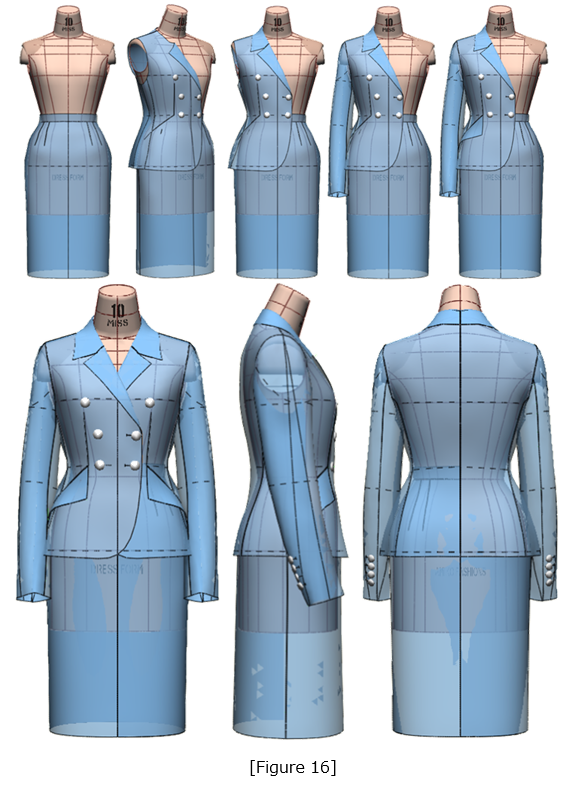
Figure 16: Combine the jacket with a tight skirt and perform a toile check to ensure fit and appearance as a suit.
|
Masaharu Sekikawa 2002 - 2017: Principal at the International Total Fashion College Currently retired as principal and serving as a part-time lecturer at the International Total Fashion College, specializing in apparel CAD education. In June 2017, he published a book on digital toile research and simultaneously launched a website. Please see below. |

| Academic Presentations |
Delivered a presentation on "Pattern & 3D Simulation Verification of Women's Tailored Jackets Using 3D Toile" at the National Conference of the Fashion Business Society in 2016. Delivered a presentation on “Practical Applications of Digital Toile” at the National Conference of the Fashion Business Society in 2017. |
| Website | http://masa-cad.com/ |
| Publications | https://masacad.thebase.in/ |