Chapter 14: Bar Jacket Pattern and Digital Toile Check
"Flat Pattern Making and Digital Toile Check" by Masaharu Sekikawa
- Study


Link copied.
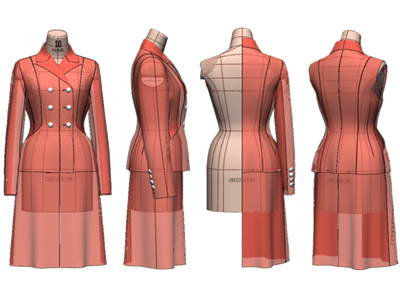
In this article, we explore DIOR’s iconic Bar Jacket as our design theme. Using Amiko Fashions’ newly released 3D dress form, Miss 10 1st Edition, we’ll walk you through the patternmaking and digital toile check process. Let’s get started.
Chapter 14: Bar Jacket Pattern and Digital Toile Check
1. What is the Bar Jacket?
The Bar Jacket was a central piece in DIOR’s "New Look" collection launched in 1947. Incorporating structural elements and details from traditional menswear, the Bar Jacket introduced a new, innovative kind of elegance defined by a distinctly feminine, tailored silhouette.
Pattern Characteristics of the Bar Jacket
The Bar Jacket is an elegant tailored women’s jacket that enhances the wearer's natural curves through panel lines and princess seams featuring hallmarks of womenswear patterning such as bust shaping and curved body lines. Its key features include:
(1) A cinched waist
(2) Gently sloped shoulders
(3) Accentuated hip line
(4) An open neckline
(5) Menswear-inspired two-piece sleeves
(6) Menswear-inspired tailored collar
(7) Double-breasted front closure
This time, we will demonstrate how to use Pattern Magic II and Pattern Magic II 3D to develop a jacket sloper by expanding a princess sloper made through draping using flat pattern techniques. We will also cover how to use manipulation techniques to shape the silhouette for an efficient yet high-quality patternmaking and 3D toile check process.
2. Perform Digital Toile Check on the Princess Sloper
The princess line sloper (which we will refer to as the “princess sloper”) is one of the most fundamental slopers used in women’s clothing. It is a hip-length, four-panel base pattern consisting of front, side front, side back, and back bodices—each designed to reflect the natural contours of the female form.
Figure 1 shows the pattern created by draping directly on the Miss 10 1st Edition dress form after adding 30 mm through flat pattern manipulation.
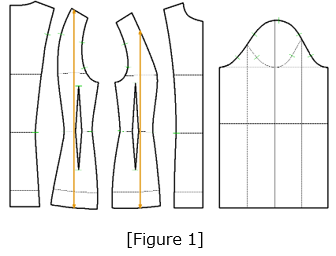
Figure 2: Place the sloper on the Miss 10 1st Edition 3D virtual dress form to perform a toile check.
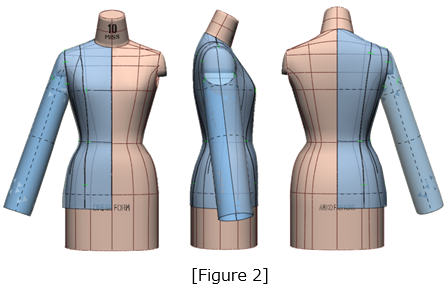
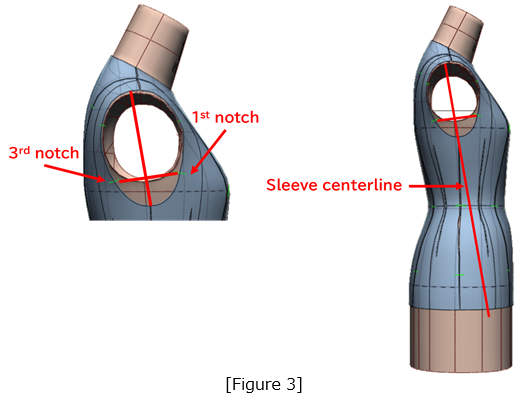
Figure 3: The straight line connecting the first and third notches—key points for sleeve attachment—intersects the sleeve centerline at a right angle.
3. Perform Dart Manipulation to Adapt the Jacket Sloper Bodice
In this step, we will use dart manipulation to make a few necessary modifications to transform the bodice into a jacket sloper. Dart manipulation refers to the technique of altering the position of darts on a garment, such as:
(1) Dart relocation
(2) Dart distribution
(3) Dart splitting
Figure 4: Draw expansion lines on the princess sloper, now adjusted to a length of 570 mm.
Draw expansion lines near the shoulder line to account for shoulder pad thickness and expansion lines extending from dart points to help distribute dart intake as ease.
Lines near the side seam add extra room to the armhole.
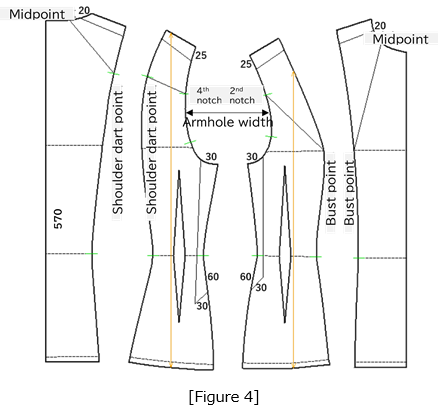
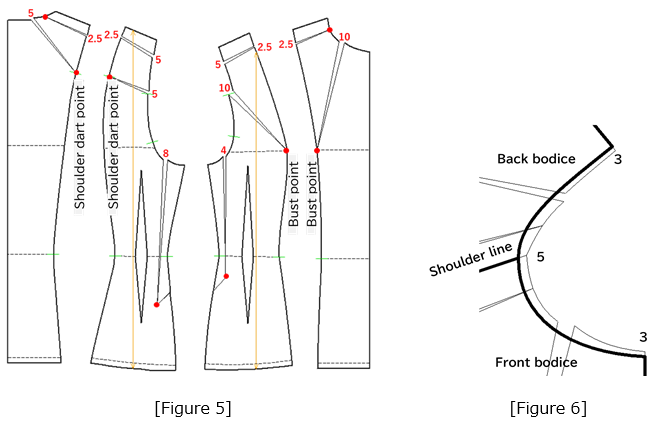
Figure 5: Using the red circle as the pivot point, rotate each section to open the specified values (shown in red).
4. Sleeve Cap Line Alignment
To compensate for the added width at the armhole, distribute one-eighth of the total increase in four directions (as indicated by the arrows) to modify the sleeve cap line.
Figure 7: Since the back armhole was expanded by 18 mm and the front armhole by 19 mm, that combined amount must be compensated for in the sleeve cap line. Use parallel grading to expand the original sleeve cap line (dotted line) outward at four key points to form the revised sleeve cap line (solid line).
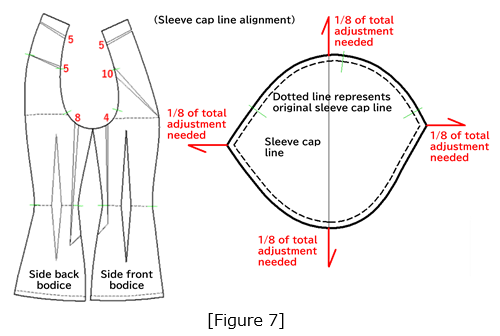
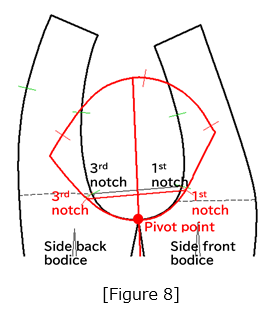
Figure 8: Rotate the sleeve cap line around its pivot point so that the line connecting the first and third notches on the sleeve cap runs parallel to the line connecting the first and third notches on the bodice armhole. This results in the best possible alignment of the sleeve cap line with the armhole.
5. Create a Two-Piece Sleeve Pattern
Figure 9: ① Extend the sleeve cap line to a sleeve length of 600 mm and mirror it along the front and back silhouette lines to create the basic sleeve pattern.
② Shift the front and back silhouette lines 20 mm to the right, and the sleeve centerline 40 mm to the right. Fold along these lines to reshape the sleeve and create a new sleeve cap line.
③ Align the new sleeve cap line with the armhole and confirm alignment.
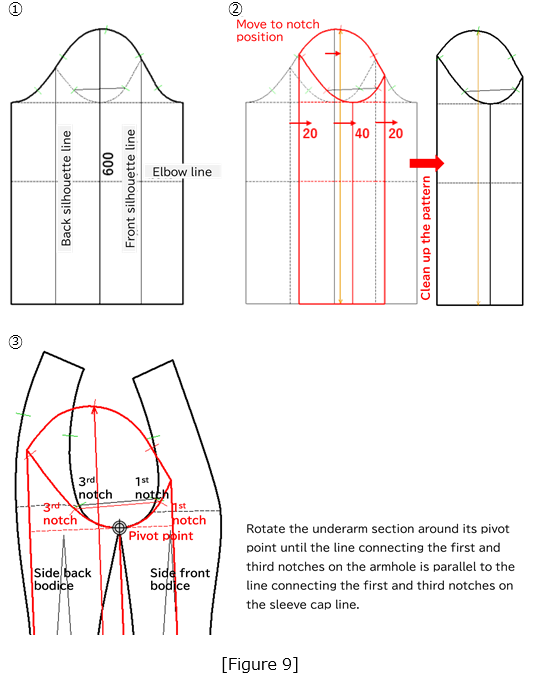
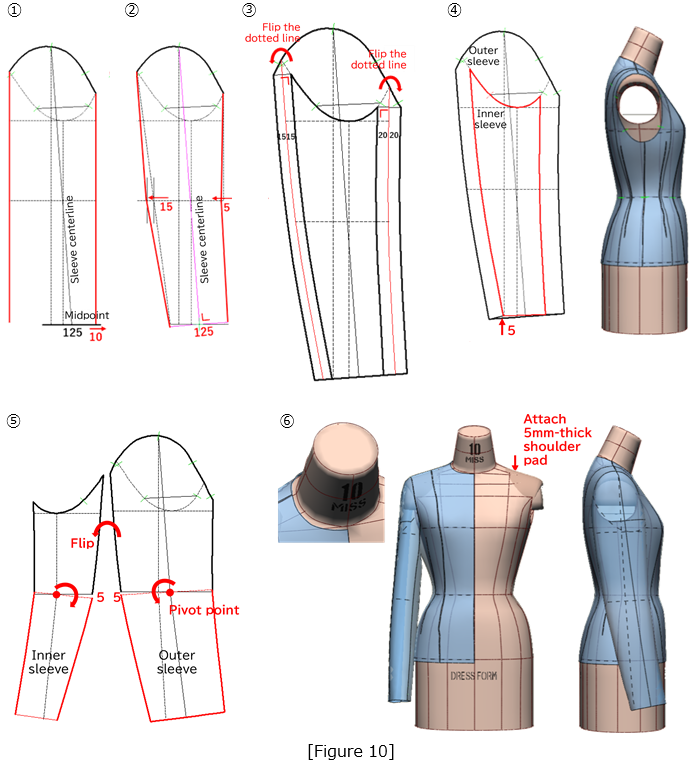
Figure 10: ① Extend the cuff line 10 mm to the right and adjust the cuff width to 125 mm (half width). Redraw the sleeve centerline from the midpoint of the cuff line.
② Redraw the front and back silhouette lines (in red) and adjust the cuff line so that it is perpendicular to the sleeve centerline.
③ Draw parallel lines 20 mm and 15 mm from the silhouette line (in red), then reflect the sleeve cap line (dotted line section) at the point where it intersects at a right angle.
④ Separate the pattern into outer sleeve (black line) and inner sleeve (red line).
⑤ Extract the inner sleeve and rotate the section below the elbow line by 5 mm around the pivot point (red dot).
⑥ Perform a toile check.
6. Create the Bar Jacket Silhouette
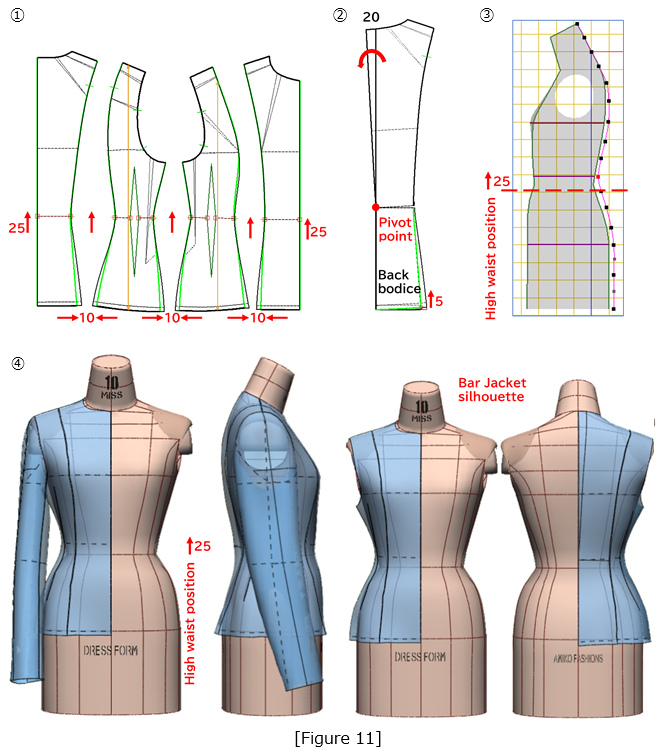
Figure 11: ① Raise the waistline of the sloper by 25 mm and add 10 mm of width at each side on the hip line to create the Bar Jacket silhouette.
② Use the waistline as the pivot point (red dot) to rotate the upper back bodice 20 mm to the left to shape the center back.
③ Adjust the center back to align with the high-waist position.
④ Perform a toile check.
7. Create the Double-Breasted Front and Tailored Collar of the Bar Jacket
Figure 12: ① Check the upper collar attachment diagram.
② Draw the outer edge of the upper collar onto the back bodice.
③ On the front bodice, draw a 60 mm overlap extension for the double-breasted front.
From the side neck point (blue dot), measure 25 mm downward and then draw a 30 mm line parallel to the shoulder line (based on a 35 mm collar stand minus 5 mm).
Connect point ⓐ and the bustline intersection point ⓑ to form the lapel break line and mirror axis.
Sketch the lapel (dotted line) freehand, then flip it to complete the front neckline curve.
Mirror the neckline curve to complete the other side.
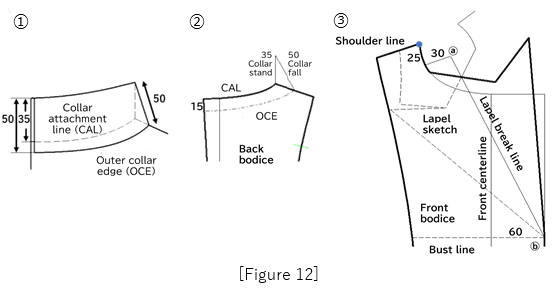
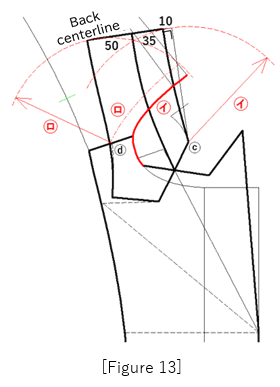
Figure 13: Join the front and back bodices at the shoulder line and draw an arc centered at point ⓒ using the collar attachment length (solid red line ⓑ) as the radius.
Next, draw another arc centered at point ⓓ using the outer collar edge length (red dash-dotted line ⓛ) as the radius.
Draw the center back line of the collar tangent to both arcs.
Next, draw a perpendicular guideline from that center back line, and use it to draft the collar attachment line, collar stand line, and outer collar edge.
This completes the upper collar.
8. Perform a Toile Check on the Bar Jacket
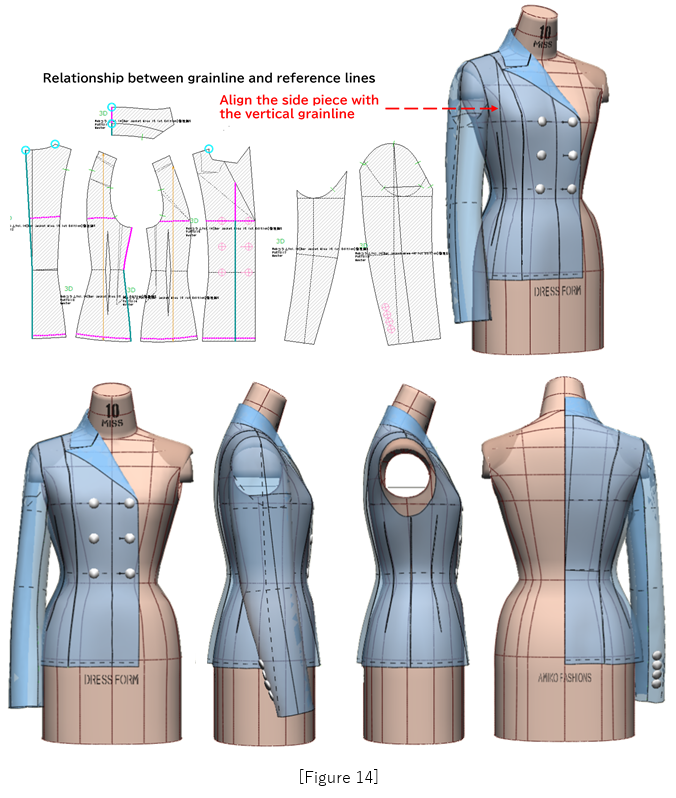
Figure 14: Check the toile for the completed double-breasted front bodice with six buttons, the lapel and upper collar, the two-piece sleeve, and the four-button cuff. (As with an actual toile fitting, carefully check the silhouette by focusing on how the garment aligns with key reference lines and grainlines.)
9. Create the Front Side Panel
Figure 15: ① Separate the lower piece of the front side bodice along the green line and align it flush to the front bodice.
② Convert the seam line into a curve and form a single panel.
③ Cut along the red line to separate the front side bodice piece.
④ From the [Placement] menu, set the front bodice to layer 5 (outermost layer).
⑤ Use the 3D simulation to check that the seam line lies flat against the body.

10. Combine the jacket with an A-line skirt on Miss 10 1st Edition (dress form) to check for fit and appearance as a suit
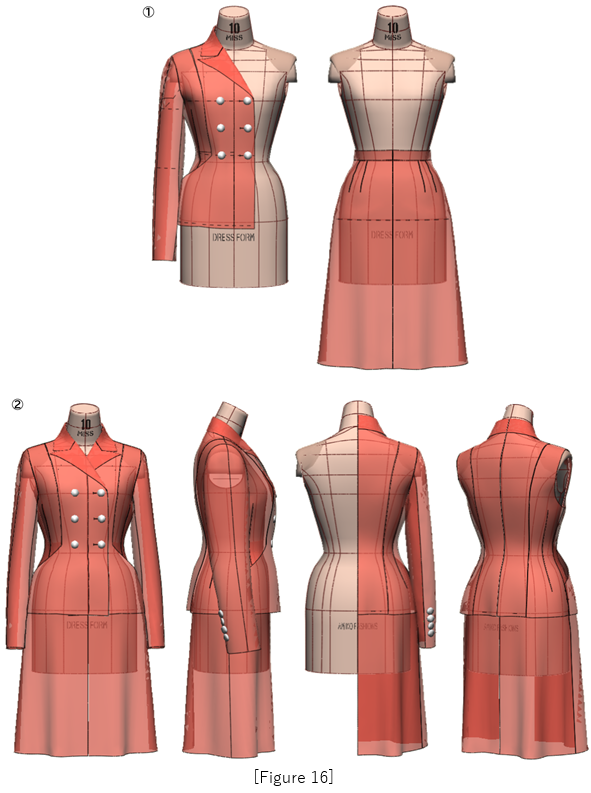
Figure 16: ① Check the 3D silhouette of the jacket alone.
② Combine with an A-line skirt and check the 3D silhouette as a suit.
11. Combine the jacket with an A-line skirt on Human Body (slim body type) to check for fit and appearance when worn as a coordinated outfit
Figure 17: Bar Jacket and A-line skirt from Figure 16 as a coordinated outfit.
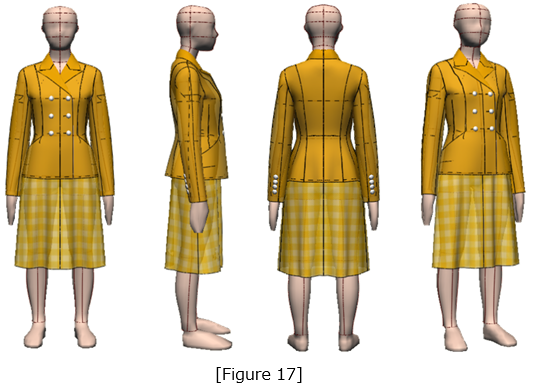
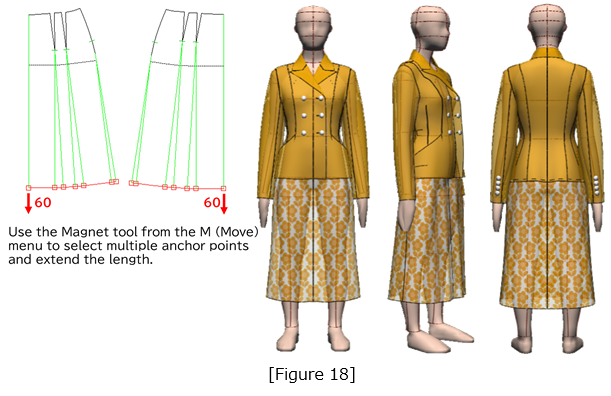
Figure 18: Extend the skirt length by 60 mm and check for overall fit and appearance.
|
Masaharu Sekikawa 2002 - 2017: Principal at the International Total Fashion College Currently retired as principal and serving as a part-time lecturer at the International Total Fashion College, specializing in apparel CAD education. In June 2017, he published a book on digital toile research and simultaneously launched a website. Please see below. |

| Academic Presentations |
Delivered a presentation on "Pattern & 3D Simulation Verification of Women's Tailored Jackets Using 3D Toile" at the National Conference of the Fashion Business Society in 2016. Delivered a presentation on “Practical Applications of Digital Toile” at the National Conference of the Fashion Business Society in 2017. |
| Website | http://masa-cad.com/ |
| Publications | https://masacad.thebase.in/ |