Chapter 12: Dirndl Dress and Digital Toile Check
"Flat Pattern Making and Digital Toile Check" by Masaharu Sekikawa
- Study


Link copied.
In this chapter, we will use a basic dress sloper created by draping on an actual dress form. We will cover the pattern-making process for transforming waist darts on the bodice into seam lines, as well as creating tucked cap sleeves and a gathered skirt featuring inverted pleats (where the folds of the pleats meet at the center). We will also cover the digital toile check process. Let's get started.
Chapter 12: Dirndl Dress and Digital Toile Check
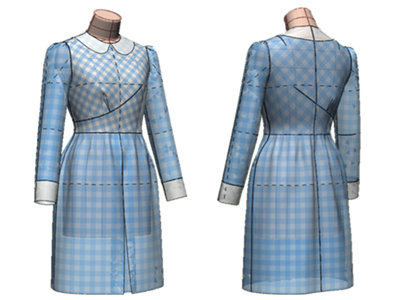
Figure 1: Place the completed dress onto the ACS_women's (set-in sleeve) dress form.
Check the garment for balance, with the bodice closely following the shape of the form and a gathered skirt to create a voluminous dirndl-inspired silhouette ("dirndl" refers to the traditional working attire of farming women in the Alps).
Incorporate elbow darts for a gently fitted shape and tuck detailing at the sleeve cap.
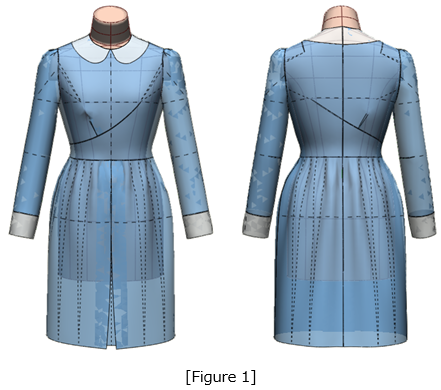
Figure 2: Place the basic dress sloper (created through draping on an industrial dress form) onto a 3D body model.
(1) Add ease to the finished sloper waistline.
Add 48 mm of ease to the waistline of the sloper (originally designed without ease) for a finished waist measurement of 680 mm.
Figure 3: Open each section by 6 mm along the guideline connecting the midpoint of the waistline and the side seam, using the points marked by red dots as pivot points.
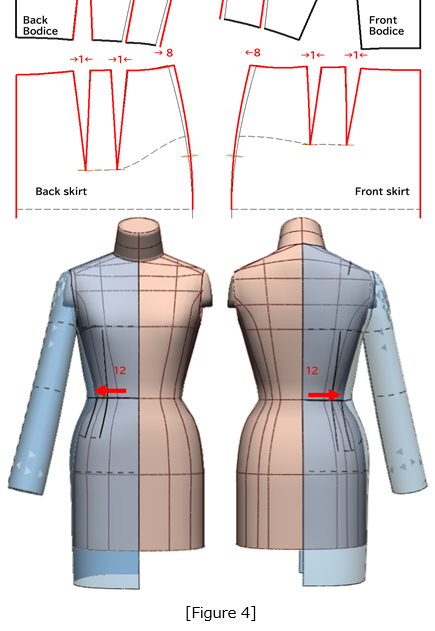
Shift the back bodice dart 1 mm toward the side seam.
Figure 4: Narrow the front and back skirt dart lines by moving them each 1 mm inward and widen each side seam corner outward by 8 mm.
Check the finished sloper on the 3D model (displayed with component opacity set to 50%).
(2) Adjust the sloper for a high-shoulder sleeve attachment.
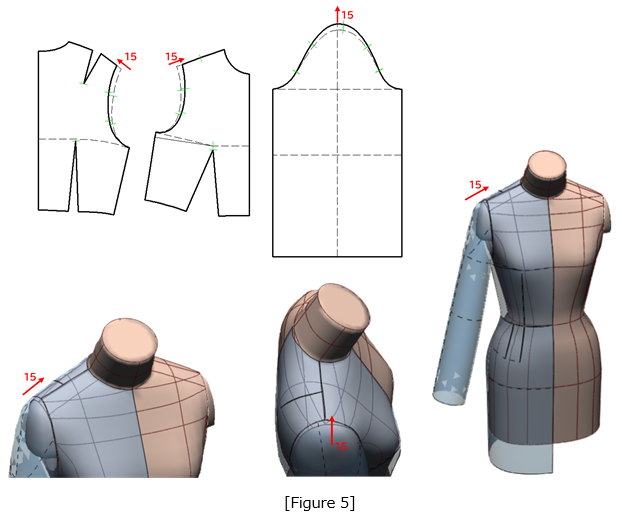
Figure 5: Trim 15 mm off the shoulder tip of the bodice and raise the sleeve cap by 15 mm to compensate.
(3) Apply dart manipulation.
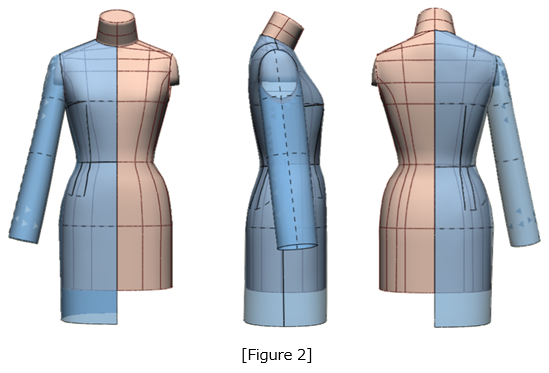
Figure 6: ❶ Draw guidelines connecting the tip of the shoulder dart to the fourth notch, and the tip of the waist dart to the third, second, and first notches.
❷ Using the red dots as pivot points, close the shoulder dart while opening 5 mm at the fourth notch position, allocating the remaining amount to a new shoulder dart.
Close the waist dart and open it at the third notch position.
Then, open 10 mm at the second notch position, and distribute the remaining dart intake at the first notch position, closing the original waist dart.
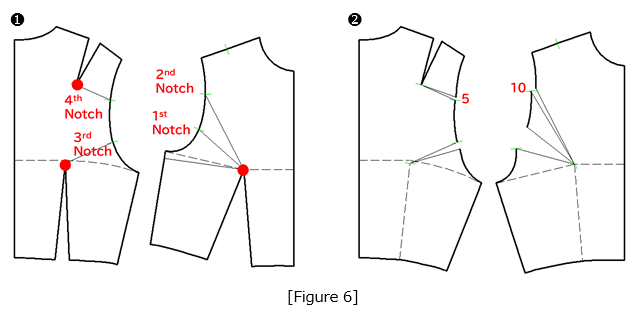
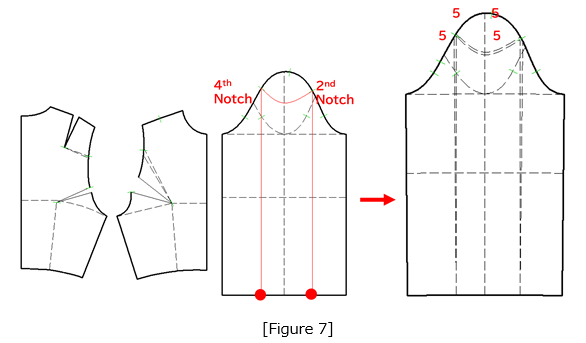
Figure 7: Redraw the armhole curves for both the front and back bodice.
From the fourth and second notches on the sleeve, draw vertical lines and slightly curved lines down to the sleeve hem.
Using the intersection points with the sleeve hem as pivot points (marked with red dots), shift the sections outward by 5 mm, moving them parallel to the original lines.
(4) Draw lines in 3D and convert darts into style lines in 2D.
Figure 8: ❶ Mirror the pattern pieces along the center front and center back lines, and place them on the 3D body.
❷ Use [Create Line] in 3D to draw a line (green line) from the third notch on the back to the right side seam, then continue drawing a line (green line) to the first notch on the front.
❸ Adjust the lines to ensure smooth connections.
❹ Click the [Apply to Pattern] tab to transfer the lines drawn in 3D onto the 2D pattern.
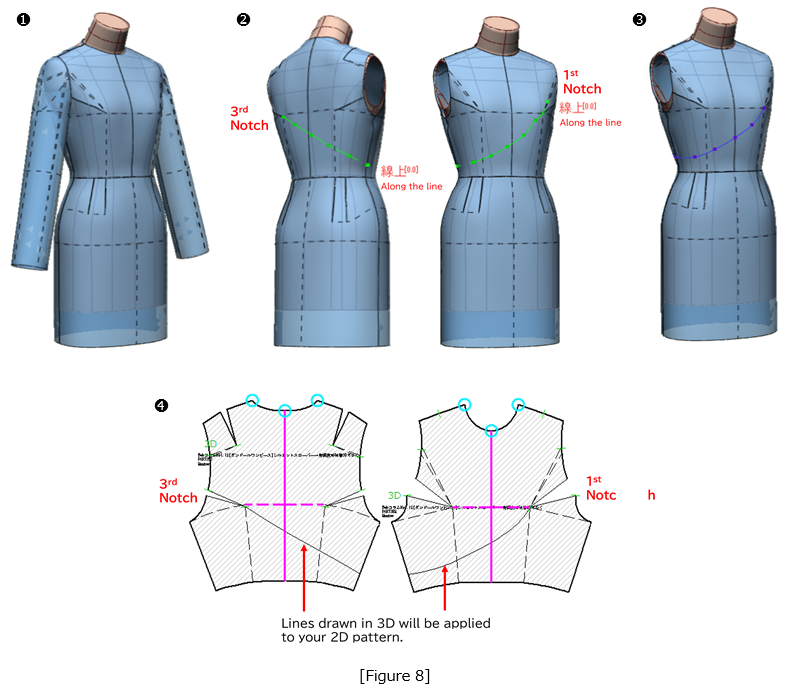
Figure 9: ❶ After making adjustments to the pattern, draw guidelines at right angles from ⓐ to ⓑ and from ⓒ to ⓓ.
❷ Using the dart tips as pivot points (marked with red dots), fold the darts closed.
❸ Convert the darts into tucks.
❹ Check the result in 3D (the sleeves are hidden for this step).
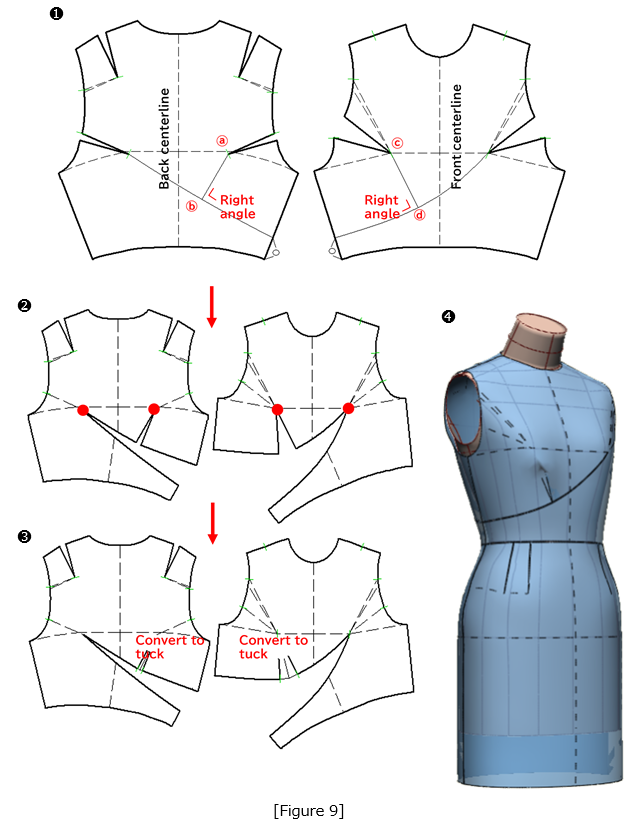
Figure 10:❶ Adjust the front skirt centerline length to 550 mm.
❷ Using the waist dart tip as the pivot point (marked with a red dot), open the hemline by 25 mm on each side. Next, using the side seam notch as a pivot point, open the hem by 12.5 mm.
Draw slash lines (red lines) at the center of each opened section.
❸ Using the intersection points at the hemline as pivot points (marked with red dots), ❹ Open the area between the dart tips by 25 mm each, and then redraw the waistline as a single smooth curve.
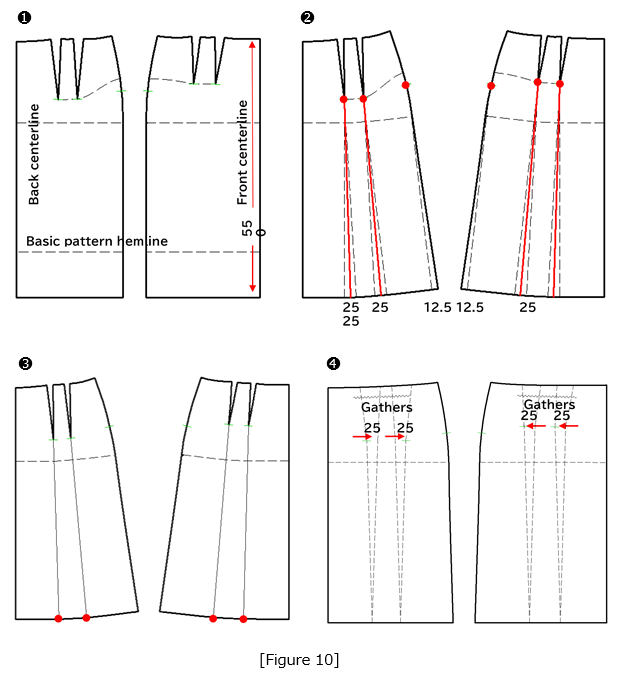
Figure 11:❶ Mirror the front skirt along the centerline and ❷ create an inverted pleat with a width of 40 mm.
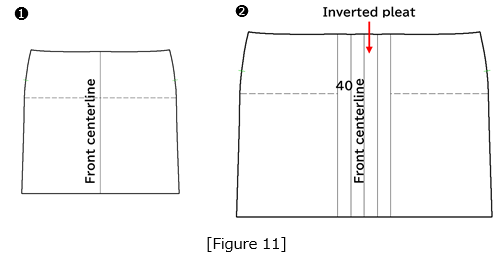
Figure 12:❶ From the corner of the sleeve cap on the basic sleeve pattern, draw a vertical line (dashed silhouette line) downward.
At the cuff line, move 10 mm outward from the vertical line, then measure 120 mm (half the sleeve opening width) and mark it.
Connect the midpoint to create the sleeve center line. At the elbow line, mark 5 mm and 15 mm outward to draw the front and back silhouette lines (red lines).
❷ Mirror the sleeve along these silhouette lines. Connect the sleeve cap intersection points ⓔ and ⓕ with a straight line.
❸ From points ⓖ and ⓗ, measure 20 mm each, and draw a curved line for the sleeve cap thickness (hatched lines).
From the sleeve cap notch, mark 20 mm along the curve, and from there, draw two tuck expansion lines to the cuff line for both front and back.

Figure 13: ❶ Prepare the basic pattern with the expansion lines drawn.
❷ Using the cuff line as the pivot point (red dot), open the sleeve by 5 mm at each intersection with the convex line (ⓔ–ⓖ–ⓕ).
Cut the sleeve cap part (outlined in red) along the concave line (ⓔ–ⓗ–ⓕ) and position it so that it touches the convex line.
❸ Convert into 25 mm long tucks, and smooth out the connections along the sleeve cap line.
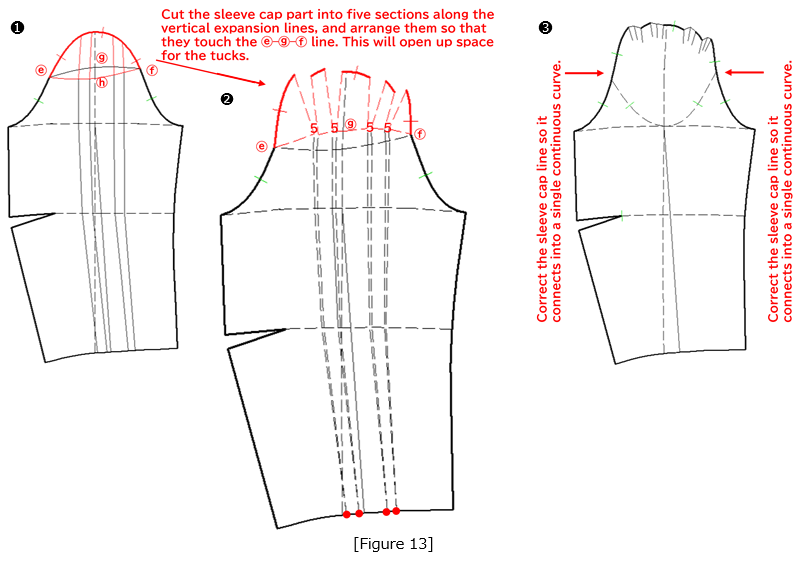
Figure 14: To create a back zipper opening, cut the bodice along the centerline.
Separate the right bodice along the seam line and position the lower part so that the back centerline becomes vertical.
Detach the sleeve cuff by cutting it 70 mm parallel to the original line.
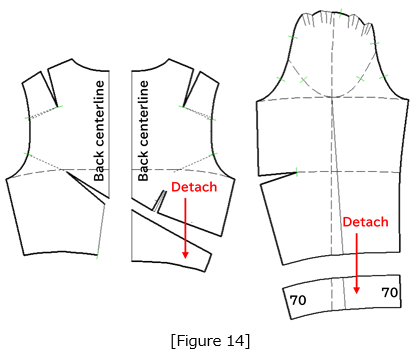
Figure 15: ❶ To draft a flat collar, prepare the front and back half bodice patterns.
Lower the neckline by 5 mm at the side neck point and 10 mm at the center neck point.
❷ Join the front and back bodices at the shoulder seam.
From the bodice neckline (red dashed line), redraw the collar attachment line 5 mm lower (red solid line), adjusting the collar attachment line to match the bodice neckline.
Draw a line 60 mm outward, parallel to the collar attachment line, and round off the collar tip slightly.
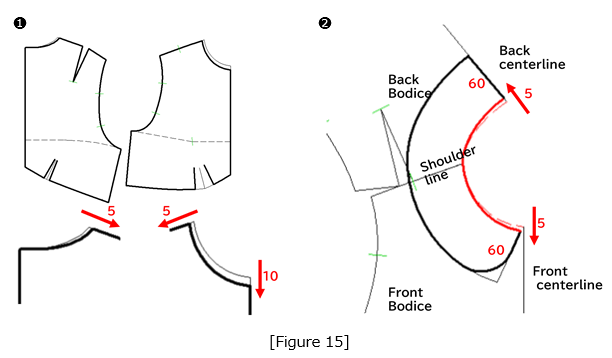
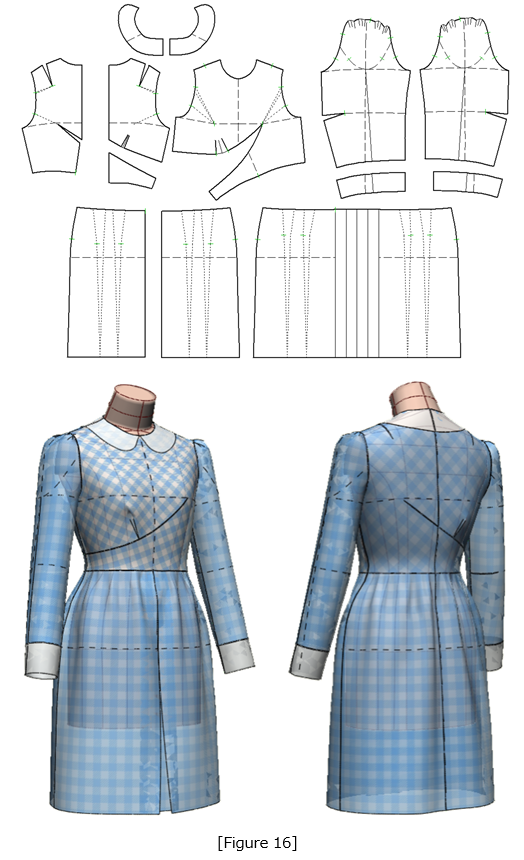
Figure 16: Perform a digital toile check on the completed pattern.
|
Masaharu Sekikawa 2002 - 2017: Principal at the International Total Fashion College Currently retired as principal and serving as a part-time lecturer at the International Total Fashion College, specializing in apparel CAD education. In June 2017, he published a book on digital toile research and simultaneously launched a website. Please see below. |

| Academic Presentations |
Delivered a presentation on "Pattern & 3D Simulation Verification of Women's Tailored Jackets Using 3D Toile" at the National Conference of the Fashion Business Society in 2016. Delivered a presentation on “Practical Applications of Digital Toile” at the National Conference of the Fashion Business Society in 2017. |
| Website | http://masa-cad.com/ |
| Publications | https://masacad.thebase.in/ |