Chapter 11: Four-Piece Tailored Jacket and Digital Toile Check
"Flat Pattern Making and Digital Toile Check" by Masaharu Sekikawa
- Study


Link copied.
This time, we’ll focus on the pattern making and digital toile check for a feminine four-piece tailored jacket, which highlights the elegant curves characteristic of women's clothing. We will start with a jacket sloper and develop panel lines, incorporating feminine details along the way. Let’s get started.
1. Menswear-Inspired Versus Feminine Tailored Jackets
Tailored jackets in women's fashion first appeared during the 19th century. Featuring the functionality and detailing of men's attire, the ladies' tailored jacket shifted the focus of women's clothing from decorative to dynamic, serving the changing needs of society at the time. The tailored jacket has since become a staple of modern ladies' fashion. Today we will take a look at a more feminine style of tailored jacket which brings out the wearer's natural feminine curves. It is primarily constructed using a four-piece design created using what are known as panel lines.
Two Types of Women's Tailored Jackets
(1) Menswear-Inspired Jackets
Menswear-inspired women's jackets feature a three-piece construction, characterized by broad shoulder lines and a subtle twist from the elbow down the sleeve, creating a masculine and structured silhouette that downplays the feminine form.
(For a more detailed explanation, please refer to the PDF entitled "Mastering the Three-Piece Tailored Jacket V6".)
(2) Feminine Tailored Jackets
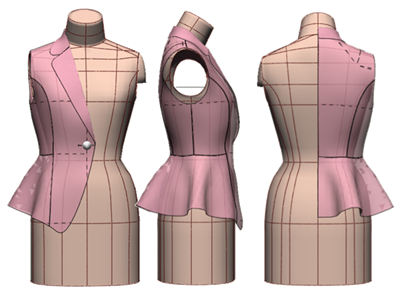
Softer, more feminine tailored jackets feature a four-piece construction with panel lines or princess seams and bust shaping to accentuate the wearer's natural curves.
Figure 1: Perform a digital toile check on a menswear-inspired tailored jacket.
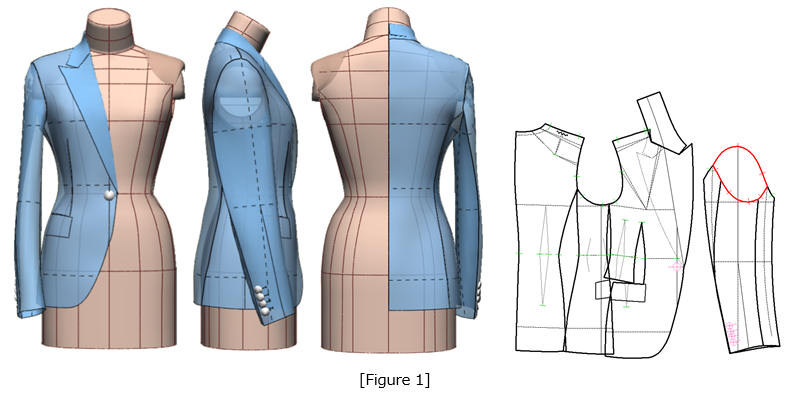
Pattern-Making Tips
1. Increase the shoulder width.
2. Narrow the side piece to help distribute bust shaping.
3. Insert thick shoulder pads to create square shoulders.
4. Add a subtle twist from elbow to wrist by setting the sleeve grainline (red line) on the bias.
5. Shift the lower sleeve's center line forward to create a forward sleeve rotation.
Figure 2: Perform a digital toile check on a feminine tailored jacket.
Pattern-Making Tips
1. Narrow the shoulder width.
2. Use panel lines to incorporate bust shaping.
3. Create a softer shoulder line by using thin shoulder pads or none at all. (For our discussion today we will not be using shoulder pads.)
4. Set the sleeve grainline (red line) in a regular orientation.
5. Use irregular hemlines, flares, etc.
2. Adjust Sloper for the Feminine Tailored Jacket
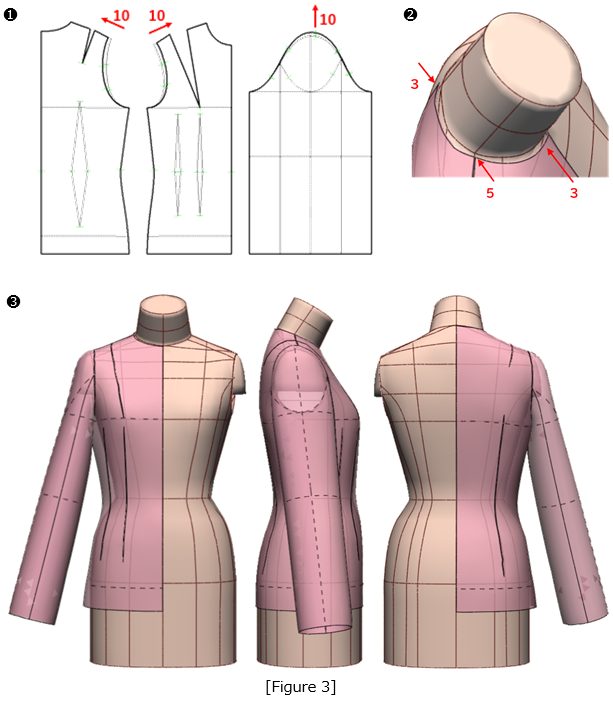
1. Key Adjustment No. 1
First, ensure that sleeves are attached high on the shoulder (narrowing the shoulder width).
Figure 3: ➊ Adjust the jacket sloper to a high shoulder position, and transfer the amount cut from the shoulder line to the sleeve cap.
➋ Lower the neckline by 3mm at the front and back neck points, and by 5mm at the side neck point.
➌ Check the sleeve position and rotation.
3. Develop Bodice Panel Lines
(2) Key Adjustment No. 2
Use bust dart manipulation to define the bust point and create a feminine contour.
Figure 4: ➊ Raise waist darts by 20mm and move to the side as shown in the diagram.
Apply 15mm shaping (ease) along the center back seam.
Rotate the shoulder dart tip around the pivot point (red circle) and distribute 5mm toward the armhole, 3mm toward the neckline and incorporate the remainder as ease.
Using the bust point as the pivot center (red circle), distribute 10mm toward the neckline, 10mm toward the armhole, and the remaining amount toward the side dart position.
➋Draw the back panel line using the waist dart line as a guide.
For the front panel line, use the waist dart tip ⓐ as the pivot point, close the side dart, and release fullness at point ⓑ.
Use the waist dart line as a guide to draft the panel line.
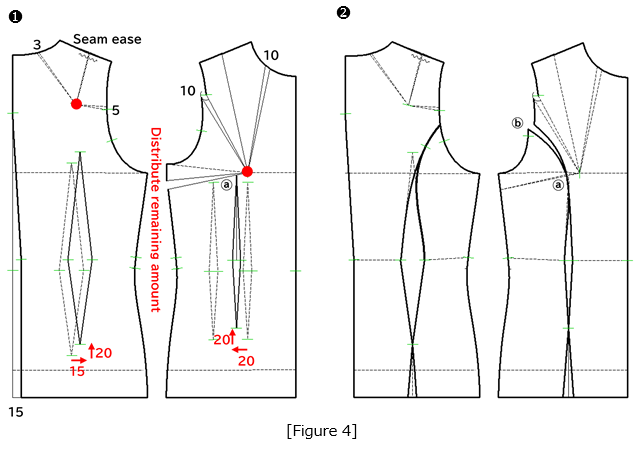
Figure 5: Perform a digital toile check on the panel lines.
Check for balance by ensuring that the underarm hole and the bottom of the sleeve match.

Figure 6: Extend the front overlap (extension) by 25mm, and position the button 25mm above the waistline.
➊ In the 3D Menu, use the [Create Line] function to input the jacket length (base point: 550mm).
➋ Click on the center back line of the toile.
➌ Draw the hemline and front cut line from the back.
➍ Use the Edit function to adjust the nodes (blue points) for smooth line connections.
➎ Click the “Apply to Pattern” tab.
➏ The hemline and front cut line from the digital toile will now be displayed on the 2D pattern.
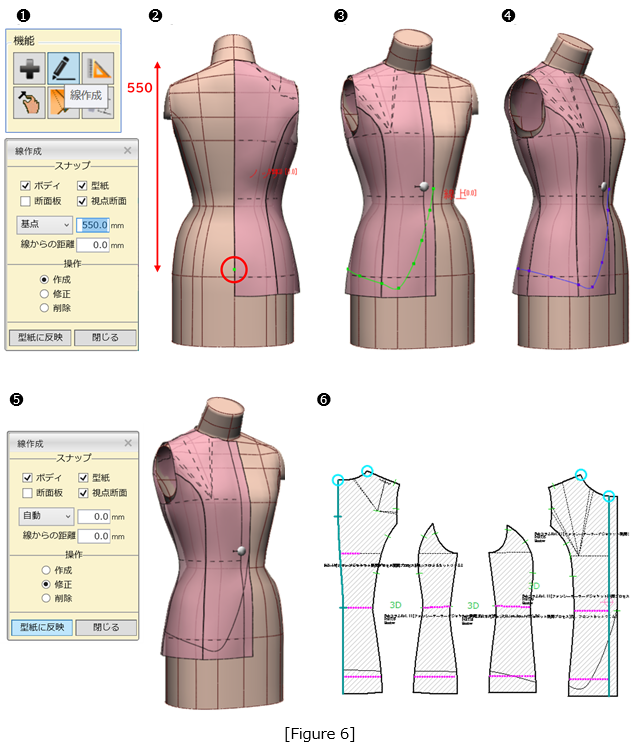
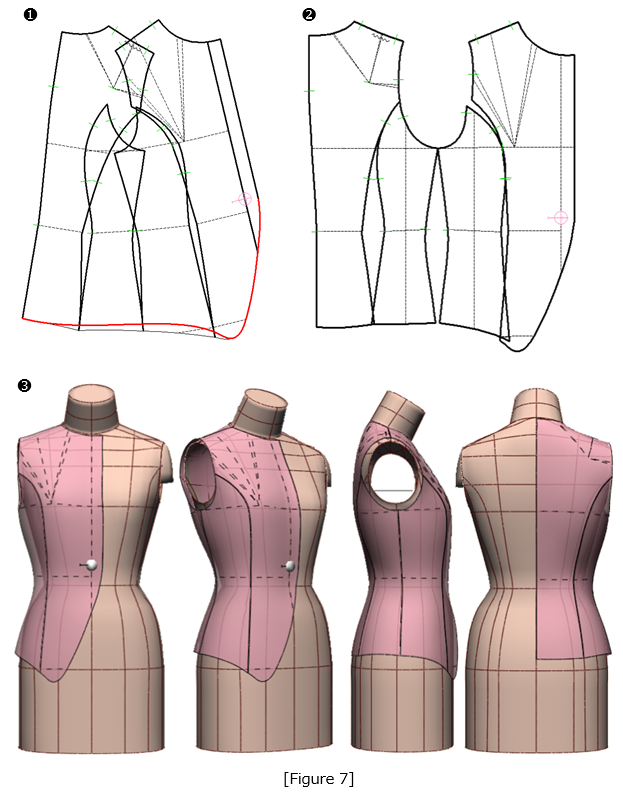
Figure 7: ➊ Align the side seams of each bodice piece and use the toile hem guideline (red line) to ensure that hemlines align smoothly.
➋ Separate each piece and organize the pattern layout.
➌ Perform a digital toile check to assess overall balance.
4. Create the Tailored Collar
Figure 8: ➊ From the 3D menu, use the [Create Line] function to draw the lapel roll line (green line) on the toile.
➋ Draw the gorge line.
➌ Draw the finished lapel edge line.
➍ Draw the upper collar line.
➎ Click the “Apply to Pattern” tab.
➏ The collar lines will now be displayed on the 2D pattern.
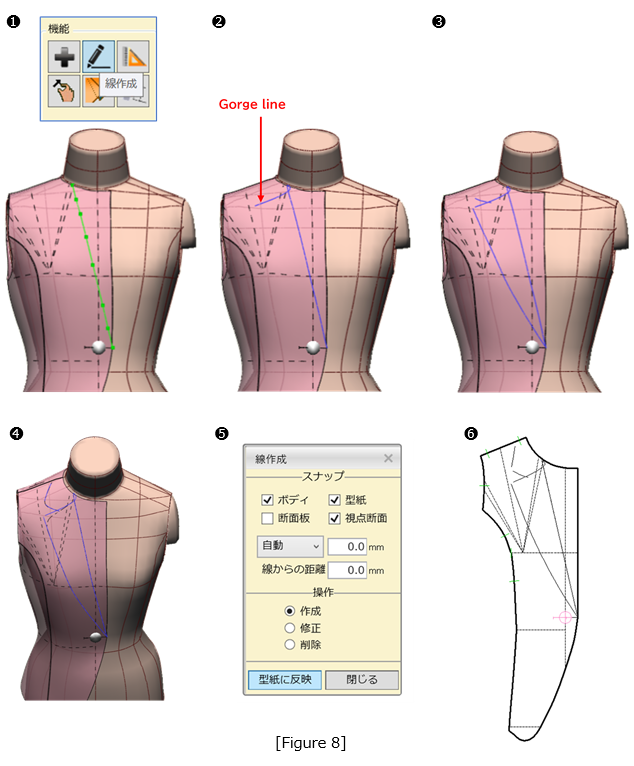
Figure 9: ➊ Lower the front and back neckline by 5mm.
From the neck point, draw a perpendicular line downward to create the collar stand height (25mm), and extend the collar fall (40mm) until it meets the shoulder seam.
➋ Draw the outer collar line on the back bodice, then flip the lapel and draw the neckline from the gorge line.
➌ Flip the collar attachment line, then draw the arcs for both the collar attachment length ⓐ and the outer collar length ⓑ.
Draw a perpendicular guideline from the center back of the collar, and complete the collar shape as shown in the figure.

(3) Key Adjustment No. 3
The third adjustment involves incorporating feminine details, such as soft curves on the collar and lapel, irregular hemlines or flared peplums.
Figure 10: ➊ Take the back, side back, and side front bodice pieces from the waistline and align them together into a single piece as shown in the diagram.
➋ Use the [Development (Open)] menu to divide the piece into six sections and open each by 50 mm.
➌ Perform a digital toile check on the finished pattern.
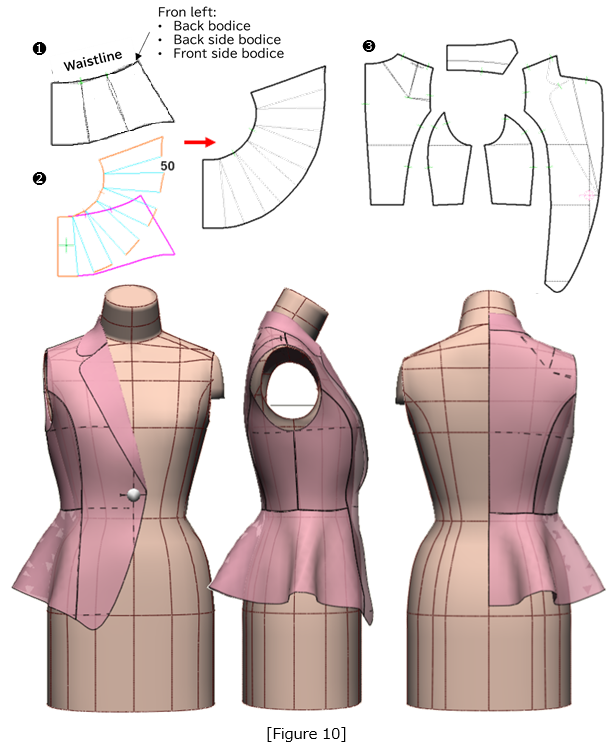
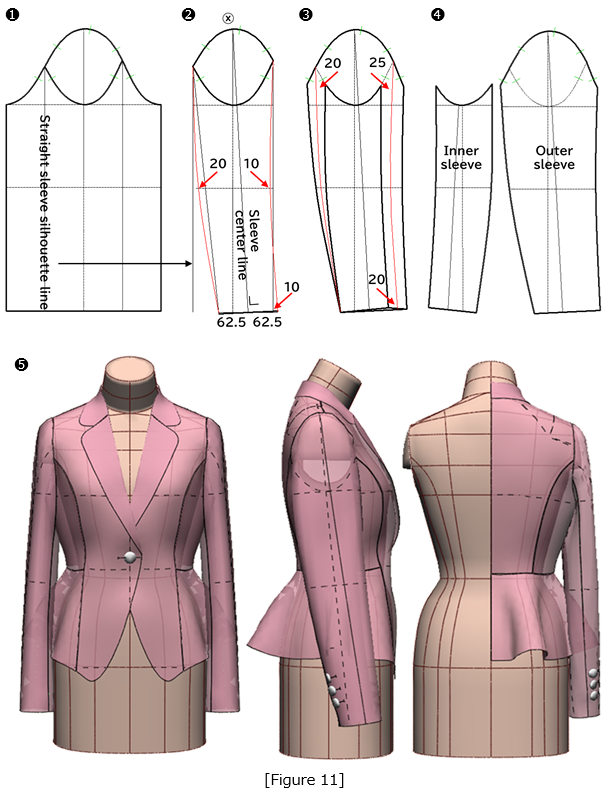
Figure 11: ➊ Open the basic sleeve pattern.
➋ On the sleeve hemline, draw a 125 mm segment and mark the midpoint.
From this midpoint, draw a perpendicular line connecting to point ⓧ — this becomes the sleeve centerline.
Then, draw the front and back silhouette lines (in red) for the two-piece sleeve.
➌ Draw the inner and outer sleeve lines.
➍ Separate the inner and outer sleeve sections.
➎ Perform a digital toile check.
|
Masaharu Sekikawa 2002 - 2017: Principal at the International Total Fashion College Currently retired as principal and serving as a part-time lecturer at the International Total Fashion College, specializing in apparel CAD education. In June 2017, he published a book on digital toile research and simultaneously launched a website. Please see below. |

| Academic Presentations |
Delivered a presentation on "Pattern & 3D Simulation Verification of Women's Tailored Jackets Using 3D Toile" at the National Conference of the Fashion Business Society in 2016. Delivered a presentation on “Practical Applications of Digital Toile” at the National Conference of the Fashion Business Society in 2017. |
| Website | http://masa-cad.com/ |
| Publications | https://masacad.thebase.in/ |