Chapter 9: Coat Pattern Development and Digital Toile Check
"Flat Pattern Making and Digital Toile Check" by Masaharu Sekikawa
- Study


Link copied.
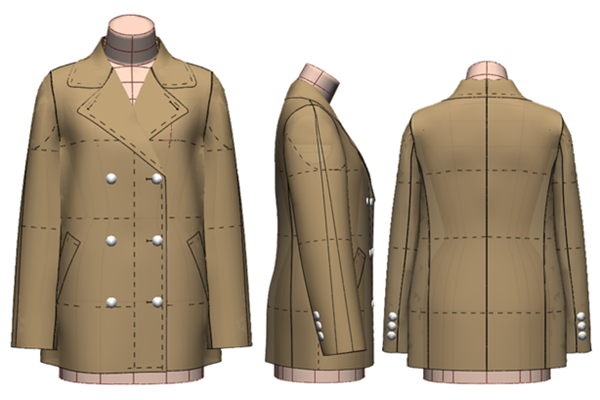
This time, we will focus on a ladies' P-coat.
We will create a coat sloper with "width expansion," explaining the pattern making and digital toile check for a coat with a slightly back-contoured silhouette that is easy to wear, featuring a convertible collar that can be worn open or closed.
Let’s get started.
1. Width Expansion of the Torso Sloper
This section covers the width expansion of the coat from the torso sloper.
Figure 1: Draw expansion lines at the indicated positions on the front and back bodice.
Connect vertical expansion lines and concave lines from the second and fourth notches of the sleeve.
Assemble the digital toile and check the expansion line positions of the torso sloper. (Do not fold the front and back waist darts, and use vertical lines for the side seams.)
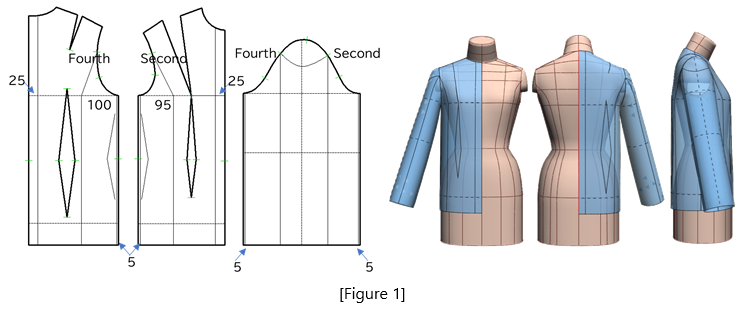
Figure 2: Using the "Cut and Spread" menu, input the values from line 1 to line 11 for the coat width expansion.
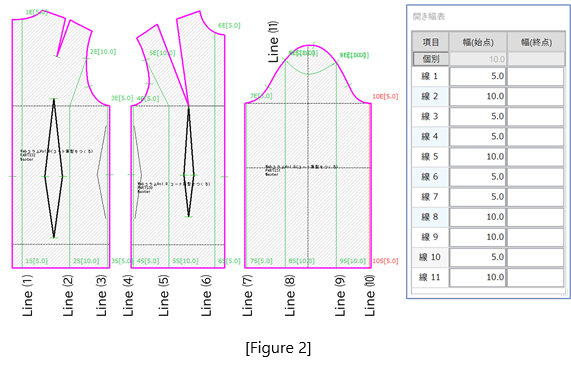
Figure 3: Lower the neckline by 6mm at the front and back center lines, and by 10mm at the shoulder line intersection.
Lower the armhole line by 20mm from the side seam.
Lower the sleeve cap line by 10mm from the body contour. (Keep the dart volume constant.)
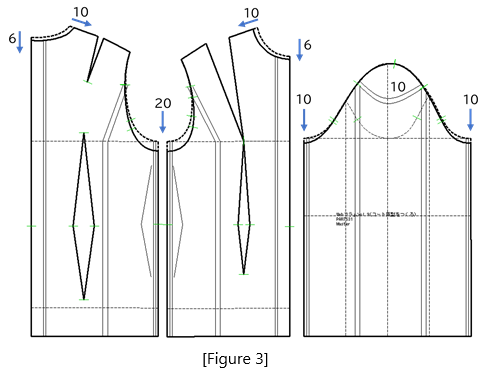
Figure 4: Perform a digital toile check on the width-expanded coat sloper, confirming the neckline lowering and the 80mm width expansion across the entire bodice.
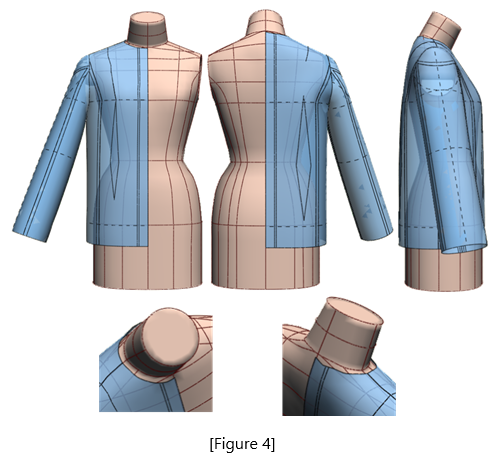
Figure 5: Draw expansion lines on the width-expanded coat pattern for manipulation, on the front and back bodice and sleeves.
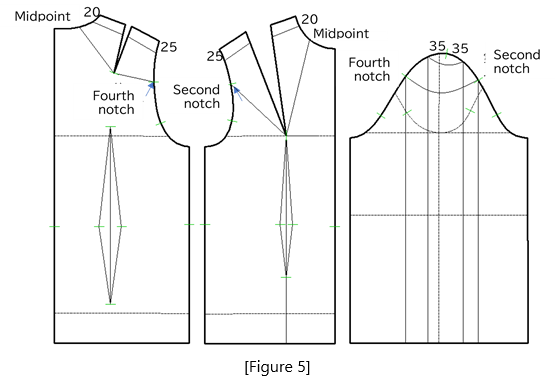
Figure 6: Explain the bodice manipulation.
Set the coat length to 700mm and reduce the waist dart width to 2/3.
Move the back waist dart position 70mm to the right and 15mm upwards.
Move the front dart position 15mm upwards.
Use red circles as rotation centers: distribute 3mm at the midpoint of the back neckline, 5mm at the fourth notch, and the remaining to the shoulder dart position, creating gathers.
For the front neckline, distribute 15mm at the midpoint and second notch, close the shoulder dart, and open the hemline.
For the neckline, open 10mm at the armhole to account for shoulder pad thickness.
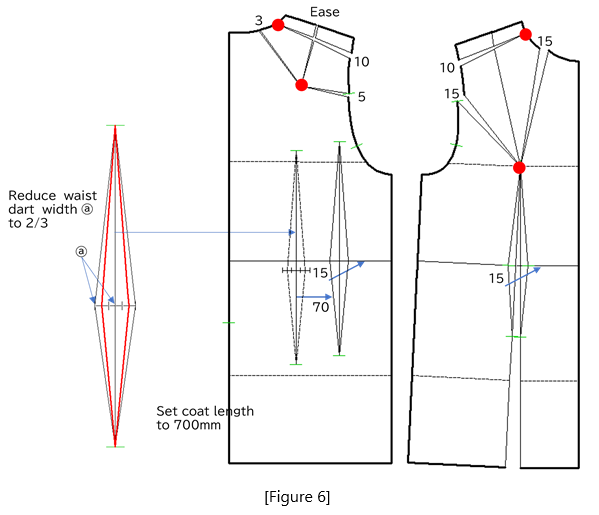
Figure 7: Explain the sleeve manipulation.
Set the sleeve length to 600mm and open lines 1 through 6 with the provided values.
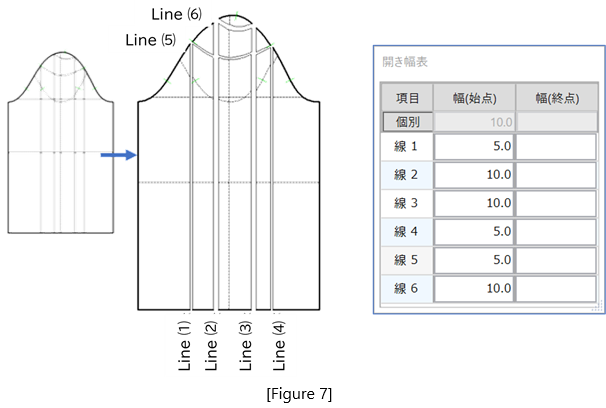
Figure 8: Adjust the moved waist dart lines to panel lines.
Remove the 15mm seam allowance from the back center.
Merge the front and side bodice pieces with a 15mm gap, align the intermediate line with the side seam, and add a 70mm front extension.
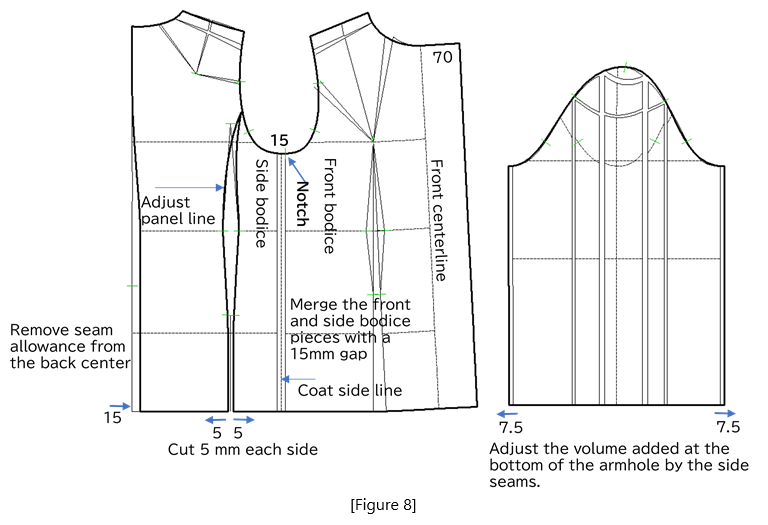
Figure 9: Adjust the sleeve to create a twisted silhouette from the elbow to the cuff.
1. Move the front and back silhouette lines of the sleeve 20mm to the right, and the sleeve centerline 40mm to the right, with the sleeve side seam and centerline intersecting at the fifth notch (red line is the completed pattern).
2. From the intersection of the moved front silhouette line (red line) and cuff line (green line), extend 15mm to the right and take 150mm horizontally for the sleeve hem width.
Draw a perpendicular sleeve hem line (black line) intersecting the sleeve centerline and the midpoint and fifth notch.
Connect the sleeve hem base point to the sleeve corner, extending 10mm from the elbow line, passing through the intersection of the front silhouette line and elbow line.
3. Draw parallel lines 20mm on both sides of the front silhouette line (dashed line) and 15mm on both sides of the back silhouette line (dashed line) to create inner and outer sleeve switching lines.
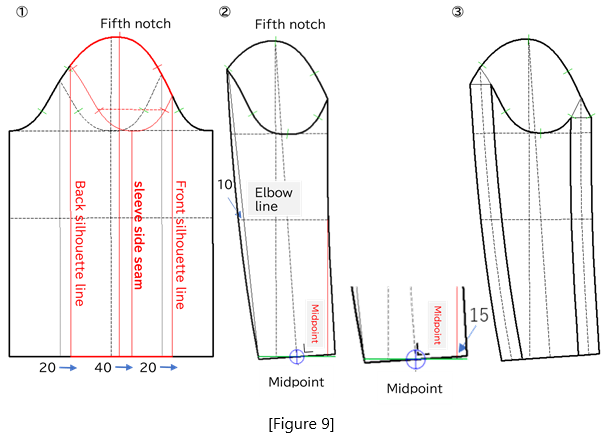
Figure 10: Match the completed two-piece sleeve to the armhole.
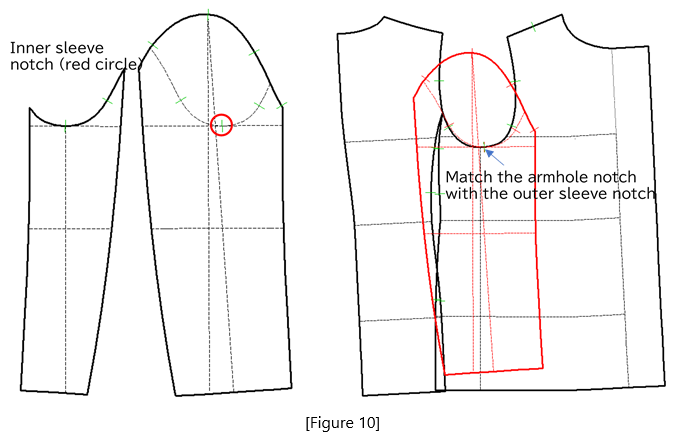
Figure 11: Perform a digital toile check for the slightly twisted two-piece sleeve from the elbow to the cuff.
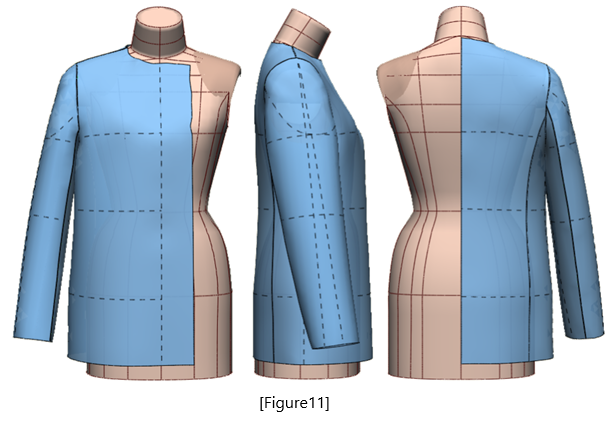
Figure 12: Create a convertible collar. "Convertible" means a collar that can be worn open or closed.
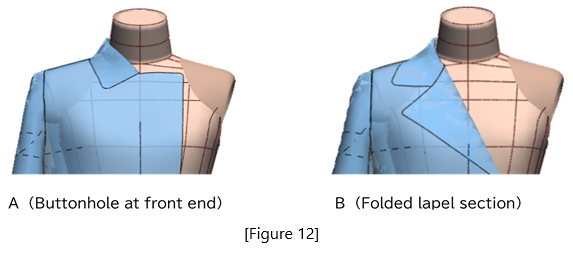
Figure 13: Align the bodice at the shoulder line and lower the front centerline by 5mm, then redraw the front neckline line.
Find the intersection of the front edge line and bust line to determine the lapel return point ⓐ.
Draw a straight line ⓧ through ⓐ and find intersections with the front neckline line at ⓑ and shoulder line at ⓒ.
From ⓑ, draw a vertical line 20mm to ⓓ, and connect the midpoint with ⓐ to form the lapel return line.
Reverse the collar section (dashed line) to the neckline intersection ⓔ and the front center notch ⓕ.
Figure 14: Draw arc ㋑ with radius ⓓ to ⓕ, and arc ㋺ with radius 25mm from ⓕ (to account for the ease when the collar is closed), and find intersection ⓖ.
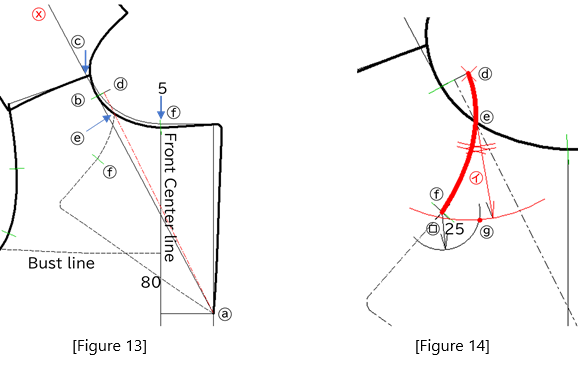
Figure 15: From the shoulder line intersection ⓒ, take the collar width of 55mm to ⓗ.
Draw an arc with radius ㋩ centered at ⓓ and an outer collar circumference arc of ㋥ - 25mm centered at ⓗ.
Figure 16: Draw auxiliary lines ㋭ to ㋬ along the center back collar line. From ⓖ, draw a collar width line of 80mm and connect to ⓗ.
Draw a perpendicular auxiliary line from ⓓ, and mark the collar attachment line at 10mm, collar waist line at 30mm, and collar width of 55mm at ⓘ, connecting to the collar end.
Figure 17: Align the collar to the collar attachment and draw the open collar neckline line (red line).
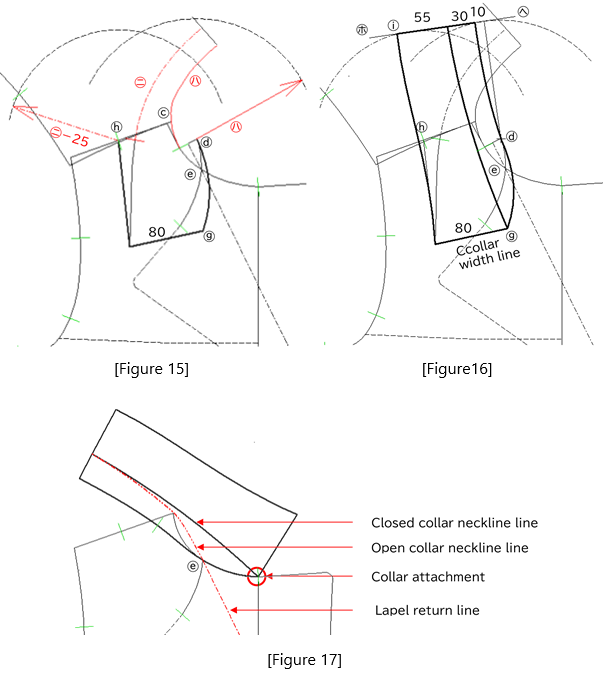
Figure 18: For a separate collar, raise the collar stand to fit the neck.
Diagram A shows a single collar, while Diagram B shows a two-piece collar with a separate stand.
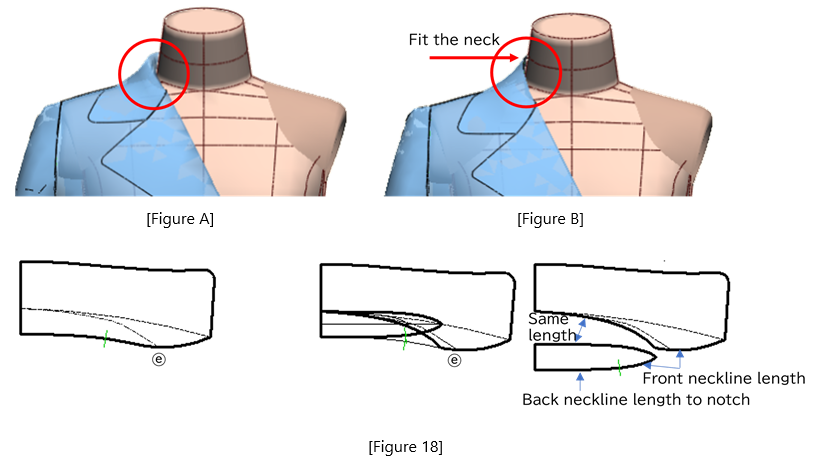
Figure 19: Perform a digital toile check for the collar in two states: 1) buttoned up and closed, and 2) folded back and open.
For a separate stand, confirm with the upper collar hidden. Draw and place the box pocket (170×45mm).
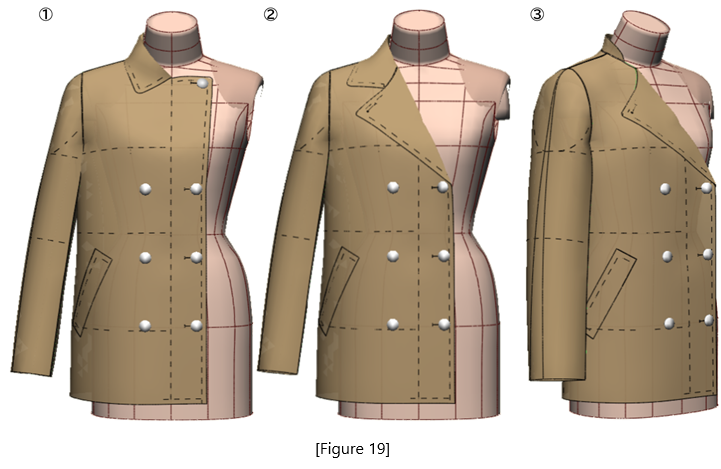
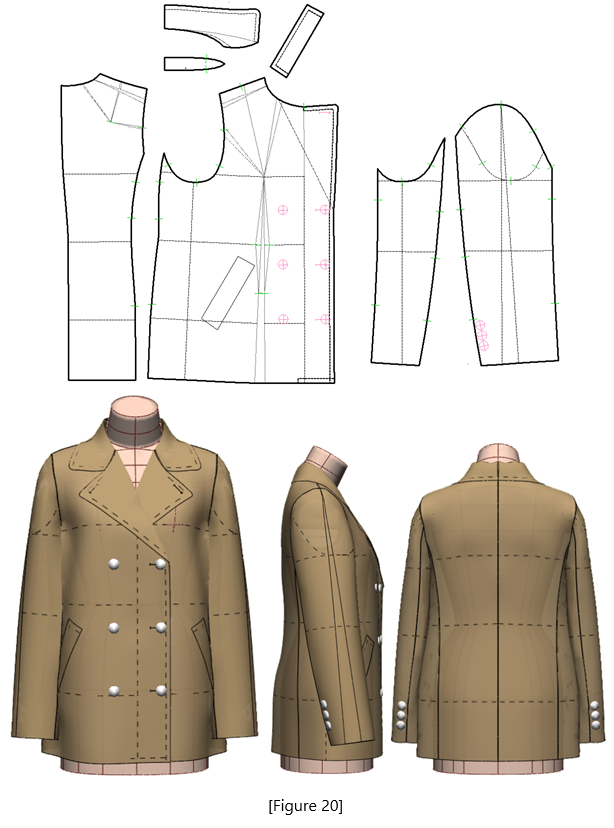
Figure 20: Use the mirror display function to perform a digital toile check with half-body pieces and confirm the silhouette and sleeve movement.
|
Masaharu Sekikawa 2002 - 2017: Principal at the International Total Fashion College Currently retired as principal and serving as a part-time lecturer at the International Total Fashion College, specializing in apparel CAD education. In June 2017, he published a book on digital toile research and simultaneously launched a website. Please see below. |

| Academic Presentations |
Delivered a presentation on "Pattern & 3D Simulation Verification of Women's Tailored Jackets Using 3D Toile" at the National Conference of the Fashion Business Society in 2016. Delivered a presentation on “Practical Applications of Digital Toile” at the National Conference of the Fashion Business Society in 2017. |
| Website | http://masa-cad.com/ |
| Publications | https://masacad.thebase.in/ |